Electrolux RH36PC60GS Complete Owner's Guide (English) - Page 9
Ceiling Support Structur, Ceiling Support Structures - hood
 |
UPC - 012505558757
View all Electrolux RH36PC60GS manuals
Add to My Manuals
Save this manual to your list of manuals |
Page 9 highlights
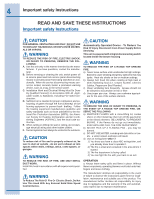
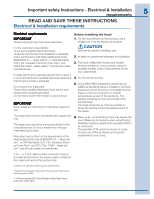
Installing the hood Ceiling Support Structures • This vent hood is heavy. 'Adequate structure and support must be provided in all types of installations. • At the hood location, install 2"x 4" cross framing between ceiling joists as shown. (2"x 4" are required to support the weight of the hood.) • Arrange cross framing in the ceiling to suit the existing structure. • Your ceiling joists will be like one of the following examples. Drill3/16” Pilot Approx.1 1/2” Deep 8 1/4” to Centerline 10 1/4” to Centerline emplate Cut Dia. Wire Access Dia. 8-1/2 FRONTOFHOOD Cut Dia. Wire Access Drill3/16” Pilot Approx.1 1/2” Deep 8 1/4” to Centerline 49-80406 Printed Italy 04-06JR NOTE: Do not cut the duct opening shown on the template for the recirculating installation. IMPORTANT Framing must be capable of supporting 150lbs. EXAMPLE A 10-1/16" Install cross-framing symmetrically over duct/cooktop centerline 16" joist spacing 7 1/16" 8" duct 2x4 cross framing Align duct to center Front of cooktop of hood Top view–ceiling joists parallel to front of hood EXAMPLE B 16" joist spacing 10-1/16" Install cross-framing symmetrically over duct/cooktop centerline Cooktop outline 7 1/16" 8" duct 2x4 cross framing Align duct to center Front of cooktop of hood Top view–ceiling joists run perpendicular to front of hood Cooktop outline EXAMPLE C 10-1/16" Install cross-framing symmetrically over duct/cooktop centerline 2x4 cross framing 7 1/16" 8" duct 16" joist spacing Front of hood Align duct to center of cooktop Top view–ceiling joists at angle to front of hood Cooktop outline 9
-
 1
1 -
2
-
3
-
 4
4 -
 5
5 -
 6
6 -
 7
7 -
 8
8 -
 9
9 -
 10
10 -
 11
11 -
 12
12 -
 13
13 -
 14
14 -
15
-
16
-
17
-
18
-
19
 |
 |
