Epson 11880 Quick Reference Guide - Page 6
Checking, leaning, and Aligning the Print Head, Automatically Checking and Cleaning the Print Head - manual
 |
UPC - 010343867024
View all Epson 11880 manuals
Add to My Manuals
Save this manual to your list of manuals |
Page 6 highlights
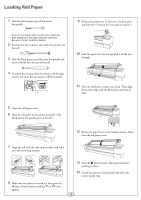
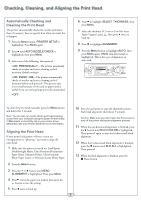
Checking, Cleaning, and Aligning the Print Head Automatically Checking and Cleaning the Print Head The printer automatically checks the nozzles and cleans them if necessary. You can specify how often you want this to happen. 1 Press the Menu button. PRINTER SETUP is highlighted. Press Menu again. 2 Press until AUTO NOZZLE CHECK is highlighted, then press Menu. 3 Select one of the following, then press : • ON: PERIODICALLY-The printer periodically checks its nozzles and runs a cleaning cycle if necessary (default settings). • ON: EVERY JOB-The printer automatically checks its nozzles and runs a cleaning cycle if necessary before each print job. This process uses a very small amount of ink (and no paper) and is useful if you are running large print jobs unattended. • OFF 6 Press to highlight SELECT THICKNESS, then press Menu. 7 Select the thickness (0.2 mm or 8 mil for most Epson® papers), press , then press twice to back up. 8 Press to highlight ALIGNMENT. 9 Press the Menu button to highlight AUTO, then press Menu again. UNI-D (uni-directional) is highlighted. This is the type of alignment to start with. ALIGNMENT AUTO UNI-D BI-D 2 COLOR BI-D ALL 9 To clean the print head manually, press the Menu button and hold it for 3 seconds. Note: You can also run nozzle checks and head cleaning cycles from your computer using the Epson Printer Utility 2 (Macintosh) or the Utility tab in your printer driver (Windows). See your Printer Guide for more information. Aligning the Print Head If your prints look grainy or blurry, or you see misregistration or "ghosting," you need to align the print head. 1 Make sure the printer is turned on. Load Epson Doubleweight Matte, Ultra Premium Presentation Paper Matte, Enhanced Matte, Ultra Premium Photo Paper Luster, or Premium Luster Photo Paper. 2 Press the Menu button. 3 Press the or button until HEAD ALIGNMENT is highlighted. Then press Menu. 4 Press , select the paper you loaded, then press the button to save the setting. 5 Press twice to back up. 10 Press the button to start the alignment process. Each head alignment takes about 7 minutes. Caution: Make sure you don't open the front cover or turn off the printer during the alignment process. 11 When the uni-directional alignment is finished, press the button until BI-D 2-COLOR is highlighted. Then press again to start the bi-directional black alignment. 12 When the bi-directional black alignment is finished, press the button until BI-D ALL is highlighted. Then press . 13 When the final alignment is finished, press the Pause button. 5
-
 1
1 -
 2
2 -
 3
3 -
 4
4 -
 5
5 -
 6
6 -
 7
7 -
 8
8 -
 9
9 -
 10
10 -
 11
11 -
 12
12 -
13
 |
 |
