Epson 2165W Operation Guide - EasyMP Multi PC Projection v2.10 - Page 58
Using a USB Key to Connect a Windows Computer, USB Key Setup Tool
 |
View all Epson 2165W manuals
Add to My Manuals
Save this manual to your list of manuals |
Page 58 highlights
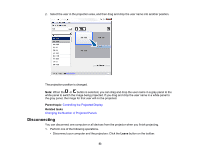
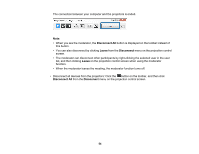
• Windows 8 and Windows 8.1: Navigate to the Apps screen and select USB Key Setup Tool. • Windows 10: Select Start, select All apps, select EPSON Projector, EasyMP Multi PC Projection, Tools, and then select USB Key Setup Tool. 2. Select the application type that starts when you insert the USB key to your computer. 3. Insert an empty USB flash drive directly to your computer's USB port. 4. Follow the on-screen instructions to create the USB key. USB key creation begins and the software writes a file to the USB flash drive. Caution: Do not remove the USB flash drive from the computer during USB key creation. If you remove the drive, the USB key may not be created correctly. If USB key creation fails, create the USB key again. Note: If there are multiple USB flash drives connected to your computer, follow the on-screen instructions to specify the drive for which you want to create a USB key. 5. Select Safely Remove Hardware in the Windows taskbar, and then remove the USB flash drive. You can now use the USB flash drive as a USB key. Parent topic: Connecting to Network Projector Using a USB Flash Drive (Windows Only) Using a USB Key to Connect a Windows Computer After creating the USB key, you can quickly project images from the network projector. If you have previously used the USB key, you can use the network projector by simply connecting the USB key to your computer. 1. Make sure your projector is using one of the following network connections: • The wireless LAN module is installed or built into your projector. • A wired LAN cable is connected to your projector. 2. Turn on the projector. 3. Press the LAN button or Source Search button on the remote control to switch the input source to LAN. The LAN standby screen is projected. 4. Verify that an SSID and IP address are displayed. 58
-
 1
1 -
2
-
3
-
4
-
5
-
6
-
7
-
8
-
9
-
10
-
11
-
12
-
13
-
14
-
15
-
16
-
17
-
18
-
19
-
20
-
21
-
22
-
23
-
24
-
25
-
26
-
27
-
28
-
29
-
30
-
31
-
32
-
33
-
34
-
35
-
36
-
37
-
38
-
39
-
40
-
41
-
42
-
43
-
44
-
45
-
46
-
47
-
48
-
49
-
50
-
51
-
52
-
 53
53 -
 54
54 -
 55
55 -
 56
56 -
 57
57 -
 58
58 -
 59
59 -
 60
60 -
 61
61 -
 62
62 -
 63
63 -
64
-
65
-
66
-
67
-
68
-
69
-
70
-
71
-
72
-
73
-
74
-
75
-
76
-
77
-
78
-
79
-
80
-
81
-
82
-
83
-
84
-
85
-
86
-
87
-
88
-
89
-
90
-
91
-
92
-
93
-
94
-
95
-
96
-
97
-
98
-
99
-
100
-
101
-
102
-
103
-
104
-
105
-
106
-
107
-
108
-
109
-
110
-
111
-
112
-
113
-
114
-
115
-
116
-
117
-
118
-
119
-
120
-
121
-
122
-
123
 |
 |
