Epson 3590 Product Information Guide - Page 3
Scanning Documents and Photos, Restoring Photos, Epson Perfection 3590 Photo - perfection photo scanner
 |
UPC - 010343854055
View all Epson 3590 manuals
Add to My Manuals
Save this manual to your list of manuals |
Page 3 highlights
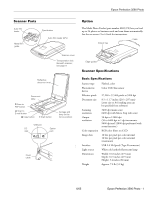
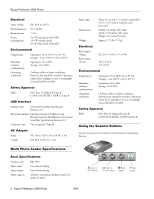
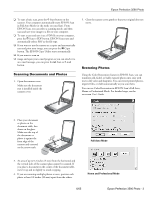
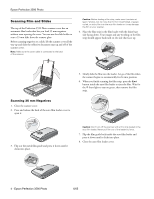
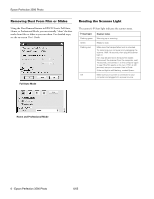
Epson Perfection 3590 Photo ❏ To start a basic scan, press the ] Start button on the scanner. Your computer automatically starts EPSON Scan in Full Auto Mode (or the mode you used last). From EPSON Scan, you can select a scanning mode, and then scan and save your image to a file on your computer. ❏ To start a scan and save it as a PDF file on your computer, press the a Scan to PDF button. EPSON Scan starts and automatically selects PDF as the file type. ❏ If you want to use the scanner as a copier and automatically scan and print your image, you can press the { Copy button. The EPSON Copy Utility starts automatically. ❏ If you want to scan an ❏ image and open your e-mail program so you can attach it to an e-mail message, you can press the | Scan to E-mail button. Scanning Documents and Photos 1. Open the scanner cover. Make sure the document mat is installed inside the scanner cover. 5. Close the scanner cover gently so that your original does not move. Restoring Photos Using the Color Restoration feature in EPSON Scan, you can transform old, faded, or badly exposed photos into ones with true-to-life color and sharpness. You can restore printed photos, negative film, or slides automatically as you scan them. You can use Color Restoration in EPSON Scan's Full Auto, Home or Professional Mode. For detailed steps, see the on-screen User's Guide. 2. Place your document or photo on the document table, face down on the glass. Make sure the top of the document or photo is against the front edge of the scanner and centered on the arrow mark. Full Auto Mode 3. An area of up to 0.2 inches (5 mm) from the horizontal and the vertical sides of the scanner glass cannot be scanned. If you place a document in the corner of the document table, move it up and in slightly to avoid cropping. 4. If you are scanning multiple photos at once, position each photo at least 0.8 inches (20 mm) apart from the others. Home and Professional Mode 6/05 Epson Perfection 3590 Photo - 3
-
 1
1 -
 2
2 -
 3
3 -
 4
4 -
 5
5 -
 6
6 -
 7
7
 |
 |
