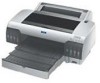
Epson 4000 Quick Reference Guide - Page 5
Checking Ink Levels and Replacing Ink Cartridges Checking Ink Levels and Replacing Ink Cartridges
 |
UPC - 010343848337
View all Epson 4000 manuals
Add to My Manuals
Save this manual to your list of manuals |
Page 5 highlights
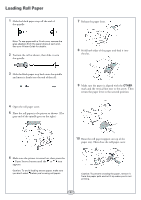
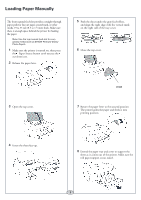
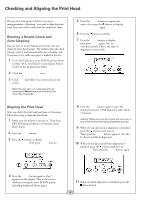
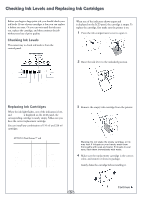
Checking Ink Levels and Replacing Ink Cartridges Before you begin a large print job, you should check your ink levels. If one of your cartridges is low, you can replace it before you start. Or you can wait until the ink runs out, replace the cartridge, and then continue the job without any loss of print quality. Checking Ink Levels The easiest way to check ink levels is from the control panel. When one of the indicators shows empty and INK OUT is displayed on the LCD panel, the cartridge is empty. To replace the cartridge, first make sure the printer is on. 1 Press the ink compartment cover to open it. (full) (empty) 1 Matte Black 8 Light Black 2 Cyan 3 Magenta 4 Yellow 6 Light Cyan 5 Photo Black 7 Light Magenta 2 Raise the ink lever to the unlocked position. Replacing Ink Cartridges When the ink light flashes, one of the indicators is low, and INK LOW is displayed on the LCD panel, the corresponding cartridge is nearly empty. Make sure you have the correct replacement cartridge. You can install any combination of 110 ml and 220 ml cartridges. EPSON UltraChromeTM ink 110 ml Photo Black Cyan Magenta Yellow Light Cyan Light Magenta Light Black Matte Black T543100 T543200 T543300 T543400 T543500 T543600 T543700 T543800 220 ml T544100 T544200 T544300 T544400 T544500 T544600 T544700 T544800 3 Remove the empty ink cartridge from the printer. Warning: Do not shake the empty cartridge, or ink may leak. If ink gets on your hands, wash them thoroughly with soap and water. If ink gets in your eyes, flush them immediately with water. 4 Make sure the replacement cartridge is the correct color, and remove it from its package. Gently shake the cartridge before installing it. Continue 5
-
 1
1 -
 2
2 -
 3
3 -
 4
4 -
 5
5 -
 6
6 -
 7
7 -
 8
8 -
 9
9 -
 10
10
 |
 |
