Epson 500DN Network Guide - Page 46
Installing EpsonNet Print, For Windows Vista/XP/2000/Server 2003, Install Network Utility
 |
UPC - 010343870048
View all Epson 500DN manuals
Add to My Manuals
Save this manual to your list of manuals |
Page 46 highlights
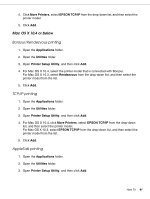
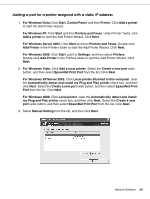
Installing EpsonNet Print Follow the steps below to install EpsonNet Print. Be sure to install it on a computer connected to the network. Note: If EpsonNet Direct Print (the older version of EpsonNet Print) is already installed on your computer, you need to uninstall it before installing EpsonNet Print (the installation program will lead you through uninstalling EpsonNet Direct Print 2). 1. Make sure all the applications are closed, then insert the Software CD-ROM in the CD-ROM drive. 2. Click Install Network Utility. 3. Click the icon located next to EpsonNet Print. 4. Follow the on-screen instructions to complete the installation. Your computer is now set up to print using LPR via EpsonNet Print. See the next section to set up your printer. For Windows Vista/XP/2000/Server 2003 Follow the steps below to add a port using the Add Printer Wizard. ❏ If you want to add a port for a printer with its IP address assigned automatically by the DHCP server or router, see "Adding a port for a printer assigned with a dynamic IP address," below. ❏ If you want to add a port for a printer with its IP address assigned manually, see "Adding a port for a printer assigned with a static IP address" on page 50. Note: ❏ Be sure that the computer is connected to the network and TCP/IP is correctly set up. ❏ Be sure that the target Epson printer driver is installed on the computer. ❏ A valid IP address must be assigned to the printer. Network Software 46
-
 1
1 -
2
-
3
-
4
-
5
-
6
-
7
-
8
-
9
-
10
-
11
-
12
-
13
-
14
-
15
-
16
-
17
-
18
-
19
-
20
-
21
-
22
-
23
-
24
-
25
-
26
-
27
-
28
-
29
-
30
-
31
-
32
-
33
-
34
-
35
-
36
-
37
-
38
-
39
-
40
-
 41
41 -
 42
42 -
 43
43 -
 44
44 -
 45
45 -
 46
46 -
 47
47 -
 48
48 -
 49
49 -
 50
50 -
 51
51 -
52
-
53
-
54
-
55
-
56
-
57
-
58
-
59
-
60
-
61
-
62
 |
 |
