Epson 500DN Network Guide - Page 52
Configuring the Printer Port, Have Disk, Browse, Finish, Start, Control Panel, Printer
 |
UPC - 010343870048
View all Epson 500DN manuals
Add to My Manuals
Save this manual to your list of manuals |
Page 52 highlights
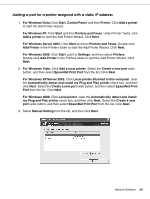
Installing the Printer Driver Install the printer driver that comes with your printer. 1. Insert the Software CD-ROM shipped with the printer. 2. Close the EPSON Installation Program screen if it appears. 3. Click the Have Disk button. The Install From Disk dialog box appears. 4. Click Browse. 5. Select the CD-ROM drive for Drives, and double-click the appropriate folder for your operating system. Click OK. 6. Click OK in the Install From Disk dialog box. 7. Select the model name of the printer, and then click Next. Note: If the Add Printer wizard asks you to select either Keep existing driver or Replace existing driver, be sure to select the Replace existing driver radio button. Click Next. 8. Click Finish and follow the on-screen instructions to complete the setup. The printer is now ready for peer-to-peer printing. To configure the printer port, see the next section. Configuring the Printer Port Follow the steps below to configure the printer port. The printing speed differs depending on your selection. 1. For Windows Vista: Click Start, Control Panel, and then Printer. For Windows XP/Server 2003: Click Start and then Printers and Faxes. For Windows 2000: Click Start, point to Settings, and then select Printers. 2. Right-click the target printer, and then click Properties. 3. For Windows Vista/XP/Server 2003/2000: Click the Ports tab, and then click the Configure Port button. Network Software 52
-
 1
1 -
2
-
3
-
4
-
5
-
6
-
7
-
8
-
9
-
10
-
11
-
12
-
13
-
14
-
15
-
16
-
17
-
18
-
19
-
20
-
21
-
22
-
23
-
24
-
25
-
26
-
27
-
28
-
29
-
30
-
31
-
32
-
33
-
34
-
35
-
36
-
37
-
38
-
39
-
40
-
41
-
42
-
43
-
44
-
45
-
46
-
 47
47 -
 48
48 -
 49
49 -
 50
50 -
 51
51 -
 52
52 -
 53
53 -
 54
54 -
 55
55 -
 56
56 -
 57
57 -
58
-
59
-
60
-
61
-
62
 |
 |
