Epson 875DCS Product Information Guide - Page 8
Epson 875DCS - Stylus Photo Color Inkjet Printer Manual
 |
View all Epson 875DCS manuals
Add to My Manuals
Save this manual to your list of manuals |
Page 8 highlights
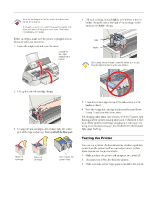
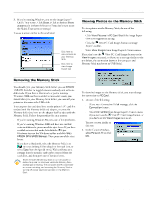
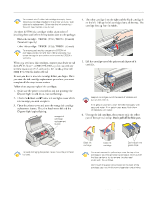
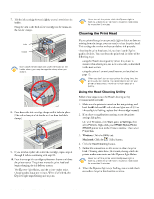
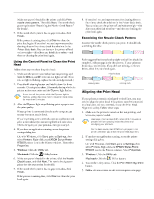
EPSON Stylus Photo 875DCS 3. Click OK to enable write-to-disk mode, then insert the Memory Stick in the adapter. 4. Locate the photos you want to upload on your hard drive. Drag them to the following directory on your Memory Stick: D:\Dcim\100msdcf (substitute the drive letter assigned to your Memory Stick for D). You must copy or move your photos to the correct folder on your Memory Stick. Otherwise, you won't be able to view them using the View PC Card Images button or View Images command in Image Expert. If you're using a memory card and camera made by a different manufacturer, the location of the photos on your card will be different. Closing EPSON PhotoStarter If you don't want to start Image Expert automatically when you insert the Memory Stick in the adapter, you can close EPSON PhotoStarter. This change only applies to one session, as EPSON PhotoStarter starts automatically the next time you restart your computer. Windows: Right-click the EPSON PhotoStarter icon on the Windows taskbar, and click End on the menu that appears. Macintosh: Click the Application menu on the right side of your desktop's menubar, and then click EPSON PhotoStarter. Click Quit on the File menu. 5. To return to read-only mode, eject the Memory Stick (see "Removing the Memory Stick" on page 8). Uploading Photos to Your Memory Stick To upload photos from your computer to the Memory Stick, EPSON USB RW Switcher must be installed on your computer. USB RW Switcher lets you toggle your Memory Stick between read-only mode and write-to-disk mode. 1. Eject the Memory Stick from the adapter (see "Removing the Memory Stick" on page 8). 2. Windows: Click Start, point to Programs, EPSON USB RW Switcher, and select EPSON USB RW Switcher. Macintosh: Open the EPSON USB RW Switcher folder on your hard drive. Double-click the EPSON USB RW Switcher icon. You see a screen similar to the following: 6. Windows: Click Start and point to Programs, EPSON USB RW Switcher, and select RW Switcher. Macintosh: Open the EPSON USB RW Switcher folder on your hard drive and double-click the EPSON USB RW Switcher icon. You see a screen similar to this one: 7. Click OK. Replacing an Ink Cartridge When the B black or A color ink out light flashes, the indicated cartridge is low on ink. This is a good time to make sure you have a new cartridge. When the light stays on, the cartridge is empty and you need to replace it. When an installed ink cartridge is more than six months old, you may also need to replace it if you notice that your printouts don't look as good as they used to. If print quality doesn't improve after cleaning and aligning the print head, you can replace one or both cartridges. To check the level of ink you have left, see the graphic in the printer driver (Windows) or click the ink level icon in the printer driver or EPSON Monitor 3 utility (Macintosh). 9 - EPSON Stylus Photo 875DCS 9/00
-
 1
1 -
2
-
 3
3 -
 4
4 -
 5
5 -
 6
6 -
 7
7 -
 8
8 -
 9
9 -
 10
10 -
 11
11 -
 12
12
 |
 |
