Epson ActionNote 895CX User Manual - Page 62
the plastic cover and carefully pry the, cover off. You may need to use gently
 |
View all Epson ActionNote 895CX manuals
Add to My Manuals
Save this manual to your list of manuals |
Page 62 highlights
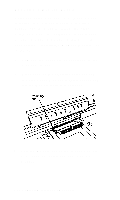
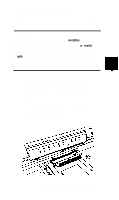
2. Refer to the illustration below to locate the connector on the system board. 3. Remove the plastic insert covering the port opening on the left side of the computer, next to the PC card slots. Insert the tip of a screwdriver through the slot in the plastic cover and carefully pry the cover off. You may need to use gently Increasing pressure to pull the cover away from the case and push it out. Upgrading Internal Components 5-15
-
 1
1 -
2
-
3
-
4
-
5
-
6
-
7
-
8
-
9
-
10
-
11
-
12
-
13
-
14
-
15
-
16
-
17
-
18
-
19
-
20
-
21
-
22
-
23
-
24
-
25
-
26
-
27
-
28
-
29
-
30
-
31
-
32
-
33
-
34
-
35
-
36
-
37
-
38
-
39
-
40
-
41
-
42
-
43
-
44
-
45
-
46
-
47
-
48
-
49
-
50
-
51
-
52
-
53
-
54
-
55
-
56
-
 57
57 -
 58
58 -
 59
59 -
 60
60 -
 61
61 -
 62
62 -
 63
63 -
 64
64 -
 65
65 -
 66
66 -
 67
67 -
68
-
69
-
70
-
71
-
72
-
73
-
74
-
75
-
76
-
77
-
78
-
79
-
80
-
81
-
82
-
83
-
84
-
85
-
86
-
87
-
88
-
89
-
90
-
91
-
92
-
93
-
94
-
95
-
96
-
97
-
98
-
99
-
100
-
101
-
102
-
103
-
104
-
105
-
106
-
107
-
108
-
109
-
110
-
111
-
112
-
113
 |
 |

2.
Refer to the illustration below to locate
the connector on the system board.
3.
Remove the plastic insert covering the
port opening on the left side of the
computer, next
to
the PC card slots. Insert
the tip of a screwdriver through the slot in
the plastic cover and carefully pry the
cover off. You may need to use gently
Increasing pressure to pull the cover away
from the case and push it out.
Upgrading Internal Components
5-15