Epson ActionPrinter 4500X User Manual - Page 134
the LINE FEED, FORM FEED, LINE FEED, A part of the printout of the first sheet is shown below.
 |
View all Epson ActionPrinter 4500X manuals
Add to My Manuals
Save this manual to your list of manuals |
Page 134 highlights
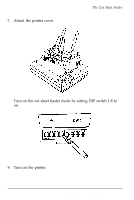
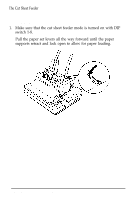
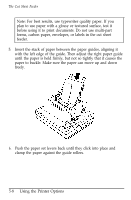
The Cut Sheet Feeder 1. Make sure that the printer is turned off and a stack of paper is in the bin. Check that the cut sheet feeder mode is selected and the paper release lever is set to the back position. 2. While holding down the LINE FEED button, turn on the printer. (For LQ mode, press the FORM FEED button instead of the LINE FEED button.) A part of the printout of the first sheet is shown below. The printout of the second sheet is similar to the original self test described in Chapter 1. This is the first line. This is line XX. 5-10 Using the Printer Options
-
 1
1 -
2
-
3
-
4
-
5
-
6
-
7
-
8
-
9
-
10
-
11
-
12
-
13
-
14
-
15
-
16
-
17
-
18
-
19
-
20
-
21
-
22
-
23
-
24
-
25
-
26
-
27
-
28
-
29
-
30
-
31
-
32
-
33
-
34
-
35
-
36
-
37
-
38
-
39
-
40
-
41
-
42
-
43
-
44
-
45
-
46
-
47
-
48
-
49
-
50
-
51
-
52
-
53
-
54
-
55
-
56
-
57
-
58
-
59
-
60
-
61
-
62
-
63
-
64
-
65
-
66
-
67
-
68
-
69
-
70
-
71
-
72
-
73
-
74
-
75
-
76
-
77
-
78
-
79
-
80
-
81
-
82
-
83
-
84
-
85
-
86
-
87
-
88
-
89
-
90
-
91
-
92
-
93
-
94
-
95
-
96
-
97
-
98
-
99
-
100
-
101
-
102
-
103
-
104
-
105
-
106
-
107
-
108
-
109
-
110
-
111
-
112
-
113
-
114
-
115
-
116
-
117
-
118
-
119
-
120
-
121
-
122
-
123
-
124
-
125
-
126
-
127
-
128
-
 129
129 -
 130
130 -
 131
131 -
 132
132 -
 133
133 -
 134
134 -
 135
135 -
 136
136 -
 137
137 -
 138
138 -
 139
139 -
140
-
141
-
142
-
143
-
144
-
145
-
146
-
147
-
148
-
149
-
150
-
151
-
152
-
153
-
154
-
155
-
156
-
157
-
158
-
159
-
160
-
161
-
162
-
163
-
164
-
165
-
166
-
167
-
168
-
169
-
170
-
171
-
172
-
173
-
174
-
175
-
176
-
177
-
178
-
179
-
180
-
181
-
182
-
183
-
184
-
185
-
186
-
187
-
188
-
189
-
190
-
191
-
192
-
193
-
194
-
195
-
196
-
197
-
198
-
199
-
200
-
201
-
202
-
203
-
204
-
205
-
206
-
207
-
208
-
209
-
210
-
211
-
212
-
213
-
214
-
215
-
216
-
217
-
218
-
219
-
220
-
221
-
222
-
223
-
224
-
225
-
226
-
227
-
228
-
229
-
230
-
231
-
232
-
233
-
234
-
235
-
236
-
237
-
238
-
239
-
240
-
241
-
242
-
243
-
244
-
245
-
246
-
247
-
248
-
249
-
250
-
251
-
252
-
253
-
254
-
255
-
256
-
257
-
258
-
259
-
260
-
261
-
262
-
263
-
264
-
265
-
266
-
267
-
268
-
269
-
270
-
271
-
272
-
273
-
274
-
275
-
276
-
277
-
278
-
279
-
280
 |
 |

The Cut Sheet Feeder
1.
Make sure that the printer is turned off and a stack of paper is in
the bin. Check that the cut sheet feeder mode is selected and the
paper release lever is set to the back position.
2.
While holding down
the LINE FEED
button, turn on the printer.
(For LQ mode, press the
FORM FEED
button instead of the
LINE FEED
button.)
A part of the printout of the first sheet is shown below. The
printout of
the
second sheet is similar to the original self test
described in Chapter 1.
This is the first line.
This is line XX.
5-10
Using the Printer Options