Epson Artisan 810 Quick Guide - Page 42
Scanning Multiple s - adf
 |
View all Epson Artisan 810 manuals
Add to My Manuals
Save this manual to your list of manuals |
Page 42 highlights
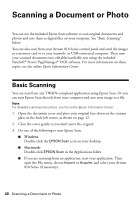
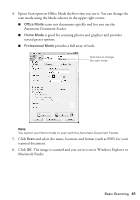
Scanning Multiple Pages You can scan a multiple-page document and save it on your computer in PDF or another format. With the Automatic Document Feeder, you can scan up to 30 letter-size pages at a time. 1. Place your document in the Automatic Document Feeder (see page 13). 2. Do one of the following to start Epson Scan: ■ Windows: Double-click the EPSON Scan icon on your desktop. ■ Macintosh: Double-click EPSON Scan in the Applications folder. 3. Select Office Mode in the upper right. Select Office Mode 4. Select the Image Type. 5. Select Auto Detect or ADF (Automatic Document Feeder) as the Document Source setting. 6. Select the Size of the originals and their Orientation on the scanner. 7. Select the scanning Resolution based on how you will use the scanned image: ■ E-mail, view on a computer screen, or post on the web: 96 to 150 dpi ■ Print or convert to editable text (OCR): 300 dpi ■ Fax: 200 dpi 8. Click the Preview button to scan and eject the first page. Place the page back on top of the other pages and reload them in the feeder. 9. If desired, draw a marquee (or box) around the area you want to scan in the Preview window. Adjust the image quality, if necessary. 10. Click Scan and select the name, location, and format (such as PDF) for your scanned document. Then click OK. The document is scanned and you see its icon(s) in Windows Explorer or Macintosh Finder. Note: Depending on the file format you select, Epson Scan may create one file containing all of the pages in your document or create one file for each page of your document. For more information, see the online Epson Information Center. 42 Scanning a Document or Photo
-
 1
1 -
2
-
3
-
4
-
5
-
6
-
7
-
8
-
9
-
10
-
11
-
12
-
13
-
14
-
15
-
16
-
17
-
18
-
19
-
20
-
21
-
22
-
23
-
24
-
25
-
26
-
27
-
28
-
29
-
30
-
31
-
32
-
33
-
34
-
35
-
36
-
 37
37 -
 38
38 -
 39
39 -
 40
40 -
 41
41 -
 42
42 -
 43
43 -
 44
44 -
 45
45 -
 46
46 -
 47
47 -
48
-
49
-
50
-
51
-
52
-
53
-
54
-
55
-
56
-
57
-
58
-
59
-
60
-
61
-
62
-
63
-
64
 |
 |
