Epson B351A Start Here Card - Page 2
Install the Photo Cartridge - ink
 |
UPC - 010343854888
View all Epson B351A manuals
Add to My Manuals
Save this manual to your list of manuals |
Page 2 highlights
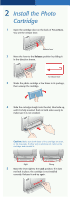
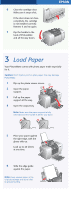
2 Install the Photo Cartridge 1 Open the cartridge door on the back of PictureMate. You see the release lever. Release lever 2 Move the lever to the Release position by sliding it in the direction shown. To release lever 3 Shake the photo cartridge a few times in its package, then unwrap the cartridge. 4 Slide the cartridge straight into the slot, label side up, until it is fully inserted. Push in both sides evenly to make sure it is not crooked. Caution: Make sure both sides of the cartridge are even, or ink may leak. If either side is sticking out, remove the cartridge and reinstall it. Right Wrong 5 Move the lever right to the Lock position. If it does not lock in place, the cartridge is not installed correctly. Release it and try again.
-
 1
1 -
 2
2 -
 3
3 -
 4
4 -
 5
5 -
 6
6
 |
 |