Epson B351A Start Here Card - Page 4
Plug In and Turn On PictureMate - photo cartridge
 |
UPC - 010343854888
View all Epson B351A manuals
Add to My Manuals
Save this manual to your list of manuals |
Page 4 highlights
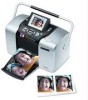
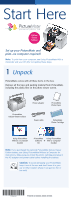
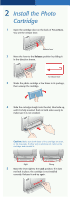
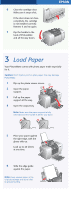
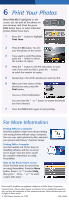
4 Plug In and Turn On PictureMate 1 Connect the power cable to the power adapter. 2 Plug the small cable into the back of PictureMate. 3 Plug the other end of the power cable into a standard power outlet. On button 4 Press the On button to turn on PictureMate. PictureMate gets the cartridge ready for printing. After a few minutes, you see a message that PictureMate is ready. 5 Press the OK button. You see this message on the photo viewer screen: 6 Do one of the following: • If you want to start printing right away, press the Back button. Then go to section 5. • If you want to select your personal settings, press the OK button and follow the steps below. After you press OK, you see the first wizard message: 7 Press the button. You see a list of layout settings: 8 Press the or button to highlight the layout you want to use most often. Then press the OK button. 9 Press the OK button again to move to the Color Effects setting. Repeat steps 7 and 8 to select the color, date stamp, time stamp, and print mode settings you want to use most of the time.
-
 1
1 -
 2
2 -
 3
3 -
 4
4 -
 5
5 -
 6
6
 |
 |