Epson C11C456021 Product Information Guide - Page 7
Managing Color with Custom Profiles
 |
UPC - 010343844186
View all Epson C11C456021 manuals
Add to My Manuals
Save this manual to your list of manuals |
Page 7 highlights
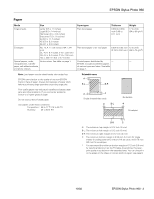
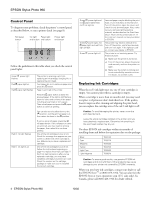
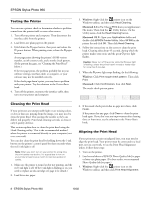
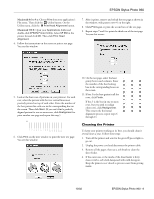
EPSON Stylus Photo 960 Printing Borderless Photos on Mac OS 8.6 to 9.x 1. Start your photo program and open your photo file. 2. Click File > Page Setup. 3. Select your Paper Size. Then choose Auto Sheet Feeder as the Paper Source. 4. Click the Borderless checkbox. Read the message and click OK. Then click OK to close the dialog box. 5. Click File > Print. 6. Select the Media Type for the paper you're using. Then click Print. Managing Color with Custom Profiles Follow the steps in this section to use custom profiles for printing with Adobe® Photoshop® (the instructions cover Photoshop 6.0). You'll also need to use profile-building software to create your profiles, such as Monaco Systems™ MonacoEZcolor™ or GretagMacbeth® ProfileMaker™ . Printing a Custom Profile Test Target Follow these steps to create individual custom profile test targets for each paper type you'll be printing on: 1. Start your profile creation software and follow the manufacturer's instructions to open and prepare your test target file. 2. When you're ready to print the test target, select File > Print. 3. Windows: Click the Properties or Preferences button. 4. Select these settings in the printer settings window: Media Type: Select the paper type you'll be printing on when you print with the profile. Source Space: It doesn't matter which source space you're using at this time. Print Space - Profile: Select Same As Source. 5. Click Custom, then click the Advanced button. 6. Select these settings in the Advanced window: Color Management: Select No Color Adjustment. Print Quality: We recommend that you select Photo - 1440 dpi, though you can select a lower or higher quality setting. High Speed and Edge Smoothing: We recommend that you turn off these options. 7. Click OK to return to the printer settings window. 8. Click OK (Windows) or Print (Macintosh) to print your test page. 9. Repeat these steps to print a test target for each paper type that you'll be printing on. Creating Your Custom Profile Follow the instructions provided with your profile-building software (such as Monaco Systems MonacoEZcolor or GretagMacbeth ProfileMaker) to create your custom profile using the test target your printed. Once you create the profile, be sure to place it in the correct folder on your computer, as recommended by Microsoft® or Apple®. Printing With Your Custom Profile 1. Start Photoshop, open your image file, and make sure it is tagged with the appropriate source profile. (See your Photoshop documentation for instructions.) Note: We recommend the ColorMatch RGB source profile for RGB image files. 2. Select File > Print. 3. Windows: Click the Properties or Preferences button. 4. Select these settings in the printer settings window: Media Type: Select the type of paper for which you created the custom profile (see "Printing a Custom Profile Test Target"). Source Space: Select Document: ColorMatch RGB. Print Space - Profile: Select your custom printer profile from the pull-down menu. Print Space - Intent: Select Relative Colorimetric. 5. Click Custom, then click the Advanced button. 6. Select No Color Adjustment as the Color Management setting. 7. Select the same settings on the Advanced window that you selected when you printed the test target (see "Printing a Custom Profile Test Target"). 8. Click OK to close the Advanced window. 9. Click OK (Windows) or Print (Macintosh) to print your photo. 10/02 EPSON Stylus Photo 960 - 7
-
 1
1 -
 2
2 -
 3
3 -
 4
4 -
 5
5 -
 6
6 -
 7
7 -
 8
8 -
 9
9 -
 10
10
 |
 |
