Epson C11C456021 Product Information Guide - Page 9
Cleaning the Printer
 |
UPC - 010343844186
View all Epson C11C456021 manuals
Add to My Manuals
Save this manual to your list of manuals |
Page 9 highlights
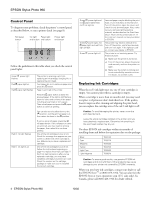
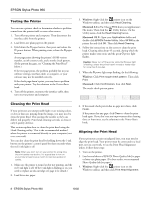
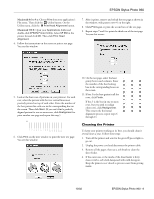
EPSON Stylus Photo 960 Macintosh 8.6 to 9.x: Choose Print from your application's File menu. Then click the Utility button. On the Utility menu, click the Print Head Alignment button. Macintosh OS X: Open your Applications folder and double-click EPSON Printer Utility. Select SP 960 in the printer list and click OK. Then click Print Head Alignment. 4. Follow the instructions on the screen to print a test page. You see this window: 7. After it prints, remove and reload the test page as shown in the window, with pattern row #1 on the right. 8. Click Print again to print the second row of the test page. 9. Repeat steps 7 and 8 to print the third row of the test page. You see this screen: 5. Look at the four rows of patterns on your printout. For each row, select the pattern with the two vertical lines most precisely printed on top of each other. Enter the number of the best pattern for each row in the corresponding box on the screen. Then click Next. (If you can't find a perfectly aligned pattern for one or more rows, click Realignment to print another test page and repeat this step.) 6. Click Print on the next window to print the next test page. You see this window: 10. On the test page, select the least grainy box in each column. Enter the number of the best looking box in the corresponding boxes on the screen. 11. If box 5 is the least grainy in all the rows, click Finish. If box 5 is the best in one or more rows, but you need to realign other rows, click Realignment. This restarts the horizontal alignment process; repeat steps 6 through 11. Cleaning the Printer To keep your printer working at its best, you should clean it several times a year. Follow these steps: 1. Turn off the printer and wait for the green Ppower light to go out. 2. Unplug the power cord and disconnect the printer cable. 3. Remove all the paper, then use a soft brush to clean the sheet feeder. 4. If the outer case or the inside of the sheet feeder is dirty, clean it with a soft cloth dampened with mild detergent. Keep the printer cover closed to prevent water from getting inside. 10/02 EPSON Stylus Photo 960 - 9
-
 1
1 -
2
-
3
-
 4
4 -
 5
5 -
 6
6 -
 7
7 -
 8
8 -
 9
9 -
 10
10
 |
 |
