Epson C1440AXIS User Setup Information - Page 8
Printer Error Condition Pop-up - printer drivers
 |
UPC - 667026001031
View all Epson C1440AXIS manuals
Add to My Manuals
Save this manual to your list of manuals |
Page 8 highlights
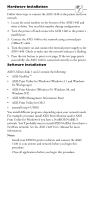
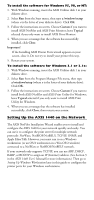
To configure printer ports for Windows NT: 1. Click Start, point to Settings, then click Printers. 2. Right-click your EPSON printer icon and click Properties. 3. Click the Ports tab, then click Add Port. 4. Select AXIS Port from the list, and click New Port... 5. Select your network protocol and click OK. 6. If your network supports NetBIOS/NetBEUI: • Select the AXIS printer port from the ports list and click OK. The port name appears as .LP 1, where is AX followed by the last six digits of the AXIS 1440 serial number (for example, AX560B35.LP1). Click Close. If your network supports LPR (TCP/IP): • Enter the IP address or host name for your print server, then enter LPT1 as the printer name. Click OK, then click Close. 7. Click Configure Port... If you want error condition pop-up messages to be displayed, check the Show printer error condition pop-up messages box and specify the frequency at which messages will re-display in the Printer Error Condition Pop-up Timeout option. Click OK to close the dialog box. 8. Click OK to save your settings. To configure printer ports for Windows 3.1 or Windows for Workgroups: 1. Double-click the AXIS Utilities icon in Program Manager, then double-click the AXIS Print Utility icon to start the program. 2. In the Port menu, click Add. 3. Select the AXIS printer port from the NPS Port list. The port name appears as .LP1, where is AX followed by the last six digits of the AXIS 1440 serial number (for example, AX100086.LP1). 4. Click on the port name in the NPS Port field to highlight it. The port name should appear in the Windows Port field. If it doesn't appear, make sure the name in the NPS Port field is highlighted and, if necessary, click on the name again. Make a note of the port name, which you'll need later. 5. Type any desired comment in the Description field. Click OK to install the port. 6. Click Connect in the Port menu. 7. Select your EPSON printer driver from the list of Installed Printers, then click Connect... 8. In the Ports list, select the Windows port name from step 4 above. Click OK to close the Connect dialog box. 9. Click Close to save your settings. Note: t Windows 3.1 workstations must be running LAN Manager Workstation client software to use a network printer.
-
 1
1 -
2
-
 3
3 -
 4
4 -
 5
5 -
 6
6 -
 7
7 -
 8
8 -
 9
9 -
 10
10 -
 11
11
 |
 |
