Epson C276001 User Setup Information - Page 10
front notches ¿ over the small pegs on, each side of the printer as shown. Then lay
 |
View all Epson C276001 manuals
Add to My Manuals
Save this manual to your list of manuals |
Page 10 highlights
Replacing the Ribbon Cartridge 6 7 ribbon-tightening knob separator Remove the separator from the new ribbon cartridge and discard it. Then turn the ribbon-tightening knob in the direction of the arrow to remove any slack in the ribbon. Hold the cartridge with the ribbontightening knob up. Fit the cartridge's two front notches (¿) over the small pegs on each side of the printer as shown. Then lay the cartridge flat so that the rear notches (¡) fit over the corresponding pegs. 10
-
 1
1 -
2
-
3
-
4
-
 5
5 -
 6
6 -
 7
7 -
 8
8 -
 9
9 -
 10
10 -
 11
11 -
 12
12 -
 13
13 -
 14
14 -
 15
15 -
16
 |
 |

10
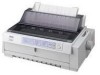
Replacing the Ribbon Cartridge
Remove the separator from the new ribbon
cartridge and discard it. Then turn the
ribbon-tightening knob in the direction of
the arrow to remove any slack in the ribbon.
Hold the cartridge with the ribbon-
tightening knob up. Fit the cartridge’s two
front notches (¿) over the small pegs on
each side of the printer as shown. Then lay
the cartridge flat so that the rear notches (¡)
fit over the corresponding pegs.
6
ribbon-tightening knob
separator
7