Epson CX3810 Product Information Guide - Page 6
Error Indicators, Clearing a Paper Jam, Cleaning the Print Head - stylus ink cartridge
 |
UPC - 010343855151
View all Epson CX3810 manuals
Add to My Manuals
Save this manual to your list of manuals |
Page 6 highlights
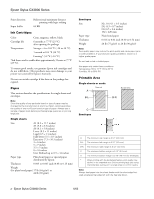
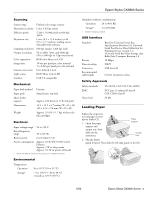
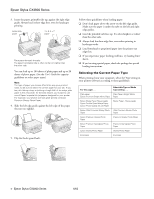
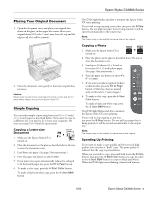
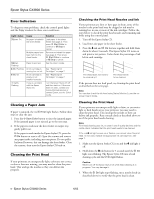
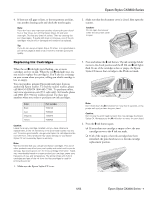
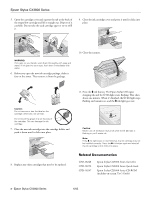
Epson Stylus CX3800 Series Error Indicators To diagnose some problems, check the control panel lights and the Copy window for these error conditions: Light: status b Error: On b Error: Flashing B Ink: Flashing B Ink: On All lights: Flashing Cause Solution No paper is loaded in the sheet feeder. Load paper in the sheet feeder (see page 3). Then press x Start Color to continue or y Stop to cancel. Multiple pages have been fed into the sheet feeder. Remove and reload the paper (see page 3). Then press x Start Color to continue or y Stop to cancel. Paper is jammed. See the User's Guide. An ink cartridge is running low on ink. An ink cartridge is empty or not installed correctly. There is a problem with the Epson Stylus CX. See "Replacing Ink Cartridges" on page 7. See "Replacing Ink Cartridges" on page 7. Turn the Epson Stylus CX off and then back on. If the error does not clear, contact your local authorized servicer or contact Epson; see the Quick Guide. Clearing a Paper Jam If paper is jammed, the red m Error light flashes. Follow these steps to clear the jam: 1. Press the x Start Color button to eject the jammed paper. If the jammed paper is not ejected, go to the next step. 2. If the paper is stuck near the sheet feeder or output tray, gently pull it out. If the paper is stuck inside the Epson Stylus CX, press the P On button to turn it off. Open the scanner and remove any paper inside, including any torn pieces. Do not pull it backward however; this can damage the sheet feeder. Close the scanner, then turn the Epson Stylus CX back on. Cleaning the Print Head If your printouts are unexpectedly light, colors are not correct, or dots or lines are missing, you may need to clean the print head. This unclogs the nozzles so they can deliver ink properly. Checking the Print Head Nozzles and Ink If your printouts are faint or have gaps in them, some of the nozzles in the print head may be clogged or ink may be running low in one or more of the ink cartridges. Follow the steps below to check the print head nozzles and remaining ink levels using the control panel. 1. Turn off the Epson Stylus CX. 2. Load letter-size paper in the sheet feeder. 3. Press the B ink and P On buttons together and hold them down for about 3 seconds. The Epson Stylus CX turns on and prints a test pattern. It also shows the percentage of ink left in each cartridge. Print head does not need to be cleaned yet Print head needs to be cleaned If the pattern does not look good, try cleaning the print head as described on the next page. Note: You can also check the ink level using Status Monitor 3; see the onscreen User's Guide. Cleaning the Print Head If your printouts are unexpectedly light or faint, or you notice light or dark bands across your printout, you may need to clean the print head. This unclogs the nozzles so they can deliver ink properly. Run a nozzle check as described above to see if the print head needs cleaning. Note: Print head cleaning uses ink, so clean it only if quality declines and the nozzle check indicates that the print head needs to be cleaned. If the red B ink light comes on or flashes, you cannot clean the print head. In this case, replace the appropriate ink cartridge first; see page 7. 1. Make sure the Epson Stylus CX is on and the B ink light is off. 2. Hold down the B ink button for 3 seconds until the P On light starts flashing. The Epson Stylus CX runs a head cleaning cycle and the P On light flashes. Caution: Never turn off the Epson Stylus CX while head cleaning is in progress. You may damage it. 3. When the P On light stops flashing, run a nozzle check (as described above) to verify that the print head is clean. 6 - Epson Stylus CX3800 Series 6/05
-
 1
1 -
 2
2 -
 3
3 -
 4
4 -
 5
5 -
 6
6 -
 7
7 -
 8
8
 |
 |