Epson EMP-5550 Owners Manual
Epson EMP-5550 - SVGA LCD Projector Manual
 |
View all Epson EMP-5550 manuals
Add to My Manuals
Save this manual to your list of manuals |
Epson EMP-5550 manual content summary:
- Epson EMP-5550 | Owners Manual - Page 1
- Epson EMP-5550 | Owners Manual - Page 2
ISO/IEC Guide 22 y EN 45014/selon les normes ISO/IEC Guide 22 et EN45014 Manufacturer/Produttore/Hersteller/Fabricante/Constructeur SEIKO EPSON CORPORATION Address du produit LCD Projector Model name/Nome modello/Modellbezeichnung/Nombre del modelo/Nom du modèle EMP-7500/5550/5500 Conforms - Epson EMP-5550 | Owners Manual - Page 3
FCC Compliance Statement For United States Users This equipment has been tested and found to comply with the limits for a radio frequency energy and, if not installed and used in accordance with the instructions, may cause harmful interference to radio or television reception. However, there is - Epson EMP-5550 | Owners Manual - Page 4
covers on the projector except the lamp and filter covers. Dangerous electrical voltages inside the projector can cause severe injury. Except as specifically directed in this Owner's Manual, do not attempt to service this product yourself. Refer all servicing to qualified service personnel. Warning - Epson EMP-5550 | Owners Manual - Page 5
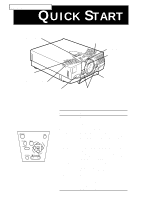
EMP-7500/5550/5500 QUICK START operation panel speaker operation indicator remote control receiver speaker zoom ring focus ring front foot foot adjust lever Operation Panel Button Function Power Turns the projector tracking+) Matches the projector's internal clock projector temporarily. - - Epson EMP-5550 | Owners Manual - Page 6
EMP-7500/5550/5500 QUICK START 1 2 Source Menu Effects 3 5 4 AV/Mute Resize Custom Freeze Help - Volume + Power Remote control help menu for various types of problems you may encounter. Resize Switches between projector temporarily. - Volume + Adjusts the volume. Power Turns the projector - Epson EMP-5550 | Owners Manual - Page 7
® DATA/VIDEO PROJECTOR Owner's Manual - Epson EMP-5550 | Owners Manual - Page 8
alterations to this product, or (excluding the U.S.) failure to strictly comply with SEIKO EPSON CORPORATION's operating and maintenance instructions. SEIKO EPSON CORPORATION shall not be liable against any damages or problems arising from the use of any options or any consumable products other than - Epson EMP-5550 | Owners Manual - Page 9
ss s s s s s s s s s Contents Contents iii Introduction vii Getting the Most Out of Your Projector ix Remote control ix Optional Accessories x About This Manual xi Safety Instructions xii Where to Get Help xiv World Wide Web site xv Transporting your projecotor xv 1 Installation - Epson EMP-5550 | Owners Manual - Page 10
42 Setting Menu 42 User's Logo Menu 45 Effect Menu 47 About Menu 48 RESET ALL Menu 48 4 Maintenance 51 Cleaning the Lens 52 Cleaning the Projector Case 52 Cleaning the Air Filter 53 Replacing the Lamp 54 5 Troubleshooting 57 Problems with the Projector 58 Problems with the Image - Epson EMP-5550 | Owners Manual - Page 11
6 Technical Specifications 63 Supported Monitor Displays (EMP-7500 65 Supported Monitor Displays (EMP-5550/5500 66 Monitor and Computer connector pin assignments 67 Glossary 69 Index 71 s s s s s s v - Epson EMP-5550 | Owners Manual - Page 12
s s s s s vi Contents - Epson EMP-5550 | Owners Manual - Page 13
EPSON EMP series projector is a compact, lightweight projector that lets you project XGA(EMP-7500) or SVGA(EMP-5550/5500) full-color images and video onto a large screen for presentations. The projector time. You can control your projector through a hand-held remote control unit, with menus being - Epson EMP-5550 | Owners Manual - Page 14
number of add-on features that are designed to make presentations more effective. Your projector also features a new patented BIS CUIT (Balanced Image Size Conversion UnIT) chip which supports XGA(EMP-7500), VGA~XGA(EMP-5550/5500) computer output, as well as VGA and SXGA output. No matter what type - Epson EMP-5550 | Owners Manual - Page 15
for the image display, video and audio. To get the most out of your projector, read this section for a quick summary of the important features. Remote control The buttons on the remote control let you turn the projector on or off, and provide direct access to auto set-up, blank, freeze, volume - Epson EMP-5550 | Owners Manual - Page 16
Optional Accessories To enhance your use of the projector, EPSON provides the following optional accessories: • Spare lamp (EMP-7500/5500) ELPLP06 • Spare lamp (EMP-5550) ELPLP07 • Computer cable ELPKC02 • Link set for PC ELPSW03 • Link set for Mac ELPSW04 • Link ser for 98 ELPSW05 • - Epson EMP-5550 | Owners Manual - Page 17
. Chapter 5, "Troubleshooting", describes you how to interpret the projector's indicator lights and gives helpful information for avoiding errors, optimizing image quality and solving problems. Chapter 6, "Technical Specifications," lists the technical specifications for your projector. A Glossary - Epson EMP-5550 | Owners Manual - Page 18
these safety instructions when setting up and using the projector: 1. Do not place the projector on an unstable cart, stand, or table. 2. Do not use the projector near water or sources of heat. 3. Use attachments only as recommended. 4. Use the type of power source indicated on the projector. If you - Epson EMP-5550 | Owners Manual - Page 19
through cabinet slots. Never spill liquid of any kind into the projector. 13. Except as specifically explained in this User's Guide, do not attempt to service this product yourself. Refer all servicing to qualified service personnel. Opening or removing covers may expose you to dangerous voltages - Epson EMP-5550 | Owners Manual - Page 20
If you are haveing trouble setting up or running your projector, first see Chapter 5, "Troubleshooting". If you cannot resolve the problem, contact the appropriate representative listed in the section entitled "After sales service contact addresses" at the end of this manual. Before you call, please - Epson EMP-5550 | Owners Manual - Page 21
includes Contact Information for local EPSON subsidiaries. Transporting your projecotor Your projector contains many glass parts and precision parts. To prevent shock damages while transporting, handle as the following. When transporting to maker due to troubleshooting • Use the original packing - Epson EMP-5550 | Owners Manual - Page 22
). When traveling by an airplane • Be sure to bring the projector with you when traveling by an airplane. • When transporting the projector as baggage on an airplane, first put the projector in a hard travel case to avoid any damage. EPSON shall not be liable against any damages arose during the - Epson EMP-5550 | Owners Manual - Page 23
disk player before it can project any images. You may also what to set up the projector for one or more of the following: • Connect the mouse cable to use the remote control as a wireless mouse. • Connect the projector to an audio source for one or both image sources. The audio source can be - Epson EMP-5550 | Owners Manual - Page 24
, make sure you have all these components: • Projector • Remote Control • 2 AA batteries • Power cord • Computer cable • Audio cable • A/V cable • Mouse cable (for PS/2 and Mac) • Owner's manual • Hand strap • Soft carrying case Depending on the configration of your equipment, you may not need - Epson EMP-5550 | Owners Manual - Page 25
you need an S-Video cable. (One is usually provided with your video device.) A separate cable is required for each video source. • To connect the projector to a Macintosh PowerBook, you need a video-out cable. (One is provided by/or can be purchased from Apple for all new PowerBooks that have video - Epson EMP-5550 | Owners Manual - Page 26
screen determines the actual image size. Use the general guidelines below to determine the correct distance. Screen size Horizontal distance from projector to screen 300 inches (610x460cm)493.7 inches (12.6 m) ~ 638.7 inches (16.3 m) 200 inches (410x300cm)315.0 inches (8.0 m) ~ 409.4 inches (10 - Epson EMP-5550 | Owners Manual - Page 27
by an orange power indicator. ♦ Warning: Never look into the lens when the projector is on. There is a risk that the projector might come on suddenly even though it is not in use. The light from the lamp can damage your eyes. It is especially important that children should not be allowed to - Epson EMP-5550 | Owners Manual - Page 28
5. To insert the batteries in the remote control device, slide off the battery compartment cover as shown below. 6. Insert the two AA batteries included with the projector. Make sure the polarity of the batteries is correct. 7. Replace the battery compartment cover. When replacing batteries, take - Epson EMP-5550 | Owners Manual - Page 29
projector to a computer capable of XGA, VGA, and SVGA output. Resizing is supported for VGA, XGA output. The following types of computers are supported To connect the video and mouse cable ( to use the wireless remote as a mouse pointer), see the section in this chapter that applies to your computer - Epson EMP-5550 | Owners Manual - Page 30
Monitor cable Computer cable ♦ Note: Computer configurations vary. See your computer manual for the location of the ports needed to connect your projector. a. Connect either end of the computer cable to the projector's Computer In port. b. Disconnect the monitor cable from the computer, and - Epson EMP-5550 | Owners Manual - Page 31
2. Connect the audio cable if needed. Audio cable a. Connect one end of the audio cable to the Audio In jack on the projector. b. Connect the other end of the audio cable to the audio out port on a sound card in the computer. s s s s s s Connecting to a Computer 9 - Epson EMP-5550 | Owners Manual - Page 32
the computer cable. Computer cable ♦ Note: Laptop configurations vary. See your computer manual for the location of the ports needed to connect your projector. a. Connect either end of the computer cable to the projector's Computer In port. b. Connect the other end of the computer cable to - Epson EMP-5550 | Owners Manual - Page 33
2. Connect the audio cable. Audio cable a. Connect one end of the audio cable to the Audio In jack on the projector. b. Connect the other end of the audio cable to your laptop. s s s s s s Connecting to a Computer 11 - Epson EMP-5550 | Owners Manual - Page 34
cable adapter Mac monitor adapter Monitor cable Computer cable ♦ Note: Macintosh computer configurations vary. See your computer manual for the location of the ports needed to connect your projector. * You may need adapters that came with your computer or purchased from your computer dealer for - Epson EMP-5550 | Owners Manual - Page 35
2. Connect the audio cable. Audio cable a. Connect one end of the audio cable to the Audio In jack on the projector. b. Connect the other end of the audio cable to your computer. s s s s s s Connecting to a Computer 13 - Epson EMP-5550 | Owners Manual - Page 36
only use a PowerBook model that has video-out capability. See page 7 for more information. Before beginning, turn off the projector and computer if PowerBook configurations vary. See your computer manual for the location of the ports needed to connect your projector. * You may need adapters that - Epson EMP-5550 | Owners Manual - Page 37
2. Connect the audio cable. Audio cable a. Connect one end of the audio cable to the Audio In jack on the projector. b. Connect the other end of the audio cable to your computer. s s s s s s Connecting to a Computer 15 - Epson EMP-5550 | Owners Manual - Page 38
automatically selects the S-Video as the video source. To display composite video, first disconnect the S-Video source. The projector supports NTSC, PAL, PAL 60 and SECAM video formats, and automatically detects and identifies the video format. However, you can specify that a single broadcast - Epson EMP-5550 | Owners Manual - Page 39
video source if they are on. 2. If your composite video uses an RCA-type composite video connector, you will need the A/V cable supplied with your projector. If your video uses a S-Video, you will need to provide YOUR OWN S-Video or use the S-Video cable that came with your video source. 3. For - Epson EMP-5550 | Owners Manual - Page 40
. Insert the other end in the S-Video Out jack on your S-Video source. S-Video cable Connecting to an External Speaker or PA System Although the projector's internal speakers are enough for most small-size or medium-size rooms, an external speaker for large room to gain maximum benefit from the - Epson EMP-5550 | Owners Manual - Page 41
2. Connect the cable's 3.5 mm stereo mini plug to the projector's Audio Out jack. RCA/3.5 mm cable 3. Connect the other end of the cable to the external speaker or PA system. Insert the cable's red RCA - Epson EMP-5550 | Owners Manual - Page 42
s s s s s 20 - Epson EMP-5550 | Owners Manual - Page 43
s 2 Using the Projector This chapter provides the following information about using your projector: • Turning the equipment on and off • Focusing and positioning the screen image • Controlling the projector with the remote control and the operation panel • Monitoring the projector's operating status - Epson EMP-5550 | Owners Manual - Page 44
The illustration below identifies the parts of your projector. operation panel speaker zoom ring focus ring speaker operation indicator remote control receiver front foot foot adjust lever s s s s s 22 - Epson EMP-5550 | Owners Manual - Page 45
: Never look into the lens when the lamp is on. This can damage your eyes. It is especially important that children are not allowed to look into the lens. ♦ Caution: When turning the projector on or off with the remote control, be sure to turn the remote control on first with the power switch - Epson EMP-5550 | Owners Manual - Page 46
been used for 30 minutes. In sleep mode, the projector's operation indicator is orange and only a minimum amount of the projector's circuitry remains on. This conserves electricity, cools the projector, and extends the life of the lamp. When the projector is in sleep mode, you can press the Power - Epson EMP-5550 | Owners Manual - Page 47
in focus and correctly positioned on the screen. zoom ring focus ring • To focus the image, rotate the focus ring (the outer ring on the projector's lens). • To adjust the size of the image, rotate the inner zoom ring. Rotate the zoom ring wide to make the image larger, or tele - Epson EMP-5550 | Owners Manual - Page 48
If you need to raise or lower the image on the screen, extend or retract the two feet at the bottom of the projector as follows: 1. Stand behind the projector and support the front of it while you lift the foot adjust lever above the feet. This unlocks the feet so they can move - Epson EMP-5550 | Owners Manual - Page 49
Button The Resize button lets you switch between Resize display and Window display. The Resize button cannot be used with XGA(1024 × 768 pixels) for EMP-7500 and SVGA(800 × 600 pixels) for EMP5550/5500. How to switch With images up to XGA(1024 × 768 pixels) size (for example a 600 × 480 - Epson EMP-5550 | Owners Manual - Page 50
of the projector or the remote control to perform the following actions: • Turn power on and off • Switch between input sources (video - computer) • Access the projector menus to adjust the image, audio, video, and display settings • Control resizing • Control display freeze • Control A/V mute (Cuts - Epson EMP-5550 | Owners Manual - Page 51
infrared receiver; or other equipment emitting infrared energy is present (such as a radiant room heater). Correct these conditions to use the remote control or control the projector from a computer. ♦ Note: If you use the other mouse except the PS/2 mouse, you need to purchase the Link Set to - Epson EMP-5550 | Owners Manual - Page 52
remote control, you can also control the projector by using the buttons on the projector's operation panel located on top of the projector. This table summarizes the functions on the remote control the help menu for various types of problems you may encounter. Switches between Resizing screen - Epson EMP-5550 | Owners Manual - Page 53
Using the Operation Panel Enter button Operation Panel You can use the operation panel to control the projector instead of the remote control. However, you can program and access the custom features only using the remote control. s s s s s s Focusing and Positioning the Screen Image 31 - Epson EMP-5550 | Owners Manual - Page 54
panel. Button Function Power Turns the projector on or off. Source Menu Switches items during menu operations. Left, right Matches the projector's internal clock to various arrows(tracking-/ computer the screen and sound of the projector temporarily. - Volume + Adjusts the volume. Help - Epson EMP-5550 | Owners Manual - Page 55
Status Indicators The power and lamp indicators at the top of the projector tell you its operating status. Operation Indicator Lamp Indicator Temperature Indicator ♦ Caution: A red indicator warns you if a serious problem occurs. See Chapter 5, "Troubleshooting," for what to do if a warning - Epson EMP-5550 | Owners Manual - Page 56
life and will not longer project images. Replace the projection lamp with a new one. Red Flashing There is a problem with the projection lamp, lamp power supply, lamp fuse, or a circuit malfunctioned in the projector. Temperature Indicator Displays the internal temperature condition. This - Epson EMP-5550 | Owners Manual - Page 57
you to set various projector options. • The User's logo menu allows you to select special features such as zoom, backcolor or logo. • The Effect menu allows you to use effect buttons. • The About menu provides information about lamp hours, frequency and etc.. • The Reset All menu returns all - Epson EMP-5550 | Owners Manual - Page 58
Main menu, press the Menu button on the operation panel or remote control. The Main menu appears: Press the Menu button again to hide the menu. Changing a Menu Setting To change a menu setting: 1. Press the Menu button on the operation panel or remote control to display the Main menu. s s s s s 36 - Epson EMP-5550 | Owners Manual - Page 59
2. Press the up or down buttons (operation panel) or press the top or bottom of the pointer button (remote) to scroll through the menu choices. 5 4 Source Menu up and down buttons pointer button 1 2 Effects 3 AV/Mute Resize Custom Freeze Help - Volume + Power s s s s s s Changing a Menu - Epson EMP-5550 | Owners Manual - Page 60
3. Press either the Enter button (operation panel) or the top or bottom multi-purpose button (remote) to display a submenu. Source Menu Effects 3 1 2 5 4 Enter button top multi-purpose button bottom multi-purpose button AV/Mute Resize Custom Freeze Help - Volume + Power As - Epson EMP-5550 | Owners Manual - Page 61
right buttons (operation panel) or the right or left sides of the pointer button (remote) to change a setting on one of the submenus. 6. When you finish changing must be connected and operating, and the image source on the projector must be set to Computer for you to access these menu options - Epson EMP-5550 | Owners Manual - Page 62
AUTO automatically adjusts the computer input signal to the current projector settings. Press the AUTO button while the image fills the remote) or the button (operation panel) to reset the Computer Menu items. If you change your mind, select No and press either multi-purpose button(remote - Epson EMP-5550 | Owners Manual - Page 63
camcorder) must be connected and operating, and the image source on the projector must be set to Video for you to access these menu options. Menu less sharp. Reset Returns all Video Menu items to their factory defaults. Select this item and then press either multi-purpose button(remote) or the - Epson EMP-5550 | Owners Manual - Page 64
select Yes and then press the button (operation panel) or a multi-purpose button (remote) to reset the Audio menu. If you change your mind, select No and then press a multi- purpose button (remote) or the button (operation panel) to clear the confirmation screen without changing any - Epson EMP-5550 | Owners Manual - Page 65
remote) or the and buttons(operation panel) to change the value. Press the button to clear the setting screen, and return to the Main menu. Ceiling Flips the projected image so it looks correct when you're hanging the projector a user logo displays when the screen - Epson EMP-5550 | Owners Manual - Page 66
confirmation screen. Next, select Yes and then press a multi-purpose button(remote) or the button(operation panel) to reset the Setting menu. If you change your mind, select No and then press either multi-purpose button(remote) or the button(operation panel) to clear the confirmation - Epson EMP-5550 | Owners Manual - Page 67
: 1. Display the image (with the projector) you wish to use as a logo. 2. Press the Menu button to open the Menu window. 3. Select the User's Logo menu option by pressing the down arrow button on the operation panel or the pointer button on the remote control. Then press the Enter button (operation - Epson EMP-5550 | Owners Manual - Page 68
♦ Note: Saving the logo may take a moment. Do not use the projector or other sources (computer, video, speaker, etc.) while the logo is being saved. 9. When the message "Saving the user logo is completed" appears on the screen, press the Menu or Enter button to display the Main menu. s s s s s - Epson EMP-5550 | Owners Manual - Page 69
buttons on the remote control. Also, you can change the cursor speed. Select the item you want to set, then press either multi-purpose button(remote) or the - Epson EMP-5550 | Owners Manual - Page 70
of hours the current projector lamp has been used. The lamp light turns red when the projector lamp is near the end of its normal life. When this happens, replace the projector lamp with a new one as soon as possible. RESET ALL Menu Selecting the Reset All menu option resets the settings in all - Epson EMP-5550 | Owners Manual - Page 71
Next, select Yes and then press either multi-purpose button(remote) or the button(operation panel) to reset all menu items. If you change your mind, select No and then press either multi-purpose button(remote) or the button(operation panel) to clear the confirmation screen without - Epson EMP-5550 | Owners Manual - Page 72
s s s s s 50 - Epson EMP-5550 | Owners Manual - Page 73
any cover on the projector, except the lamp and filter covers. Dangerous electrical voltages in the projector can injure you severely. Do not try to service this product yourself, except as specifically explained in this User's Guide. Refer all other servicing to qualified service personnel - Epson EMP-5550 | Owners Manual - Page 74
To remove dirt or stains on the lens, moisten a soft cloth with water and a neutral detergent and gently wipe the lens surface. Cleaning the Projector Case To clean the projector case, first unplug the power cable. To remove dirt or dust, wipe the casing with a soft, dry, lint-free cloth. To remove - Epson EMP-5550 | Owners Manual - Page 75
access the filter easily. ♦ Note: Standing the projector with the handle at the top keeps dust from getting inside the projector housing. 3. Pull up the filter cover tab to . Contact your dealer or call EPSON Service Center. 5. Replace the filter cover when you're done. s s s s s s Cleaning - Epson EMP-5550 | Owners Manual - Page 76
on the screen when the projector lamp comes on. Contact your local EPSON dealer for a replacement lamp.Use only replacement lamp part number.(ELPLP06 or ELPLP07) ♦ Caution: This projector lamp develops high heat and high pressure during use, so the lamp (bulb) ruptures and burns may occur - Epson EMP-5550 | Owners Manual - Page 77
object to loosen one retaining screw on the lamp cover. When the screw is loose, lift off the lamp cover. (You cannot remove this screw from the cover.) 2 1 4. Use a screwdriver, coin, or similar object to loosen two screws holding the lamp in position. (You cannot remove these screws.) 5. Lift - Epson EMP-5550 | Owners Manual - Page 78
6. Gently insert the new lamp by lowering it into position. Make sure it is inserted securely. 7. Tighten the screws you loosened in step 4. 8. Replace the lamp cover and tighten the cover screw. (Make sure the lamp cover is securely fastened. The projector will not run if the lamp cover is open.) s - Epson EMP-5550 | Owners Manual - Page 79
5 Troubleshooting This chapter describes the problems indicated by the status lights and provides information how to solve problems with the projector. It is divided into the following sections: • "Problems with the Projector" on page 58 and 59 tells you what to do if any of the projector's warning - Epson EMP-5550 | Owners Manual - Page 80
following pages for information on what to do when you see these warning lights or encounter other specific problems with the projector. u The operation indicator is flashing orange and you cannot turn on the projector. The lamp is cooling down. Wait until the light turns off and then turn on the - Epson EMP-5550 | Owners Manual - Page 81
you clean the air filter, the problem may be caused by damage to the cooling fan or internal circuits. Contact a qualified service person. ♦ Warning: Except as specifically explained in this User's Guide, do not attempt to service this product yourself. s s s s s s Problems with the Projector 59 - Epson EMP-5550 | Owners Manual - Page 82
"Supported Monitor Displays (EMP-5550/5500)" on page 66. You also may need to modify existing presentation files if you created them for a different resolution. See your software manual for specific information. u The message NO SIGNAL is displayed. An image source not connected to the projector is - Epson EMP-5550 | Owners Manual - Page 83
all the way down and that the A/V cable is securely attached to both the projector and the audio source. The wrong source is selected. Press either the Computer or Video button on the remote control or operation panel to select the proper source. s s s s s s Problems with the Image or Sound 61 - Epson EMP-5550 | Owners Manual - Page 84
s s s s s 62 - Epson EMP-5550 | Owners Manual - Page 85
.3 meters) Remote control range 33 feet (10 meters) Internal speaker system 1W + 1W stereo Optical aspect ratio 4 : 3 (horizontal : vertical) Zoom ratio 1:1.3 Projector Lamp Type Power Part number Mechanical Height UHE Lamp (Ultra High Efficiency Lamp) 120 W EMP-7500/5500 : ELPLP06 EMP-5550 - Epson EMP-5550 | Owners Manual - Page 86
Mechanical Width Depth Weight Electrical Voltage Rated frequency Power supply Environmental Temperature Humidity 9.3 inches (238.5 mm) Maximum dimension 13.6 inches (346 mm) Maximum dimension 9.4 lb (4.2 kg) 100 - 120 VAC and 200 - 240 VAC ± 10% 50/60 Hz 100 - 120 V, approximately 2.2 A 50/60 Hz - Epson EMP-5550 | Owners Manual - Page 87
Monitor Displays (EMP-7500) The projector displays images at a resolution of 1024 × 768 pixels. To display a higher resolution image (1280 × 1024 mode), the projector compresses the image to 1024 × 768 pixels. The following table lists the display formats supported by the projector: Format PC98 - Epson EMP-5550 | Owners Manual - Page 88
Monitor Displays (EMP-5550/5500) The projector displays images at a resolution of 800 × 600 pixels. To display a higher resolution image (1024 × 768 mode), the projector compresses the image to 800 × 600 pixels. The following table lists the display formats supported by the projector: Format PC98 - Epson EMP-5550 | Owners Manual - Page 89
Monitor and Computer connector pin assignments The Monitor and Computer connectors are female video RGB, 15-pin micro-D-style connectors. The pin assignments are: Input pin Signal 1 Red analogue input 2 Green analogue input 3 Blue analogue input 4 GND 5 GND 6 Red GND 7 Green GND 8 - Epson EMP-5550 | Owners Manual - Page 90
s s s s s 68 - Epson EMP-5550 | Owners Manual - Page 91
s s s s ss s s s s s s s s s Glossary Brightness. The balance of light and dark shades in an image. Composite video. A type of video signal that encodes colours, luminance and sychronization information so it can be carried in one signal. Contrast. A measure of the luminance differences between the - Epson EMP-5550 | Owners Manual - Page 92
data over a single wire. Sleep mode. The power cable is connected but the projector is switched off. In this mode the power LED lights up orange. If the projector is not used for 30 minutes the lamp switches itself off and after 30 seconds the projector goes into sleep mode. s s s s s 70 Glossary - Epson EMP-5550 | Owners Manual - Page 93
vii B Bass 42 BIS CUIT viii Blank 43 bottom multi-purpose button 29 Brightness 40, 69 C Ceiling 43 Cleaning the Air Filter 53 Color 40 Color Temp. 43 Composite video 69 Computer cable 2 30 Frequency 48 G Glossary 69 I Installation xi L Lamp 48 Lamp Indicator 33, 34 Language 43 s s s s s s 71 - Epson EMP-5550 | Owners Manual - Page 94
Menus 35 Projector Status Indicators 33 Prompt 42 R RCA/3.5 mm cable 19 rear feet clockwise 26 Rear Proj. 43 Refresh Rate 48 Remote control ix remote control 28 Replacing the Lamp 54 Reset 40 RESET ALL Menu 48 Resize Button 27 Resize button 27 Resolution 48, 69 RGB 69 S Safety Instructions xii - Epson EMP-5550 | Owners Manual - Page 95
true XGA vii V VGA viii video source vii Volume 42 W World Wide Web xv X XGA viii Z Zoom ratio 63 zoom ring 22, 25 s s s s s s 73 - Epson EMP-5550 | Owners Manual - Page 96
s s s s s 74 Index - Epson EMP-5550 | Owners Manual - Page 97
s s s s s s 75 - Epson EMP-5550 | Owners Manual - Page 98
s s s s s 76 Index - Epson EMP-5550 | Owners Manual - Page 99
After sales service contact addresses EPSON (UK) LIMITED (01442) 261144 Campus 100 Maylands Avenue Hemel Hempstead Herts. HP2 7TJ United Kingdom EPSON FRANCE S.A. 0140873873 68 Bis Rue Marjolin 92305 Levallois Perret France EPSON DEUTSCHLAND GMBH 0211/56030 Zülpicher Straße 6, 40549 Düsseldorf F.R. - Epson EMP-5550 | Owners Manual - Page 100
-
 1
1 -
 2
2 -
 3
3 -
 4
4 -
 5
5 -
 6
6 -
 7
7 -
8
-
9
-
10
-
11
-
12
-
13
-
14
-
15
-
16
-
17
-
18
-
19
-
20
-
21
-
22
-
23
-
24
-
25
-
26
-
27
-
28
-
29
-
30
-
31
-
32
-
33
-
34
-
35
-
36
-
37
-
38
-
39
-
40
-
41
-
42
-
43
-
44
-
45
-
46
-
47
-
48
-
49
-
50
-
51
-
52
-
53
-
54
-
55
-
56
-
57
-
58
-
59
-
60
-
61
-
62
-
63
-
64
-
65
-
66
-
67
-
68
-
69
-
70
-
71
-
72
-
73
-
74
-
75
-
76
-
77
-
78
-
79
-
80
-
81
-
82
-
83
-
84
-
85
-
86
-
87
-
88
-
89
-
90
-
91
-
92
-
93
-
94
-
95
-
96
-
97
-
98
-
99
-
100
 |
 |
