Epson EMP-82e User Manual
Epson EMP-82e Manual
 |
View all Epson EMP-82e manuals
Add to My Manuals
Save this manual to your list of manuals |
Epson EMP-82e manual content summary:
- Epson EMP-82e | User Manual - Page 1
User's Guide - Epson EMP-82e | User Manual - Page 2
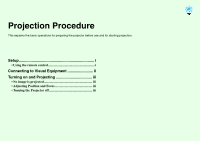
Projection Procedure This explains the basic operations for preparing the projector before use and for starting projection. Setup i • Using the remote control i Connecting to Visual Equipment ii Turning on and Projecting iii • No image is projected iii • Adjusting Position and Focus iii • - Epson EMP-82e | User Manual - Page 3
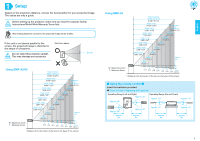
EMP-X3/82 W : Maximum Zoom T : Minimum Zoom * Distance from the center of the lens to the base of the screen. W : Maximum Zoom T : Minimum Zoom * Distance from the center of the lens to the base of the screen. ˔ Using the remote control ˔ Insert the batteries provided. User's Guide "Replacing - Epson EMP-82e | User Manual - Page 4
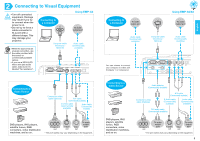
cable connector to fit a port with a different shape. This may damage your projector. • When the source has an unusual connection, use the cable provided with the equipment. Connecting to a Computer To audio output port Using EMP-82/62 To audio output port Audio cable (Commercially available) - Epson EMP-82e | User Manual - Page 5
keystone correction is not performed. (EMP-82/62 only) • You can also make keystone corrections from the configuration menu. User's Guide "Settings Menu" • Hold . ˔ Turning the Projector off ˔ Turn off all connected equipment. Press twice on the remote control or control panel. After the - Epson EMP-82e | User Manual - Page 6
numbered steps. Indicates the name of the buttons on the control panel or the remote control. Example: [Esc] button Indicates configuration menu items. Example: "Image"-"Brightness" When "unit" or "projector" appears in the text of this User's Guide, it may refer to items which are accessories or - Epson EMP-82e | User Manual - Page 7
(Pointer 21 Enlarging Part of the Image (E-Zoom 22 Using the Remote Control to Operate the Mouse Pointer (Wireless Mouse 23 Security functions 26 Preventing theft (Password Protect 26 Operation Button Lock Function 29 Configuration Menu Using the Configuration Menu 32 List of Functions - Epson EMP-82e | User Manual - Page 8
Installation 56 Setting Up the Projector 56 Maintenance 57 Cleaning 57 Replacing Consumables 58 Saving a User's Logo 64 Connecting to External Output Equipment 66 Connecting to an External Monitor 66 Connecting to an external speaker (when using the EMP-82/62 66 Optional Accessories and - Epson EMP-82e | User Manual - Page 9
detected and projected. Easy to use, big button control panel For ease of use, buttons are classified and arranged according to their projection and adjustment functions. sp.7 Setup Projection in Progress Troubleshooting When you turn the projector power on and off a "Beep" sounds A "Beep" sounds - Epson EMP-82e | User Manual - Page 10
Manage users with password protect You can set up a password to restrict the use of the projector. sp.26 Operation lock stops the use of all control panel buttons except for the Power button This can prevent your settings being changed by accident or on purpose, when using the projector at an event - Epson EMP-82e | User Manual - Page 11
retract the front foot. • Security lock ( ) sp.69 • Zoom ring sp.iii Adjusts the image size. • Focus ring sp.iii Adjusts the image focus. • Remote control light-receiving area sp.i Receives signals from the remote control. • Lens cover Attach when not using the projector to prevent the lens from - Epson EMP-82e | User Manual - Page 12
projector. • [Source Search] button sp.18 The input source is automatically searched for in the following order, and the input image from the connected equipment is projected. When using the EMP-X3 Computer port When using the EMP-82 help, which shows solutions if a problem occurs. • [ ] [ ] - Epson EMP-82e | User Manual - Page 13
and Functions 8 Rear (EMP-X3) • Computer port projector to a computer via the USBg cable when using the wireless mouse function. Computer images cannot be projected by using the USB cable to connect the computer. • Remote control light-receiving area sp.i Receives signals from the remote control - Epson EMP-82e | User Manual - Page 14
Functions 9 Rear (EMP-82/62) • Computer1 port projector from other video sources. • Audio port sp.ii This is used to input audio signals from the equipment that is connected to the S-Video or Video port. • Power inlet sp.iii Connects to the power cable. • Rear adjustable foot • Remote control - Epson EMP-82e | User Manual - Page 15
stay Remove this when suspending the projector from a ceiling. • Air filter (air intake vent) sp.57, p.63 This prevents dust and other foreign particles from getting inside the projector when air is drawn in. It should be cleaned and replaced periodically. • Suspension bracket fixing points - Epson EMP-82e | User Manual - Page 16
explains the functions shown in the illustration of the EMP-82/62 remote control. If you position the over the button icon or button name, a description of that button will appear. • [Page down] [Page up] buttons sp.24 • Remote control light-emitting area sp.i • [E-Zoom] button ( ) ( ) sp.22 - Epson EMP-82e | User Manual - Page 17
Volume 17 Changing the Projected Image (Source Search 18 • Automatically Detect Incoming Signals and Change the Projected Image (Source Search 18 • Changing Directly from the Remote Control 18 - Epson EMP-82e | User Manual - Page 18
press the [Auto] button on the remote control or the [Enter] button on the projector's control panel to make the adjustment while computer or RGB type of computer or RGB video signals being input. In such cases, use the configuration menu commands to adjust the tracking and sync settings manually - Epson EMP-82e | User Manual - Page 19
automatic setup, you will need to adjust the Sync (synchronisation)g manually using the following procedure. PROCEDURE A Select "Signal" from the the operations they perform in the guide at the bottom of the screen. Using the remote control Using the control panel The image will flash when - Epson EMP-82e | User Manual - Page 20
from the image. Using the remote control Using the control panel The sync value increases or may not be noticeable with some types of picture. However, pictures with lots images are being input) The images are vivid and brought to life. Ideal for watching TV programmes and so on in a bright - Epson EMP-82e | User Manual - Page 21
Adjusting the Image Quality 16 PROCEDURE Remote control Each time you press the button, the colour modes change in the following order. The current setting appears in the top-right corner of the - Epson EMP-82e | User Manual - Page 22
Adjusting the Volume 17 The volume of the projector's built-in speaker can be adjusted as follows. PROCEDURE Using the remote control Using the control panel When the button is pressed to the [ ] side, the volume increases, and when it is pressed to the [ ] side, the volume decreases. The - Epson EMP-82e | User Manual - Page 23
the [Source Search] button until the target image is projected. When using the EMP-X3 Changing Directly from the Remote Control You can use the remote control to change directly to the target input source. Remote Control Changes to the image from the Computer port. Changes to the image from the - Epson EMP-82e | User Manual - Page 24
(Pointer 21 • Enlarging Part of the Image (E-Zoom 22 • Using the Remote Control to Operate the Mouse Pointer (Wireless Mouse 23 Security functions 26 • Preventing theft (Password Protect 26 •When Password Protect is Enabled 26 •Setting Password Protect 27 • Operation Button Lock Function 29 - Epson EMP-82e | User Manual - Page 25
project even when the screen is frozen. You can still perform operations such as changing files, without projecting any images. PROCEDURE Remote control PROCEDURE Remote control You can turn this function on or off by pressing the [A/V Mute] button. • If you use this function when projecting moving - Epson EMP-82e | User Manual - Page 26
on the projected image, and helps you draw attention to the area you are talking about. When images in Squeeze modeg are projected at 4:3 PROCEDURE Remote control When images in squeeze mode are projected at 16:9 The display is changed whenever you press the button. You can also make this setting - Epson EMP-82e | User Manual - Page 27
Functions for Enhancing Projection B Move the pointer icon. Remote control 22 Enlarging Part of the Image (E-Zoom) This is useful when you want to see images in greater detail, " menu to change the shape of the pointer to one of three different shapes. sp.36 PROCEDURE A Start E-Zoom. Remote control - Epson EMP-82e | User Manual - Page 28
and the USB terminal on the back of this projector are connected by a commercially available USB A-B cable*, you can use the projector's remote control like a wireless mouse to control the computer's mouse pointer. *USB cable included with the EMP-82/62. Computer Windows 98/2000/Me/XP Home Edition - Epson EMP-82e | User Manual - Page 29
Functions for Enhancing Projection • The USB cable can only be connected to computers with a standard USB interface. If using a computer which is running Windows, the computer must have had a full version of Windows 98/2000/Me/XP Home Edition/XP Professional installed. If the computer is running a - Epson EMP-82e | User Manual - Page 30
Functions for Enhancing Projection 25 • If the mouse button settings are set to reverse on the computer, the operation of the remote control buttons will also be reversed. • The wireless mouse function cannot be used while the following functions are being used. · While a configuration menu is - Epson EMP-82e | User Manual - Page 31
When the power is turned on for the first time after the projector's power cable is connected to an electrical outlet, or when Direct Power On is carried out, the following password entry screen will be displayed. Remote control Keep Pressed Numeric buttons While holding down the [Num] button, press - Epson EMP-82e | User Manual - Page 32
the [Freeze] button for approximately 5 seconds. The "Password Protect" menu will be displayed. Remote control • If Password Protect has already been enabled, the "Password" screen will be displayed. If the password has been entered correctly, the "Password Protect" menu will be displayed. s"When - Epson EMP-82e | User Manual - Page 33
Security functions C Turn "Password Timer" on. If you don't use this setting, proceed to step 4. (1) Select "Password Timer", and then press the [ [Esc] button and re-enter the time. When you have finished using the "Password Protect" menu, the countdown for the elapsed time will start. D Turn "User - Epson EMP-82e | User Manual - Page 34
menu, select "Settings" "Operation Lock". For details on this operation, refer to "Using the Configuration Menu". sp.32 Check the buttons you can use and the operations they perform in the guide at the bottom of the screen. Using the remote control Using the control panel 29 B Set to "On - Epson EMP-82e | User Manual - Page 35
Security functions 30 C When the confirmation message is displayed, select "Yes". The control panel buttons will be locked in accordance with the selected setting. There are two methods to cancel the projector's control panel lock. • Using remote control, change the "Settings" "Operation Lock" in - Epson EMP-82e | User Manual - Page 36
Configuration Menu This chapter explains how to use the configuration menu and its functions. Using the Configuration Menu 32 List of Functions 33 • "Image" Menu 33 • "Signal" Menu 34 • "Settings" Menu 36 • "Extended" Menu 37 • "Info" Menu 39 • "Reset" Menu 40 - Epson EMP-82e | User Manual - Page 37
Using the Configuration Menu A Selecting from the top menu Top menu B Selecting from the sub menu C Changing the selected item 32 Buttons used Using the control panel guide Sub menu (Settings) Using the remote control Select the setting to change. - Epson EMP-82e | User Manual - Page 38
High", images appear bluish, and if you select "Low", images appear reddish. (EMP-X3 only) (This item cannot be selected if "sRGBg" has been selected as . You can adjust tints in 10 stages from 5000 K to 10000 K. (EMP-82/62 only) Red: Adjust the saturation of the red component. Green: Adjusts the - Epson EMP-82e | User Manual - Page 39
EMP-X3 Screen shot from EMP-X3 Sub-menu Auto Setup Trackingg Sync.g Position Progressive Computer Input (EMPX3 only) Computer1 Input (EMP82/62 only) Computer2 Input (EMP82 ", select the appropriate signal for the connected equipment manually. Selects the input signal in accordance with the - Epson EMP-82e | User Manual - Page 40
are recognized automatically. If interference appears in the projected images or no images appear when you select "Auto", select the appropriate signal manually. Resize Sets the aspect ratiog for projected images. sp.21 Reset Resets all adjustment values on the "Signal" menu to their default - Epson EMP-82e | User Manual - Page 41
-X3 Screen shot from EMP-82/62 Sub-menu Keystone Auto Keystone (EMP-82/62 only) Operation Lock Pointer Shape Brightness Control Volume Reset Function Corrects vertical keystone distortion in images. sp.i Sets the function for automatically detecting the projector angle and correcting keystone "On - Epson EMP-82e | User Manual - Page 42
List of Functions 37 "Extended" Menu Screen shot from EMP-X3 Screen shot from EMP-82/62 Sub-menu Display User's Logo Projection Function This lets you make settings related to the projector's display. Message: Sets whether the input source name or colour mode name or a message is displayed on - Epson EMP-82e | User Manual - Page 43
38 Sub-menu Operation Link 21L (EMP-X3 only) Standby Mode (EMP-82/62 only) COM Port (EMP-82/62 only) Language Reset Function Direct default, see "Reset All". sp.40 * EMP Monitor : Allows you to monitor multiple projectors on the network and control them all at once using functions such as turning - Epson EMP-82e | User Manual - Page 44
S-video.) Sync.g Info Information from this menu may be required when you ask for service from your dealer or from the nearest address provided in the "International Warranty Conditions" section of the Safety Instructions/World Wide Warranty Terms booklet. (Does not appear when the input source is - Epson EMP-82e | User Manual - Page 45
in all menus to their default settings. The "Computer Input", "Computer1 Input", "Computer2 Input", "User's Logo", "Lamp Hours" and "Language" settings will not be reset to their defaults. Clear the cumulative lamp operating time and reset to "0H". Perform this procedure when you replace the lamp. - Epson EMP-82e | User Manual - Page 46
Troubleshooting This chapter describes how to identify problems and what to do if a problem is found. Using the Help 42 Problems Solving 44 • Reading the Indicators 44 •Power indicator lights red 44 •Lamp or Temp indicator flashes orange 46 • When the Indicators Provide No Help 47 •Problems - Epson EMP-82e | User Manual - Page 47
Using the Help If a problem occurs with the projector, the Help function uses on-screen displays to assist you in solving the problem. It uses a series of menus in a question and answer format. PROCEDURE A Display the Help menu. Using the remote control Using the control panel B Select a menu - Epson EMP-82e | User Manual - Page 48
Using the Help 43 D Repeat the operations in steps 2 and 3 to proceed through the menu to more detailed items. E Press the [Help] button to exit the help menu. If the Help function does not provide a solution to the problem, refer to "Problem Solving" sp.44 - Epson EMP-82e | User Manual - Page 49
the projection lamp status. Indicates the internal temperature status. The following tables show what the indicators mean and how to remedy problems that they Conditions" section of the Safety Instructions/World-Wide Warranty Terms booklet. Stop using the projector, disconnect the power cable from - Epson EMP-82e | User Manual - Page 50
" section of the Safety Instructions/World-Wide Warranty Terms booklet. (You cannot continue projecting until the lamp is replaced). Check that the lamp cover and the lamp are securely installed. sp.59 If the lamp cover or the lamp is not securely installed, the lamp does not switch on. When - Epson EMP-82e | User Manual - Page 51
air filters are clogged, clean or replace them. sp.57, p.63 Power Orange Lamp replacement notification Replace the lamp with a new one. sp.59 If you continue to use the lamp after it has passed the replacement period, the possibility that the lamp may break will increase. Replace the lamp with - Epson EMP-82e | User Manual - Page 52
necessarily match, but this is not a sign of a problem.) Images appear dark sp.52 Nothing appears on the external monitor sp.53 Problems when projection starts Power does not turn on sp.53 Other problems No sound can be heard or the sound is faint sp.53 The remote control does not work sp.54 - Epson EMP-82e | User Manual - Page 53
48 Problems the projector's power cable correctly. sp.iii Check that your power supply socket is working. Press the [A/V Mute] button on the remote control to the "Sleep Mode" menu command has been set to "On", the lamp turns off automatically if no operations are carried out for about 30 minutes - Epson EMP-82e | User Manual - Page 54
of the cables required for projection are securely connected. sp.iii Has the correct video input port been selected? Press the [Computer], [S-Video] or [Video] button on the remote control or the [Source Search] button on the remote control or the projector's control panel to change the image. sp - Epson EMP-82e | User Manual - Page 55
images "List of Supported Monitor Displays" sp.72 sComputer documentation Have the "Sync.g" and "Trackingg" settings been adjusted correctly? Computer and RGB video signals only Press the [Auto] button on the remote control or the [Enter] button on the projector's control panel to carry out - Epson EMP-82e | User Manual - Page 56
, press the [Auto] button on the remote control or the [Enter] button on the projector's control panel to carry out automatic adjustment. If the images have not been correctly adjusted after using the automatic setup function, adjust the setting manually using the "Position" menu command. If - Epson EMP-82e | User Manual - Page 57
Problems to the projector, use for projection are securely connected. sp.ii Control" sp.36 Has the image contrastg been adjusted Use the "Contrast" menu command to adjust the contrast. "Image" - "Contrast" sp.33 correctly? Is the lamp due for replacement? When the lamp is nearly due for replacement - Epson EMP-82e | User Manual - Page 58
projector, disconnect the power cable from the wall outlet and contact the nearest address provided in the "International Warranty Conditions" section of the Safety Instructions/World-Wide Warranty Terms booklet. Other problems ] button on the remote control to cancel the A/V mute function. sp.20 - Epson EMP-82e | User Manual - Page 59
approximately 6m. sp.i Is direct sunlight or strong light from fluorescent lamps shining onto the remote control light-receiving area? Set the projector up in a location where strong light will not shine onto the remote control light-receiving area. Are the batteries dead, or have the batteries - Epson EMP-82e | User Manual - Page 60
•Lamp Replacement Period 59 •Replacing the Lamp 59 •Resetting the Lamp Operating Time 62 •Replacing the Air Filter 63 Saving a User's Logo 64 Connecting to External Output Equipment ...... 66 • Connecting to an External Monitor 66 • Connecting to an external speaker (when using the EMP-82/62 - Epson EMP-82e | User Manual - Page 61
Installation Setting Up the Projector The projector supports the following four different projection methods, allowing you to install correctly may result in injury or damage if the projector falls. • Do not set this projector up on its side to carry out projection,otherwise malfunctions may occur - Epson EMP-82e | User Manual - Page 62
and Air Intake Vent If dust collects on the air filter or the air outlet, it can cause the internal temperature of the projector to rise, and this can lead to problems with operation and shortening of the optical engine's service life. It is recommended that you clean these parts at least once - Epson EMP-82e | User Manual - Page 63
Consumables This section explains how to replace the remote control batteries, the lamp, and the air filters. Replacing the batteries If delays in the responsiveness of the remote control occur or if it does not operate after it has been used for some time, it probably means that the batteries - Epson EMP-82e | User Manual - Page 64
ready in case it is needed. • Contact your dealer for a spare lamp. Replacing the Lamp • If you are replacing the lamp because it has stopped working, it is possible that the lamp is broken. If replacing the lamp of a projector which has been installed on a ceiling, you should always assume that the - Epson EMP-82e | User Manual - Page 65
own cross head screwdriver). D Take out the lamp. Hold the lamp as shown in the illustration below and lift it up and out of the projector. If the lamp is broken replace it with a new lamp, or contact your local dealer for further advice. If replacing the lamp yourself, be careful to avoid pieces of - Epson EMP-82e | User Manual - Page 66
the two screws. F Install the lamp cover. Slide the lamp cover and tighten the cover fixing screws. • Install the lamp securely. If the lamp cover is removed, the lamp turns off automatically as a safety precaution. Moreover, the lamp will not turn on if the lamp or the lamp cover is not installed - Epson EMP-82e | User Manual - Page 67
the buttons you can use, and the operations they perform, in the guide at the bottom of the screen. Using the remote control Using the control panel PROCEDURE A Connect the power cable and turn on the projector. C When "Execute?" appears, select "Yes". The lamp operating time will then be reset. - Epson EMP-82e | User Manual - Page 68
if the warning message reappears after they have been cleaned, they should be replaced. The air filter can be replaced even if the projector is installed on a ceiling. PROCEDURE A After you turn off the projector's power, and the confirmation buzzer beeps twice, disconnect the power cable. B Remove - Epson EMP-82e | User Manual - Page 69
"Using the Configuration Menu". sp.32 Check which buttons on the remote control or the control panel you can use, and the operations they perform, in the guide at the bottom of the screen. • If the "User's Logo Protect" function of "Password Protect" is set to "On", a message is displayed and the - Epson EMP-82e | User Manual - Page 70
's Logo C When "Choose this image as the User's Logo?" appears, select "Yes". When you press the [Enter] button on either the remote control or the projector's control panel, the image signal will be displayed at their original resolution, so if a signal with a resolution that is different from the - Epson EMP-82e | User Manual - Page 71
monitor using the cable that is provided with the monitor. Connecting to an external speaker (when using the EMP-82/62) You can connect speakers with built-in amplifiers to the projector's Audio Out port in order to enjoy a fuller quality of sound. Use a commercially-available audio cable with pin - Epson EMP-82e | User Manual - Page 72
* A special method of installation is required in order to suspend the projector from a ceiling. Please contact your dealer if you would like to use this installation method. Spare lamp ELPLP34 Use as a replacement for used lamps. Filter kit ELPAF08 (2 air filters) Use as a replacement for used air - Epson EMP-82e | User Manual - Page 73
the terms used in this guide which may be unfamiliar or which are not explained in the text of this guide itself. Further information can be which have the video brightness signals and colour signals mixed together. The type of signals commonly used by household video equipment (NTSC, PAL and SECAM - Epson EMP-82e | User Manual - Page 74
69 Security lock Squeeze mode sRGB SVGA S-Video SXGA Sync (synchronisation) Tracking USB VGA XGA A device consisting of a projector case with a hole in it that a commercially-available theft-prevention cable can be passed through in order to secure the device to a table or pillar. This projector - Epson EMP-82e | User Manual - Page 75
for the next command to be sent. If command processing terminates with an error, the projector outputs an error message and then returns the ":" code. Item Command ON Power ON/OFF end. Cable Layouts USB connection Connector shape: USB (type B) (type B) 70 - Epson EMP-82e | User Manual - Page 76
.epson-europe.com/downloads/en/ B Install the downloaded USB driver onto your computer. Read the instructions displayed on the download screen. C Set "Link21L" to "On" in the "Extended" menu. Select "USB" for "COM port" in the "Extended" menu. D Turn the projector - Epson EMP-82e | User Manual - Page 77
List of Supported Monitor Displays 72 Computer/RGB Video Signal VGAg VGAEGA VESA Refresh rateg (Hz) 60 60/72/75/85,iMac* Resolution (dots) 640×480 640×350 640×480 Resolutions for resize display (dots) EMPX3/82 EMP-62 1024×768 800×600 1024×560 800×438 1024×768 800×600 SVGAg XGAg SXGAg - Epson EMP-82e | User Manual - Page 78
EMP-82 EMP-62 327 (W) × 86 (H) × 246 (D) mm (not including feet and speaker) 0.6 inches Polysilicon TFT active matrix XGAg 786,432 pixels (1024 (W) × 768 (H) dots) × 3 SVGAg 480,000 pixels (800 (W) × 600 (H) dots) × 3 Manual Manual (approx. 1:1.2) UHE lamp used in this Projector. Angle of - Epson EMP-82e | User Manual - Page 79
Specifications 74 Safety USA UL60950 3rd Edition Canada CSA C22.2 No.60950 European Community The Low Voltage Directive (73/23/EEC) IEC60950 3rd Edition EMC USA FCC Part 15B Class B (DoC) Canada ICES-003 Class B European Community The EMC Directive (89/336/EEC) EN55022 Class B EN55024 IEC/EN61000 - Epson EMP-82e | User Manual - Page 80
that may cause undesired operation. Trade Name :EPSON Type of Product :Projector Model :EMP-82/62/X3 FCC Compliance Statement For United States energy and, if not installed and used in accordance with the instructions, may cause harmful interference to radio or television reception. However, - Epson EMP-82e | User Manual - Page 81
Appearance EMP-X3 86 12 Centre of lens 80 50.1* 12 83.7 7.7 327 104.7 *Distance from center of lens to suspension bracket fixing point 69.7 3-M4×9 127 76 246 115 Units: mm - Epson EMP-82e | User Manual - Page 82
Appearance EMP-82/62 86 12 Centre of lens 80 50.1* 12 83.7 7.7 327 104.7 *Distance from center of lens to suspension bracket fixing point 69.7 3-M4×9 127 77 246 115 Units: mm - Epson EMP-82e | User Manual - Page 83
9 Audio port 8, 9 Auto Keystone 36 Auto Setup 13, 34 A/V Mute 20 B Blackboard 15 Brightness 33 Brightness Control 36 C Cleaning the Air Filter 57 Cleaning the Lens 57 Cleaning the Projector Surface .... 57 Color Adjustment 33 Color Mode 15, 33 Color Saturation 33 Color Temp 33 COM Port - Epson EMP-82e | User Manual - Page 84
11 Remote control light-receiving area 6, 8, 9 Replacing the Air Filter 63 Replacing the batteries 58 Replacing the Lamp 59 Request Code 26 Reset All 40 Reset Lamp Hours 40, 62 "Reset" Menu 40 Resized display 72 Resolution 39, 72 RS-232C port 9 S Search 11 Security lock 6 "Settings - Epson EMP-82e | User Manual - Page 85
alterations to this product, or (excluding the U.S.) failure to strictly comply with SEIKO EPSON CORPORATION's operating and maintenance instructions. SEIKO EPSON CORPORATION shall not be liable against any damages or problems arising from the use of any options or any consumable products other than
-
 1
1 -
 2
2 -
 3
3 -
 4
4 -
 5
5 -
 6
6 -
 7
7 -
8
-
9
-
10
-
11
-
12
-
13
-
14
-
15
-
16
-
17
-
18
-
19
-
20
-
21
-
22
-
23
-
24
-
25
-
26
-
27
-
28
-
29
-
30
-
31
-
32
-
33
-
34
-
35
-
36
-
37
-
38
-
39
-
40
-
41
-
42
-
43
-
44
-
45
-
46
-
47
-
48
-
49
-
50
-
51
-
52
-
53
-
54
-
55
-
56
-
57
-
58
-
59
-
60
-
61
-
62
-
63
-
64
-
65
-
66
-
67
-
68
-
69
-
70
-
71
-
72
-
73
-
74
-
75
-
76
-
77
-
78
-
79
-
80
-
81
-
82
-
83
-
84
-
85
 |
 |
User’s Guide