Epson ET-16650 Users Guide - Page 282
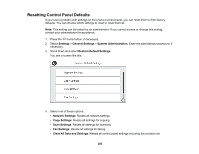
Paper Setup Auto Display, EpsonNet Print Port
 |
View all Epson ET-16650 manuals
Add to My Manuals
Save this manual to your list of manuals |
Page 282 highlights
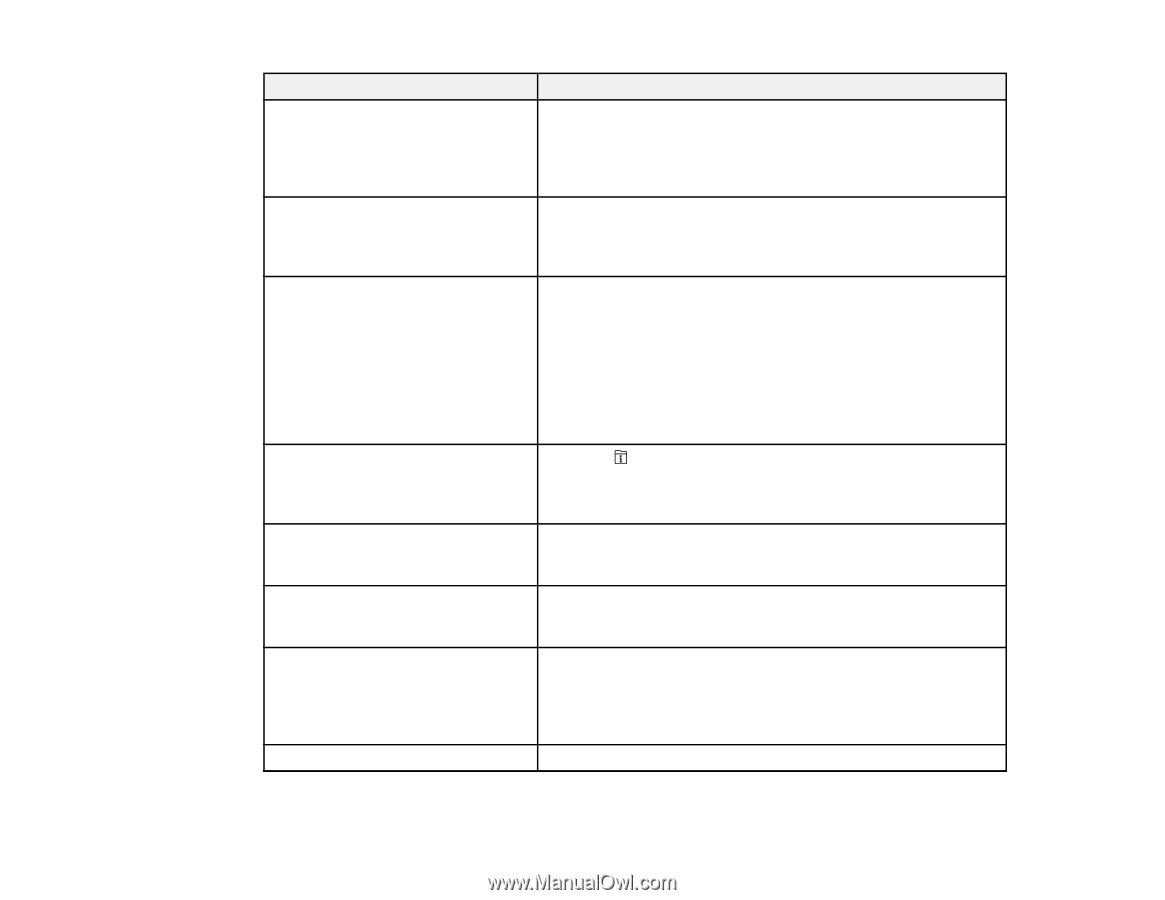
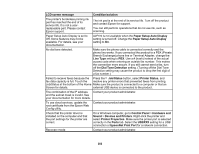
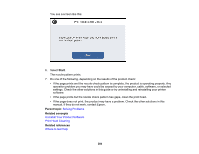
LCD screen message Condition/solution The printer's borderless printing ink pad has reached the end of its service life. It is not a userreplaceable part. Please contact Epson support. The ink pad is at the end of its service life. Turn off the product and contact Epson for support. You can still perform operations that do not use ink, such as scanning. Paper Setup Auto Display is set to Off. Some features may not be available. For details, see your documentation. AirPrint is not available when the Paper Setup Auto Display setting is turned off. Change the Paper Setup Auto Display setting to On. No dial tone detected. Make sure the phone cable is connected correctly and the phone line works. If you connected the product to a PBX (Private Branch Exchange) phone line or Terminal Adapter, change the Line Type setting to PBX. Use a # (hash) instead of the actual access code when entering an outside fax number. This makes the connection more secure. If you still cannot send a fax, turn off the Dial Tone Detection setting. (Turning off the Dial Tone Detection setting may cause the product to drop the first digit of a fax number.) Failed to receive faxes because the Press the Job/Status button, select Printer Status, and fax data capacity is full. Touch the resolve any printer errors that prevented faxes from printing. Job/Status at the bottom of the Home Make sure the product is connected to a computer or that an Screen for details. external USB device is connected to the product. The combination of the IP address Contact your product administrator. and the subnet mask is invalid. See your documentation for more details. To use cloud services, update the root certificate from the Epson Web Config utility. Contact your product administrator. Check that the printer driver is installed on the computer and that the port settings for the printer are correct. On a Windows computer, go to Control Panel > Hardware and Sound > Devices and Printers. Right-click the printer and select Printer Properties. Make sure the printer port is selected correctly in the Ports tab. Select the USBXXX setting for a USB connection or EpsonNet Print Port for a network connection. Recovery mode Contact your product administrator. 282
-
 1
1 -
2
-
3
-
4
-
5
-
6
-
7
-
8
-
9
-
10
-
11
-
12
-
13
-
14
-
15
-
16
-
17
-
18
-
19
-
20
-
21
-
22
-
23
-
24
-
25
-
26
-
27
-
28
-
29
-
30
-
31
-
32
-
33
-
34
-
35
-
36
-
37
-
38
-
39
-
40
-
41
-
42
-
43
-
44
-
45
-
46
-
47
-
48
-
49
-
50
-
51
-
52
-
53
-
54
-
55
-
56
-
57
-
58
-
59
-
60
-
61
-
62
-
63
-
64
-
65
-
66
-
67
-
68
-
69
-
70
-
71
-
72
-
73
-
74
-
75
-
76
-
77
-
78
-
79
-
80
-
81
-
82
-
83
-
84
-
85
-
86
-
87
-
88
-
89
-
90
-
91
-
92
-
93
-
94
-
95
-
96
-
97
-
98
-
99
-
100
-
101
-
102
-
103
-
104
-
105
-
106
-
107
-
108
-
109
-
110
-
111
-
112
-
113
-
114
-
115
-
116
-
117
-
118
-
119
-
120
-
121
-
122
-
123
-
124
-
125
-
126
-
127
-
128
-
129
-
130
-
131
-
132
-
133
-
134
-
135
-
136
-
137
-
138
-
139
-
140
-
141
-
142
-
143
-
144
-
145
-
146
-
147
-
148
-
149
-
150
-
151
-
152
-
153
-
154
-
155
-
156
-
157
-
158
-
159
-
160
-
161
-
162
-
163
-
164
-
165
-
166
-
167
-
168
-
169
-
170
-
171
-
172
-
173
-
174
-
175
-
176
-
177
-
178
-
179
-
180
-
181
-
182
-
183
-
184
-
185
-
186
-
187
-
188
-
189
-
190
-
191
-
192
-
193
-
194
-
195
-
196
-
197
-
198
-
199
-
200
-
201
-
202
-
203
-
204
-
205
-
206
-
207
-
208
-
209
-
210
-
211
-
212
-
213
-
214
-
215
-
216
-
217
-
218
-
219
-
220
-
221
-
222
-
223
-
224
-
225
-
226
-
227
-
228
-
229
-
230
-
231
-
232
-
233
-
234
-
235
-
236
-
237
-
238
-
239
-
240
-
241
-
242
-
243
-
244
-
245
-
246
-
247
-
248
-
249
-
250
-
251
-
252
-
253
-
254
-
255
-
256
-
257
-
258
-
259
-
260
-
261
-
262
-
263
-
264
-
265
-
266
-
267
-
268
-
269
-
270
-
271
-
272
-
273
-
274
-
275
-
276
-
 277
277 -
 278
278 -
 279
279 -
 280
280 -
 281
281 -
 282
282 -
 283
283 -
 284
284 -
 285
285 -
 286
286 -
 287
287 -
288
-
289
-
290
-
291
-
292
-
293
-
294
-
295
-
296
-
297
-
298
-
299
-
300
-
301
-
302
-
303
-
304
-
305
-
306
-
307
-
308
-
309
-
310
-
311
-
312
-
313
-
314
-
315
-
316
-
317
-
318
-
319
-
320
-
321
-
322
-
323
-
324
-
325
-
326
-
327
-
328
-
329
-
330
-
331
-
332
-
333
-
334
-
335
-
336
-
337
-
338
-
339
-
340
-
341
-
342
-
343
-
344
-
345
-
346
-
347
-
348
-
349
-
350
-
351
-
352
 |
 |