Epson Ensemble HD 6100 Installation Guide - Page 17
Making Optional Connections - receiver
 |
View all Epson Ensemble HD 6100 manuals
Add to My Manuals
Save this manual to your list of manuals |
Page 17 highlights
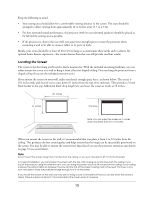
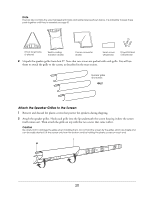
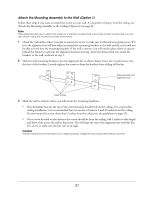
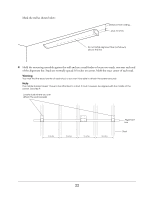
There are two locations where you can use the tracks, as shown. The track going from the AV equipment to the screen can approach the screen from either the left or right side, depending on where the AV equipment is located. (The left side is preferred so that excess cable can be stored inside the right side of the screen.) The track going from the screen to the projector looks best when aligned with the middle of the screen, as shown. If you want, you can route the video cable, speaker cable, and control cable through your wall and ceiling instead of using the tracks. These cables are plenum-rated (fire retardant), so they can be routed through a wall, an attic, or the space above your ceiling. If you choose this option, plug the AC power cables for the screen and projector directly into nearby electrical outlets. If no outlets are available, contact a licensed electrician to have them installed. Warning Do not route the included power cables through the wall or ceiling. They are not rated for this purpose. Deliberate misinstallation could result in fire or other safety hazards. It is recommended that the Ensemble HD system be powered by a dedicated 20-amp circuit. Typical power consumption is about 800 watts. Making Optional Connections Once the Ensemble HD system is installed and adjusted, you can connect additional components such as a cable box, satellite receiver, or DVR. See "Using Additional Components" on page 63. 17
-
 1
1 -
2
-
3
-
4
-
5
-
6
-
7
-
8
-
9
-
10
-
11
-
 12
12 -
 13
13 -
 14
14 -
 15
15 -
 16
16 -
 17
17 -
 18
18 -
 19
19 -
 20
20 -
 21
21 -
 22
22 -
23
-
24
-
25
-
26
-
27
-
28
-
29
-
30
-
31
-
32
-
33
-
34
-
35
-
36
-
37
-
38
-
39
-
40
-
41
-
42
-
43
-
44
-
45
-
46
-
47
-
48
-
49
-
50
-
51
-
52
-
53
-
54
-
55
-
56
-
57
-
58
-
59
-
60
-
61
-
62
-
63
-
64
-
65
-
66
-
67
-
68
-
69
-
70
-
71
 |
 |