Epson LabelWorks LW-700 Quick Start and Warranty - Page 28
Ornaments with ribbon hangers, Tape feed
 |
View all Epson LabelWorks LW-700 manuals
Add to My Manuals
Save this manual to your list of manuals |
Page 28 highlights
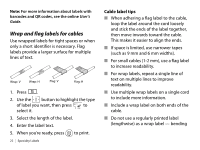
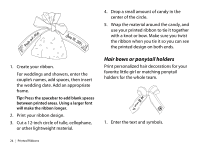
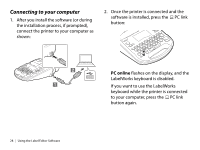
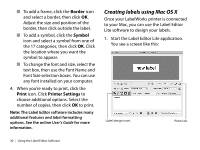
If you need a longer ribbon, add spaces or repeat the text and symbols. Tip: If you turn off the Auto Cut setting, you can use the Print copies feature to create a repeated design (by pressing ). For more information, see the online User's Guide. 2. Print your ribbon. 3. Tie the ribbon around an elastic ponytail holder. Or, tie a bow and glue it to a plastic hair clip. Make sure you twist the ribbon when tying it so you can see the printed design on both ends. Ornaments with ribbon hangers Printed ribbon makes a perfect Christmas ornament hanger. 1. To add length to one end of the ribbon (unprinted), press + , then select Tape feed. Repeat this process to add more length to the end of the ribbon. 2. Create your ribbon design with vertical text and symbols. Tip: Press and select Vertical. 3. Make sure you add enough spaces at the end of the ribbon so that you can loop it through the ornament hook. 4. Print your ribbon. 5. Thread the ribbon through the ornament hook and tie the ends together as shown. 6. Hang your ornament on the tree. Printed Ribbons | 25
-
 1
1 -
2
-
3
-
4
-
5
-
6
-
7
-
8
-
9
-
10
-
11
-
12
-
13
-
14
-
15
-
16
-
17
-
18
-
19
-
20
-
21
-
22
-
 23
23 -
 24
24 -
 25
25 -
 26
26 -
 27
27 -
 28
28 -
 29
29 -
 30
30 -
 31
31 -
 32
32 -
 33
33 -
34
-
35
-
36
-
37
-
38
-
39
-
40
-
41
-
42
-
43
-
44
-
45
-
46
-
47
-
48
-
49
-
50
-
51
-
52
-
53
-
54
-
55
-
56
-
57
-
58
-
59
-
60
-
61
-
62
-
63
-
64
-
65
-
66
-
67
-
68
-
69
-
70
-
71
-
72
-
73
-
74
-
75
-
76
-
77
-
78
-
79
-
80
-
81
-
82
-
83
-
84
-
85
-
86
-
87
-
88
 |
 |
