Epson PhotoPC L-410 Product Information Guide - Page 6
Printing the Photo Displayed on the Screen, Printing All Your Saved Photos, Printing Selected Photos
 |
View all Epson PhotoPC L-410 manuals
Add to My Manuals
Save this manual to your list of manuals |
Page 6 highlights
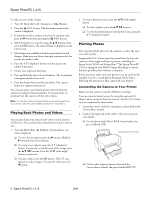
Epson PhotoPC L-410 3. Open the connector cover on the side of the camera and plug the small end of the cable into the camera's USB port as shown. Connection for the Epson Stylus Photo R200 Connection for other supported Epson printers 4. Turn on the camera. Printing the Photo Displayed on the Screen 1. Connect the camera to the printer as described in the "Printing Your Photos" section of Camera Basics and turn on the camera. 2. Turn the Mode dial to Playback and use the l r buttons to display the photo you want to print. 3. Press the button. The Print menu is displayed. 4. Press the OK button to select Print This Image. 5. If you want to print just one copy, go to step 7. 6. If you want to print more than one copy, press the OK button and use the u button to select the number of copies you want. Then press OK. 7. Press the d button to select Print Settings, then press OK. 8. Press the r button to select Paper Type, then press the d button to select 4 × 6in.Prem.Glossy and press OK. 9. If you want to print a photo with borders, turn off the date stamp, or change other settings, see the next column. 10. Press the button to start printing. When printing is complete, press the OK button. Note: If you need to cancel printing, press the MENU button. Printing All Your Saved Photos You can print all photos stored in the camera or on the memory card. 1. Connect the camera to the printer as described in the "Printing Your Photos" section of Camera Basics and turn on the camera. 2. Turn the Mode dial to Playback, then press the button. 3. Select Print All Images by using the u d buttons, then press the OK button. 4. If you want to print more than one copy of each picture, press the OK button and use the u button to select the number of copies you want. Then press OK. 5. Make sure the paper type is set to 4 × 6in. Prem. Glossy. If you want to turn off the date stamp or change other settings, consult the next section. 6. Press the button to start printing. When printing is complete, press the OK button. Printing Selected Photos You can select individual photos to print. 1. Connect the camera to the printer as described in Camera Basics and turn on the camera. 2. Turn the Mode dial to Playback, then press the button. 3. Choose Select Images by using the u d buttons, then press the OK button. 4. Select the photos to print by using the l r buttons, then select the number of copies by using the u d buttons. 5. Press the button. 6. Make sure the paper type is set to 4 × 6in. Prem. Glossy. To change settings, consult the next section. 7. Press the button to start printing. When printing is complete, press the OK button. Making Print Settings You can make the following settings when printing images directly from the camera: ❏ Printing with or without borders (borderless) ❏ Printing the date (not available with frames) ❏ Printing with normal or high quality Note: You can also set the paper type to choose 4 × 6 inch or 10 ×15 cm paper. Make sure you change this setting to 4 × 6in. Once you change it, the camera will retain this setting. The paper size 10 × 15 cm is not available in the U.S. 1. On the preview screen, select Print Settings by using the u d buttons, and then press the OK button. 2. Select the item to set by using the u d buttons, then press the OK button. 3. Select the setting by using the u d buttons, then press the OK button. 8/04 Epson PhotoPC L-410 - 6
-
 1
1 -
 2
2 -
 3
3 -
 4
4 -
 5
5 -
 6
6 -
 7
7
 |
 |
