Epson PowerLite 71c Product Information Guide - Page 9
Shutting Down the Projector, Using the Remote Control, Installing the Remote Control Batteries - replacement lamp
 |
View all Epson PowerLite 71c manuals
Add to My Manuals
Save this manual to your list of manuals |
Page 9 highlights
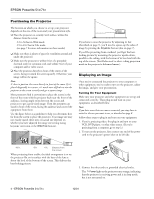
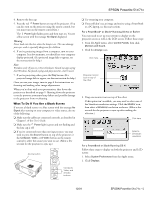
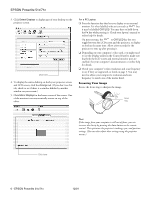
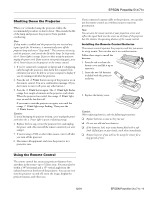
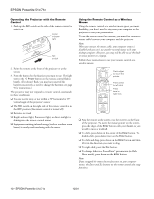
EPSON Powerlite 51c/71c Shutting Down the Projector When you've finished using the projector, follow the recommended procedure to shut it down. This extends the life of the lamp and protects the projector from possible overheating. Note: If sleep mode is enabled and the projector has not received any input signals for 30 minutes, it automatically turns off the projector lamp and enters "sleep mode." This conserves electricity, cools the projector, and extends the life of the lamp. In sleep mode, the Power light is orange. If you are done using the projector, unplug the power cord. If you want to start projecting again, press the Power button on the projector or the remote control. 1. If you've connected a computer or laptop and it's displaying only through the projector, shut down the computer first; otherwise you won't be able to see your computer's display if you try turning it off after the projector. 2. Press the red Power button on top of the projector or on the remote control. You see a confirmation message. (If you don't want to turn it off, press any other button.) 3. Press the Power button again. The Power light flashes orange for a couple of minutes as the projector cools down. When the projector has cooled, the orange Power light stays on and the fan shuts off. If you want to turn the projector on again, wait until the orange Power light stops flashing. Then press the Power button. Caution: To avoid damaging the projector or lamp, never unplug the power cord when the Power light is green or flashing orange. 4. Replace the lens cap, retract the projector feet, and unplug the power cord. Also turn off the remote control, if you were using it. 5. If you're using a VCR or other video source, turn it off after you turn off the projector. 6. Disconnect all equipment, and store the projector in a protective case. If you connected a mouse cable to the projector, you can also use the remote control as a wireless mouse to run your presentation. Note: You can aim the remote control at your projection screen and reflect the signal back into the sensor on the front of the projector, but this shortens the operating distance of the remote control. Installing the Remote Control Batteries The remote control operates the projector and lets you access its setup menus. You can also use it as a wireless mouse. Follow these steps to install the batteries: 1. Press the tab to release the battery cover and lift it up to remove it. 2. Insert the two AA batteries included with the projector as shown. 3. Replace the battery cover. Caution: When replacing batteries, take the following precautions: ❑ Replace batteries as soon as they run out. ❑ Do not mix old and new batteries. ❑ If the batteries leak, wipe away battery fluid with a soft cloth. If fluid gets on your hands, wash them immediately. ❑ Remove batteries if you will not be using the remote for a long period of time. Using the Remote Control The remote control lets you access projector features from anywhere in the room-up to 32 feet away. You must also be within a 30° horizontal and a 15° vertical angle from the infrared receiver at the front of the projector. You can use it to turn the projector on and off, zoom the image, display the projector menus, and other uses. 12/01 EPSON Powerlite 51c/71c - 9
-
 1
1 -
2
-
3
-
 4
4 -
 5
5 -
 6
6 -
 7
7 -
 8
8 -
 9
9 -
 10
10 -
 11
11 -
 12
12 -
 13
13
 |
 |