Epson PowerLite 76c Product Information Guide - Page 13
Resetting the Lamp Timer, Epson PowerLite 76c Projector - projector lamp
 |
View all Epson PowerLite 76c manuals
Add to My Manuals
Save this manual to your list of manuals |
Page 13 highlights
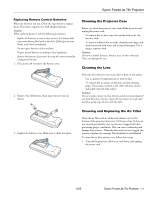
Epson PowerLite 76c Projector 5. Hold the lamp as shown and pull it straight out. Note: The lamp(s) in this product contain mercury. Please consult your state and local regulations regarding disposal or recycling. Do not put in the trash. 6. Gently insert the new lamp. If it doesn't fit easily, make sure it's facing the correct way. Caution: Do not touch the glass portion of the lamp assembly. Touching the glass could result in premature lamp failure. 7. Once the lamp is fully inserted, tighten its screws. Resetting the Lamp Timer You must reset the lamp timer after replacing the lamp to clear the Replace the Lamp warning message. Follow these steps: Note: Do not reset the lamp timer if you have not replaced the lamp. If you do, the Lamp Hours will not accurately reflect the number of hours that the lamp has been used. 1. Connect the power cable and turn on the projector. 2. Press the Menu button on the remote control or projector and select the Reset menu. Then press Enter. You see the following: 3. Select the Lamp-Hours Reset option and press Enter. You see the following: Note: Be sure to seat the lamp fully and secure the lamp cover. If the lamp is not properly installed or the cover is loose, the lamp will not turn on. 8. Lower the lamp cover into place. (The opening should be almost covered, and the top of the cover should be flush with the top of the projector.) Then slide the cover closed and tighten the screw. 4. Select Yes and press Enter. 5. Press Esc to return to the main menu or the Menu button to exit the menu system. 9. Reset the lamp timer as described in the next section. 9/05 Epson PowerLite 76c Projector - 13
-
 1
1 -
2
-
3
-
4
-
5
-
6
-
7
-
 8
8 -
 9
9 -
 10
10 -
 11
11 -
 12
12 -
 13
13 -
 14
14
 |
 |
