Epson PowerLite 76c Product Information Guide - Page 8
Adjusting the Brightness, Selecting the Color Mode, Adjusting the Volume, Selecting the Aspect Ratio - lamp
 |
View all Epson PowerLite 76c manuals
Add to My Manuals
Save this manual to your list of manuals |
Page 8 highlights
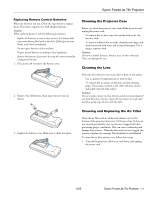
Epson PowerLite 76c Projector Adjusting the Brightness The brightness of an image depends on the source you are projecting and the amount of light in the room. If the image is too bright or not bright enough, here are two ways you can adjust it: ❏ Change the Brightness setting in the Image menu. ❏ Select Low or High for the Brightness Control option in the Settings menu. Low brightness mode extends the life of the lamp and decreases the fan noise. Adjusting the Volume You can use the buttons on the remote control or projector to increase or decrease the volume for both the projector's built-in speaker and external speakers connected to the projector. Press the button to increase the volume, or the button to decrease it. A volume gauge appears on the screen while the volume is being adjusted. Volume controls Selecting the Color Mode You may want to adjust the color mode to select a different setting that is appropriate for the image you're projecting and the environment in which you're projecting it. Color mode button If you're projecting computer or RGB video images, the default color mode is Presentation, which is appropriate for presentations in bright rooms. The following table lists the color modes available. Color mode Photo Sports Presentation Theatre Game sRGB Blackboard Description Best for projecting still images with vivid color in a bright room (computer input only). Best for watching TV in a bright room (component, S-video, or composite video input only). Use when you're projecting a presentation in a bright room. Use when projecting movies in a dark room. Best for playing video games in a bright room. Use when projecting computer images conforming to the sRGB color standard. Choose this fixed color mode when you need to project against a green blackboard. To change the color mode, press the Color Mode button on the remote control until you see the mode you want. The currently selected setting appears in the upper right corner of the screen. You can also use the projector menu system to change the color mode in the Image menu. Note: You can also adjust the volume using the projector's Settings menu. Selecting the Aspect Ratio The aspect ratio is the ratio between an image's width and its height. Standard images have an aspect ratio of 4:3 and HDTV images usually have an aspect ratio of 16:9. If your video source is 16:9, you can change the aspect ratio to view the video in 16:9 wide-screen format. Note: You must be projecting component, composite, or S-Video images to change the aspect ratio. You can also change the aspect ratio using the projector's Signal menu. See the User's Guide for details. Press the Resize button on the remote control to change the aspect ratio. Resize button 8 - Epson PowerLite 76c Projector 9/05
-
 1
1 -
2
-
 3
3 -
 4
4 -
 5
5 -
 6
6 -
 7
7 -
 8
8 -
 9
9 -
 10
10 -
 11
11 -
 12
12 -
 13
13 -
14
 |
 |
