Epson PowerLite Home 10 Product Information Guide - Page 3
Positioning the Projector, Image Size and Projection Distance, EPSON PowerLite Home 10 Projector - 3 - ceiling mount
 |
View all Epson PowerLite Home 10 manuals
Add to My Manuals
Save this manual to your list of manuals |
Page 3 highlights
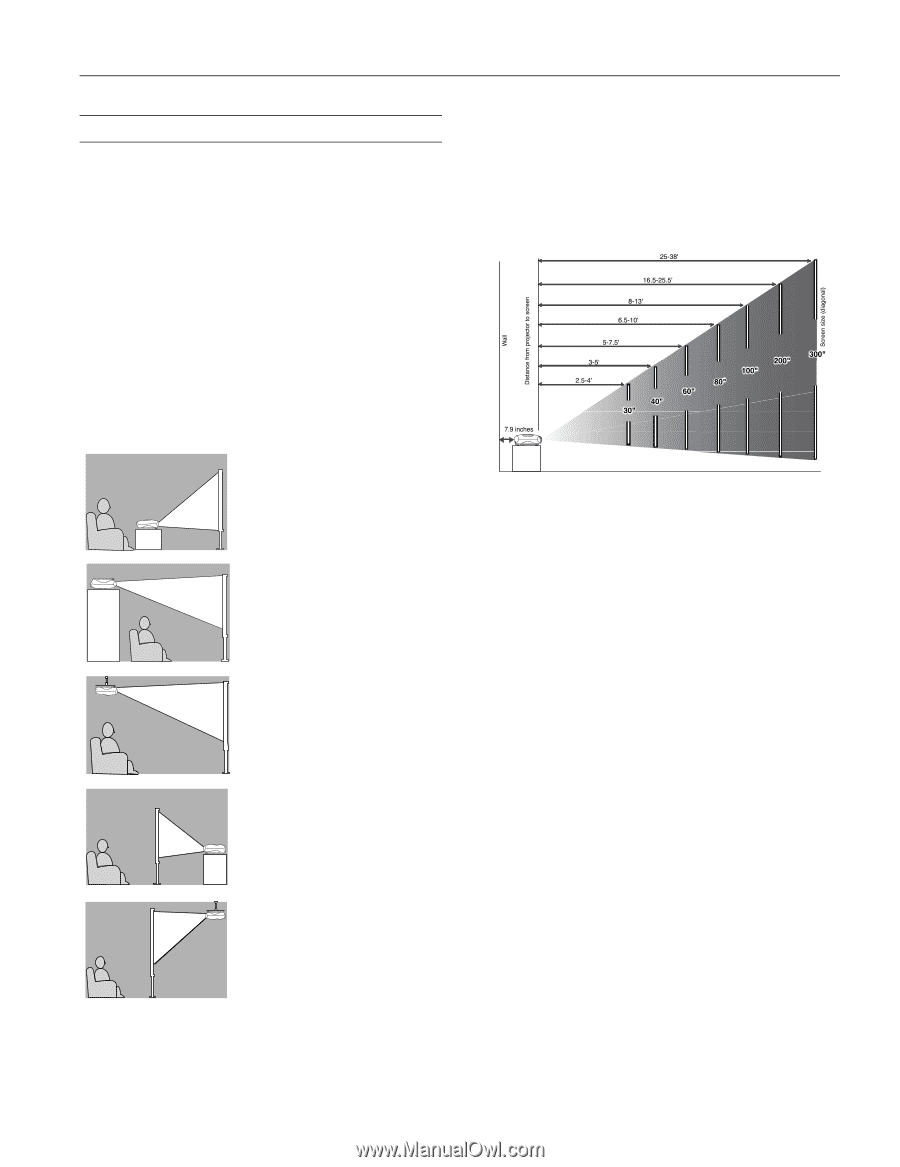
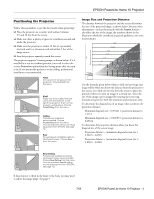
EPSON PowerLite Home 10 Projector Positioning the Projector Follow these guidelines to get the best results when projecting: ❏ Place the projector on a sturdy, level surface, between 2.5 and 38 feet from the screen. ❏ Make sure there is plenty of space for ventilation around and under the projector. ❏ Make sure the projector is within 10 feet of a grounded electrical outlet or extension cord and within 5 feet of the image source. ❏ Face the projector squarely toward the screen. The projector supports 5 viewing setups, as shown below. If it is installed in a rear or overhead position, you need to select the correct Projection option from the Setting menu after you turn it on. If you mount the projector on the ceiling, professional installation is recommended. Table Convenient for temporary front projection. Choose Front from the menu. Shelf Attach the three rubber feet that came with the projector to the top of the projector, then turn the projector upside-down. Choose Front/Ceiling from the menu. Ceiling Professional installation recommended. Choose Front/Ceiling from the menu. (You can purchase ceiling mounting equipment from EPSON; see page 12.) Rear For permanent installation behind a translucent screen. Choose Rear from the menu. Image Size and Projection Distance The distance between the projector and the screen determines the size of the projected image, as shown below. Because other adjustments-such as those made with the Aspect button- also affect the size of the image, the numbers shown in the illustration should be considered as general guidelines, not exact measurements. Use the formulas given below either to find out how large your image will be when you know the distance from the projector to the screen, or to find out how far from the screen to place the projector when you want an image of a certain size. Since the size of the image can be changed by rotating the zoom ring, formulas are given for both the minimum and maximum sizes. To determine the diagonal size of an image when you know the projection distance: Minimum diagonal size = (0.39421 × projection distance) + 1.2116 Maximum diagonal size = (0.25690 × projection distance) + 0.69164 To determine the projection distance when you know the diagonal size of the screen image: Projection distance = (minimum diagonal screen size × 2.5367) - 3.0735 Projection distance = (maximum diagonal screen size × 3.8925) - 2.6922 Rear/Ceiling Professional installation behind a translucent screen recommended. Choose Rear/Ceiling from the menu. (You can purchase special ceiling mounting equipment from EPSON; see page 12.) If the projector is tilted in the front or the back, you may need to adjust the image shape. See page 5. 7/03 EPSON PowerLite Home 10 Projector - 3
-
 1
1 -
 2
2 -
 3
3 -
 4
4 -
 5
5 -
 6
6 -
 7
7 -
 8
8 -
 9
9 -
10
-
11
-
12
 |
 |