Epson PowerLite Home 10 Product Information Guide - Page 7
The remote control doesn’t work, Only part of the picture is displayed, or the picture is distorted. - lcd
 |
View all Epson PowerLite Home 10 manuals
Add to My Manuals
Save this manual to your list of manuals |
Page 7 highlights
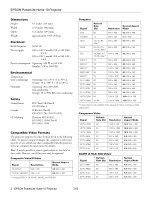
EPSON PowerLite Home 10 Projector ❏ If you're using Windows,®hold down the Fn key and press the function key that lets you display on an external monitor. It may have an icon such as , or it may be labelled CRT/LCD. (Allow a few seconds for the projector to sync up after pressing it.) The remote control doesn't work ❏ Make sure you've removed the battery insulating tape. See the Quick Setup sheet for instructions. ❏ Make sure you're within 20 feet of the projector. ❏ Point the remote control at one of the projector's two infrared receivers. You should be within range of the infrared receivers (about 30° left or right, and 15° above or below). ❏ You may need to replace the remote control's battery. See page 9 for details. ❏ Dim the room lights and turn off any fluorescent lights. Make sure the projector is not in direct sunlight. ❏ Remove the clear film covering the infrared receivers. ❏ Turn off nearby equipment that emits infrared energy, such as a radiant room heater. Only part of the picture is displayed, or the picture is distorted. ❏ Press the Aspect button to select a different aspect ratio. ❏ If the image is distorted or contains interference, make sure the cable is securely connected at both ends. ❏ If the image looks like or , press the and buttons on the projector's control panel. The picture is upside-down or reversed. Change the Projection option in the setting menu. The picture is blurry ❏ There may be dirt on the lens. Clean the lens with a canister of compressed air or lens-cleaning paper. If necessary, moisten a soft cloth with lens cleaner and gently wipe the lens surface. Never rub the lens with abrasive materials. ❏ Adjust the focus ring. ❏ Adjust the Sharpness setting on the Image menu. ❏ If you're projecting from a computer, press the Auto button on the remote control to automatically optimize the image. The colors on the screen don't look right ❏ Press the Color Mode button on the remote control to move through the different color mode settings. ❏ If the picture looks too dark, you may need to replace the lamp. See page 10 for details. ❏ You may be using the wrong source setting. Press the Source button on the projector, or the Input A/B or S-Video/Video buttons on the remote control to move through the source settings. ❏ Adjust the following settings in the projector's Image menu under Picture Quality: Brightness, Contrast, Saturation (video only), Tint (video only), Color Temperature, and Flesh Tone. The picture contains static or noise. ❏ Make sure your cable is securely connected at both ends. ❏ Don't use an extension cable or a cable longer than 6 feet. ❏ If you're displaying the same image on your computer and projector screen, try turning off your laptop's LCD display. The projector and notebook don't display the same image If you're using Windows: ❏ On most systems, the or CRT/LCD key lets you toggle between the LCD screen and the projector, or display on both at the same time. ❏ You might need to use the Display utility in the Control Panel to enable both the LCD screen and external monitor port. Check your notebook's manual or online help. ❏ If you have dual monitor support, you may need to uncheck the option to extend your Windows desktop in the Display Properties. If you're using Mac OS® X: 1. Select System Preferences from the Apple® menu and click Displays. 2. Click Detect Displays. Click here 3. To display the entire desktop on both your projector screen and LCD screen, click the Arrangement or Arrange tab. (If you don't see this tab, make sure it isn't hidden by another window on your screen.) 7/03 EPSON PowerLite Home 10 Projector - 7
-
 1
1 -
 2
2 -
 3
3 -
 4
4 -
 5
5 -
 6
6 -
 7
7 -
 8
8 -
 9
9 -
 10
10 -
 11
11 -
 12
12
 |
 |