Epson R260 Start Here Card - Page 2
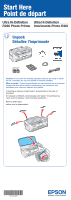
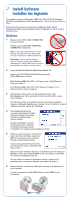
Turn On the Printer, Install Ink Cartridges
 |
UPC - 010343859043
View all Epson R260 manuals
Add to My Manuals
Save this manual to your list of manuals |
Page 2 highlights
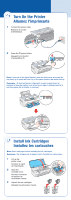
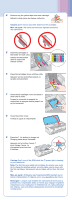
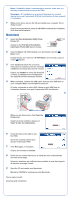
2 Turn On the Printer Allumez l'imprimante 1 Connect the power cable. Branchez le cordon d'alimentation. 2 Press the power button. Appuyez sur le bouton d'alimentation . Note: If you see all the lights flashing, open the front cover and push the tray lever up to move the front tray to the paper position (as shown below). Remarque : Si tous les témoins clignotent, ouvrez le capot avant et poussez le levier de plateau vers le haut pour régler le plateau avant à la position papier (tel qu'illustré ci-dessous). 3 Install Ink Cartridges Installez les cartouches Note: Don't load paper before installing the ink cartridges. Remarque : Ne chargez pas de papier avant d'installer les cartouches. 1 Lift up the printer cover. Soulevez le capot de l'imprimante. 2 Open the cartridge cover. Ouvrez le couvercle du support de cartouches d'encre. 3 Unpack the ink cartridges. Déballez les cartouches d'encre.
-
 1
1 -
 2
2 -
 3
3 -
 4
4 -
 5
5 -
 6
6 -
 7
7 -
 8
8
 |
 |
