Epson R260 Start Here Card - Page 5
Install Software, Windows
 |
UPC - 010343859043
View all Epson R260 manuals
Add to My Manuals
Save this manual to your list of manuals |
Page 5 highlights
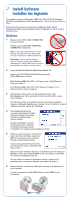
5 Install Software Installez les logiciels Your software works with Windows® 98SE, Me, 2000, XP, XP Professional x64 Edition and Windows Vista™, and Macintosh® OS X 10.2.8, and 10.3.9 to 10.4.x. Vos logiciels fonctionnent avec Windows® 98SE, Me, 2000, XP, XP Professionnel Edition x64 et Windows VistaM, C et Macintosh® OS X 10.2.8, et 10.3.9 à 10.4.x. Windows 1 Make sure the R260 is NOT CONNECTED to your computer. Vérifiez que l'appareil R260 N'EST PAS CONNECTÉ à l'ordinateur. Note: If you see a screen like this, click Cancel and disconnect the USB cable. You can't install your software that way. Remarque : Si une fenêtre comme celle-ci s'affiche, cliquez sur Annuler et débranchez le câble USB. Vous ne pouvez pas installer les logiciels de cette façon. 2 Insert the Ultra Hi-Definition R260 Photo Printer CD. Insérez le CD-ROM Ultra Hi-Definition Imprimante Photo R260 dans le lecteur. With Windows 98SE, Me, 2000, or XP, go to step 4. With Windows Vista, go to step 3. Pour Windows 98SE, Me, 2000 ou XP, passez à l'étape 4. Pour Windows Vista, passez à l'étape 3. 3 With Windows Vista, if you see the AutoPlay window, click Run Epsetup.exe. When you see the User Account Control screen, click Continue. Pour Windows Vista, si la fenêtre Exécution automatique apparaît, cliquez sur Exécuter Epsetup.exe. Lorsque l'écran Contrôle du compte utilisateur apparaît, cliquez sur Continuer. 4 Click Install and follow the on-screen instructions to install software and print a test page. Software installation takes several minutes. Cliquez sur Installer et suivez les instructions qui s'affichent et imprimez une page d'essai. L'installation des logiciels prend quelques minutes. 5 When you see this screen, click the first option and then click Next, unless the R260 is connected to your computer through an external print server. If you're using an external print server, click the second option, click Next, then skip to step 7. Quand cet écran s'affiche, cliquez sur la première option et cliquez sur Suivant, à moins que l'appareil R260 ne soit raccordé par l'entremise d'un serveur d'impression externe. Si vous utilisez un serveur d'impression externe, cliquez sur la deuxième option, cliquez sur Suivant, puis passez à l'étape 7. 6 When prompted, connect the USB cable. Use any open USB port on your computer. À l'invite, connectez le câble USB. Utilisez un port USB libre de l'ordinateur.
-
 1
1 -
 2
2 -
 3
3 -
 4
4 -
 5
5 -
 6
6 -
 7
7 -
 8
8
 |
 |
