Epson R800 Product Information Guide - Page 10
Inserting a CD or DVD, print the CD or DVD using Epson Print CD. - stylus photo ink
 |
UPC - 010343848849
View all Epson R800 manuals
Add to My Manuals
Save this manual to your list of manuals |
Page 10 highlights
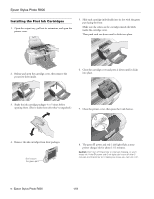
Epson Stylus Photo R800 5. Press the ) paper button to feed the paper. 4. Lift the output tray as shown below, then place one hand on the top of the printer and pull up on the output tray until it stops. Lay the tray down in the upper position. 6. Press the ) paper button again to eject the paper. 5. Place the CD or DVD on the CD tray with the white or printable side face-up. To print on a small CD (8 cm), place the small CD ring on the tray first, then place the CD inside the ring. Caution: Make sure you always use the small CD ring when printing 8-cm CDs and that the CD and ring lay flat on the tray; otherwise the printer may be damaged. Always use this piece with 8-cm CDs 7. Repeat steps 5 and 6 several times to completely clean the roller. Inserting a CD or DVD Make sure the data, music, or video is burned on your ink-jet printable CDs or DVDs before you print. Otherwise, dirt or scratches on the surface may cause errors when you burn the data. If you plan to print large numbers of CDs or DVDs, it's a good idea to print a small sample, then wait a day and check the quality to make sure it is satisfactory. Caution: Use only ink jet-printable CDs or DVDs for printing. Do not use thermal-printable or regular CDs or DVDs. If you want to check the print position or color before printing on your actual CD or DVD, see the instructions in the User's Guide. 1. Turn on the printer. Caution: Before you insert a CD or DVD, make sure the printer is turned on. Otherwise, the disc may not be positioned correctly. 2. Remove any paper from the sheet feeder, then push in the paper support extension and close the paper support. 3. Push in the output tray extensions, but leave the tray open. 6. Slide the tray into the tray guides in the output tray. Push in the guide until the arrows on the tray and the tray guide are next to each other, as shown below. Push in only until the arrows are next to each other 7. Press the ) paper button to load the CD or DVD into printing position. It is loaded when the P power button stops flashing. 8. Follow the instructions in the User's Guide to design and print the CD or DVD using Epson Print CD. 10 - Epson Stylus Photo R800 1/04
-
 1
1 -
2
-
3
-
4
-
 5
5 -
 6
6 -
 7
7 -
 8
8 -
 9
9 -
 10
10 -
 11
11 -
 12
12 -
 13
13 -
 14
14 -
 15
15 -
16
 |
 |
