Epson R800 Product Information Guide - Page 7
Loading Paper, Loading Special Paper, brighter than the other side. - stylus photo
 |
UPC - 010343848849
View all Epson R800 manuals
Add to My Manuals
Save this manual to your list of manuals |
Page 7 highlights
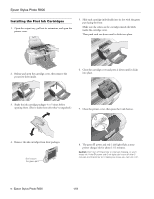
Epson Stylus Photo R800 Loading Paper Follow these steps to load plain paper and certain special papers in the sheet feeder: 1. Open the paper support and slide out its extension. 2. Make sure the output tray is in the lower position. If it isn't, lift the tray as shown below, then place one hand on the top of the printer and ease the tray down into the lower position. 3. Pull out the output tray extensions. 4. Place your paper in the printer on the right side of the sheet feeder. Loading Special Paper You can load the following number of sheets of Epson special media: Paper type Loading capacity Epson Enhanced Matte Paper Epson Matte Paper Heavyweight Epson Premium Glossy Photo Paper Epson Premium Semigloss Photo Paper Epson Premium Luster Photo Paper 20 sheets Epson Photo Quality Ink Jet Paper 100 sheets Epson Premium Bright White Paper 80 sheets Epson Photo Quality Self Adhesive Sheets PremierArt Matte Scrapbook Photo Paper for Epson 1 sheet at a time Epson Photo Quality Ink Jet Cards 50 sheets If the special paper has a cut corner, load the paper so the cut corner is positioned as shown here. Cut corner 5. Adjust the left edge guide to fit lightly against the paper. Check the following as you load paper: ❏ Always load the short edge first, even for printing landscapeoriented documents. ❏ Load the printable side face up. It's usually whiter or brighter than the other side. ❏ Load letterhead or preprinted paper into the printer top edge first. ❏ Don't load paper above the arrow on the left edge guide. Check the paper package for additional handling instructions. 1/04 Epson Stylus Photo R800 - 7
-
 1
1 -
 2
2 -
 3
3 -
 4
4 -
 5
5 -
 6
6 -
 7
7 -
 8
8 -
 9
9 -
 10
10 -
 11
11 -
 12
12 -
13
-
14
-
15
-
16
 |
 |
