Epson STYLUS900 User Manual - Page 130
Using PC Interface Boards, LocalTalk Locking Connector Kits DIN-8 version. Attach one connector
 |
View all Epson STYLUS900 manuals
Add to My Manuals
Save this manual to your list of manuals |
Page 130 highlights
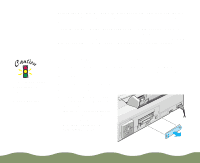
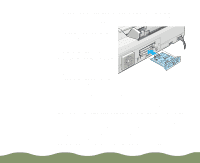
This chapter tells you how to install and use EPSON interface boards in the following sections: Using PC Interface Boards Using Macintosh Interface Boards Installing Optional Interfaces Using PC Interface Boards Before you install the serial interface board in your printer, follow the instructions that come with the board for setting baud rate and parity. You may also need to set the board's handshake timing, error handling, and other data transfer conventions. Refer to your computer documentation for information about matching the board's settings to your computer system. If you install the Ethernet board connected to a thin coaxial (10BASE2) cable, and the printer is the last device on the network, you need to obtain a 50-ohm terminator. The Ethernet transceiver is included on the EPSON Ethernet board, so you do not need an adapter box for the printer. Using Macintosh Interface Boards If you are planning to install the LocalTalk board, you also need two LocalTalk Locking Connector Kits (DIN-8 version). Attach one connector box to the AppleTalk interface on the printer and the other to the printer Optional Interfaces Page 130
-
 1
1 -
2
-
3
-
4
-
5
-
6
-
7
-
8
-
9
-
10
-
11
-
12
-
13
-
14
-
15
-
16
-
17
-
18
-
19
-
20
-
21
-
22
-
23
-
24
-
25
-
26
-
27
-
28
-
29
-
30
-
31
-
32
-
33
-
34
-
35
-
36
-
37
-
38
-
39
-
40
-
41
-
42
-
43
-
44
-
45
-
46
-
47
-
48
-
49
-
50
-
51
-
52
-
53
-
54
-
55
-
56
-
57
-
58
-
59
-
60
-
61
-
62
-
63
-
64
-
65
-
66
-
67
-
68
-
69
-
70
-
71
-
72
-
73
-
74
-
75
-
76
-
77
-
78
-
79
-
80
-
81
-
82
-
83
-
84
-
85
-
86
-
87
-
88
-
89
-
90
-
91
-
92
-
93
-
94
-
95
-
96
-
97
-
98
-
99
-
100
-
101
-
102
-
103
-
104
-
105
-
106
-
107
-
108
-
109
-
110
-
111
-
112
-
113
-
114
-
115
-
116
-
117
-
118
-
119
-
120
-
121
-
122
-
123
-
124
-
 125
125 -
 126
126 -
 127
127 -
 128
128 -
 129
129 -
 130
130 -
 131
131 -
 132
132 -
 133
133 -
 134
134 -
 135
135 -
136
-
137
-
138
-
139
-
140
-
141
-
142
-
143
-
144
-
145
-
146
-
147
-
148
-
149
-
150
-
151
-
152
-
153
-
154
-
155
-
156
-
157
-
158
-
159
-
160
-
161
-
162
-
163
-
164
-
165
-
166
-
167
-
168
-
169
-
170
-
171
-
172
-
173
-
174
-
175
-
176
-
177
-
178
-
179
-
180
-
181
-
182
-
183
-
184
-
185
-
186
-
187
-
188
-
189
-
190
-
191
-
192
-
193
-
194
-
195
-
196
-
197
-
198
-
199
-
200
-
201
-
202
-
203
-
204
-
205
 |
 |