Epson StoryTeller 8x10 10 pages Creating a Photo Book - Page 33
HP Printers: Printing Your Final s, Load the stack - document
 |
View all Epson StoryTeller 8x10 10 pages manuals
Add to My Manuals
Save this manual to your list of manuals |
Page 33 highlights
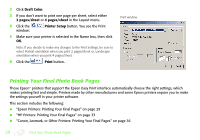
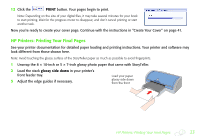
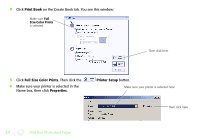
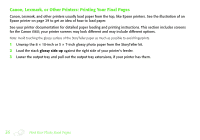
12 Click the PRINT button. Your pages begin to print. Note: Depending on the size of your digital files, it may take several minutes for your book to start printing. Wait for the progress meter to disappear, and don't cancel printing or start another task. Now you're ready to create your cover page. Continue with the instructions in "Create Your Cover" on page 41. HP Printers: Printing Your Final Pages See your printer documentation for detailed paper loading and printing instructions. Your printer and software may look different from those shown here. Note: Avoid touching the glossy surface of the StoryTeller paper as much as possible to avoid fingerprints. 1 Unwrap the 8 × 10-inch or 5 × 7-inch glossy photo paper that came with StoryTeller. 2 Load the stack glossy side down in your printer's front feeder tray. 3 Adjust the edge guides if necessary. Load your paper glossy side down from the front HP Printers: Printing Your Final Pages 33
-
 1
1 -
2
-
3
-
4
-
5
-
6
-
7
-
8
-
9
-
10
-
11
-
12
-
13
-
14
-
15
-
16
-
17
-
18
-
19
-
20
-
21
-
22
-
23
-
24
-
25
-
26
-
27
-
 28
28 -
 29
29 -
 30
30 -
 31
31 -
 32
32 -
 33
33 -
 34
34 -
 35
35 -
 36
36 -
 37
37 -
 38
38 -
39
-
40
-
41
-
42
-
43
-
44
-
45
-
46
-
47
-
48
-
49
-
50
-
51
-
52
-
53
-
54
-
55
-
56
-
57
-
58
-
59
-
60
-
61
-
62
-
63
-
64
-
65
-
66
-
67
-
68
-
69
-
70
-
71
-
72
-
73
-
74
-
75
-
76
-
77
-
78
-
79
-
80
-
81
-
82
-
83
-
84
-
85
-
86
-
87
-
88
-
89
-
90
-
91
-
92
-
93
-
94
-
95
-
96
-
97
-
98
 |
 |
