Epson StoryTeller 8x10 10 pages Creating a Photo Book - Page 83
Assemble Your Photo Book, Attaching s to the Photo Book
 |
View all Epson StoryTeller 8x10 10 pages manuals
Add to My Manuals
Save this manual to your list of manuals |
Page 83 highlights
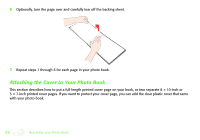
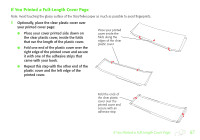
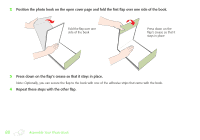
Assemble Your Photo Book Now you're ready to put your photo book together. First you'll attach the pages you printed to the book, and then you'll put the cover on. Attaching Pages to the Photo Book Follow these steps to attach your printed pages to the photo book: 1 Open your photo book to the first page. Make sure your book is oriented correctly; the adhesive strip with the StoryTeller logo should be on the right-hand page. 2 Gently press down on the center of the book to flatten it. Press down to flatten the book 83
-
 1
1 -
2
-
3
-
4
-
5
-
6
-
7
-
8
-
9
-
10
-
11
-
12
-
13
-
14
-
15
-
16
-
17
-
18
-
19
-
20
-
21
-
22
-
23
-
24
-
25
-
26
-
27
-
28
-
29
-
30
-
31
-
32
-
33
-
34
-
35
-
36
-
37
-
38
-
39
-
40
-
41
-
42
-
43
-
44
-
45
-
46
-
47
-
48
-
49
-
50
-
51
-
52
-
53
-
54
-
55
-
56
-
57
-
58
-
59
-
60
-
61
-
62
-
63
-
64
-
65
-
66
-
67
-
68
-
69
-
70
-
71
-
72
-
73
-
74
-
75
-
76
-
77
-
 78
78 -
 79
79 -
 80
80 -
 81
81 -
 82
82 -
 83
83 -
 84
84 -
 85
85 -
 86
86 -
 87
87 -
 88
88 -
89
-
90
-
91
-
92
-
93
-
94
-
95
-
96
-
97
-
98
 |
 |

83
Assemble Your Photo Book
Now you’re ready to put your photo book together. First you’ll attach the pages you printed to the book, and then
you’ll put the cover on.
Attaching Pages to the Photo Book
Follow these steps to attach your printed pages to the photo book:
1
Open your photo book to the first page. Make sure your book is oriented correctly; the adhesive strip with the
StoryTeller logo should be on the right-hand page.
2
Gently press down on the center of the book to flatten it.
Press down to
flatten the book