Epson Stylus Pro 10600 - UltraChrome Ink Product Information Guide - Page 13
Running a Nozzle Check and Cleaning Cycle, Printing a Nozzle Check Pattern, Cleaning the Print Head - - ultrachrome ink printer
 |
View all Epson Stylus Pro 10600 - UltraChrome Ink manuals
Add to My Manuals
Save this manual to your list of manuals |
Page 13 highlights
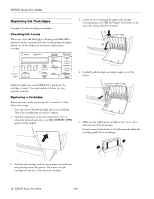
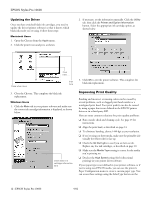
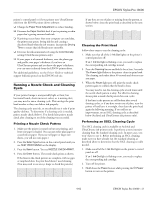
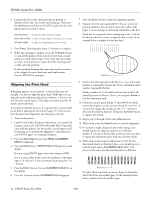
EPSON Stylus Pro 10600 printer's control panel or (if your printer uses UltraChrome ink) from the EPSON printer driver software: ❏ Change the Paper Feed Adjustment to reduce banding. ❏ Decrease the Paper Suction level if you're printing on thin paper that's getting saturated with ink. ❏ If printing occurs faster than your computer can send data, the printer may pause, letting ink dry and causing a discolored band when the job resumes. Increase the Drying Time to ensure that ink blends more smoothly. ❏ Decrease the ink saturation level using the Color Density setting (UltraChrome printers only). ❏ If your paper is of unusual thickness, reset the platen gap and profile your paper's thickness; if you have an UltraChrome printer and you know the paper's thickness, you can enter it directly from the EPSON printer driver. For additional guidelines, see the Printer Guide or technical support bulletins posted on the EPSON web site. Running a Nozzle Check and Cleaning Cycle If your printed image is unexpectedly light or faint, has horizontal bands, shows incorrect colors, or is missing dots, you may need to run a cleaning cycle. This unclogs the print head nozzles so they can deliver ink properly. The cleaning cycle uses ink, so you should run it only if print quality declines. To determine if a cleaning cycle is needed, print a nozzle check (below). You should also print a nozzle check after cleaning to see if the cleaning was successful. Printing a Nozzle Check Pattern 1. Make sure the printer is turned on but not printing, and letter-size paper is loaded. (You can use either plain paper or coated ink jet paper. If you use roll paper or larger-size sheets, you will use extra paper.) 2. Press the SelecType button on the control panel until you see TEST PRINT MENU on the display. 3. Press the Item button. You see NOZZLE CHECK=PRINT. 4. Press the Enter button. The nozzle check prints as shown. If the lines in the check pattern are complete, with no gaps or misplaced dots, the print head doesn't need cleaning. (You may need to use an eye loupe to check the pattern.) If any dots are out of place or missing from the pattern, as shown below, clean the print head as described in the next section. Cleaning the Print Head Follow these steps to run the cleaning cycle: 1. Make sure that all of the H Ink Out lights on the printer's control panel are off. If an H Ink Out light is flashing or on, you need to replace the corresponding ink cartridge instead. 2. Press the Cleaning button and hold it for at least 3 seconds. The Pause light flashes as the printer cleans its print head. The cleaning cycle takes about 60 seconds and does not use any paper. 3. When the Pause light goes off, print the nozzle check pattern again to confirm that the head is clean. You may need to run the cleaning cycle several times until the nozzle check pattern is okay. For effective cleaning, always print a nozzle check pattern between cycles. If the lines in the pattern are still broken after several cleaning cycles, or if any dots remain out of place, turn the printer off and leave it overnight, then clean the print head again the following morning. If you still see no improvement, try an SSCL cleaning cycle as described below (Archival and UltraChrome ink printers only). Performing an SSCL Cleaning Cycle The SSCL cleaning cycle is available on Archival and UltraChrome ink printers only. It performs a more intensive cleaning than the standard cleaning cycle. In most cases, you won't have to use it. Before performing an SSCL cleaning, make sure you have already run the standard cleaning as described above to determine that the SSCL cleaning is really needed. 1. Make sure all of the H Ink Out lights on the printer's control panel are off. If an H Ink Out light is flashing or on, you need to replace the corresponding ink cartridge. 2. Turn off the printer. 3. Hold down the Pause button while pressing the P Power button to turn on the printer. 9/02 EPSON Stylus Pro 10600 - 13
-
 1
1 -
2
-
3
-
4
-
5
-
6
-
7
-
 8
8 -
 9
9 -
 10
10 -
 11
11 -
 12
12 -
 13
13 -
 14
14 -
 15
15 -
 16
16
 |
 |
