Epson Stylus Pro 4000 Professional Edition Printer Guide - Page 77
PremierArt Water Resistant Canvas for Epson, choose the, enhancements or filters
 |
View all Epson Stylus Pro 4000 Professional Edition manuals
Add to My Manuals
Save this manual to your list of manuals |
Page 77 highlights
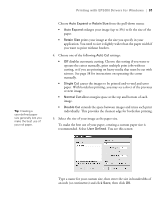
Printing with EPSON Drivers for Windows | 77 Note: Check the web site (http://prographics. epson.com) or your authorized EPSON dealer for other media that may be available. Note: In most cases, you will get better results by applying color management in your application, rather than in the printer driver. To do this, you must turn off color management in the printer driver, as described on page 85. The settings followed by (250) are for roll paper or selected 17-inch wide sheets. Choose a setting without the (250) designation when you print on smaller sheets. For EPSON UltraSmooth Fine Art Paper or PremierArt Water Resistant Canvas for Epson, choose the Watercolor Paper - Radiant White setting. If your paper is not listed, check the instructions included with the paper, or check the EPSON web site (http://prographics.epson.com). If you are using non-EPSON media, choose the closest setting. You may have to experiment with different settings to determine which one is best for the media you're using. 4. For the Ink setting, select Color/B&W Photo if you're printing either a color or black-and-white photo image. Use a color-managed workflow for best results. Select Black only if you're printing line drawings or other non-photographic images. 5. Set the Mode option as follows: • Click Automatic to have the printer driver analyze the contents of your image or file and make the appropriate printing adjustments. If a Quality/Speed slider appears in the Mode box, set it to Quality for higher resolution prints. • Click PhotoEnhance to have the driver automatically adjust the contrast, saturation, and brightness. You can also select automatic enhancements or filters for People, Nature, Soft Focus, Sepia or Digital Camera Correction. • Click Custom, and then choose one of the settings shown at the left. The two Advanced Photo settings let you print at either 1440 dpi (Advanced Photo) or 2880 dpi, the highest resolutions available. The Text/Graph setting intensifies colors and lightens the midtones and highlights for non-photographic output. The sRGB setting adjusts colors using the small-gamut sRGB (standard red green blue) color space. Best for color matching with other sRGB devices, or for images designed for the Web. • Click Custom, then click the Advanced button to turn off color management in the printer driver or access additional settings, as described on page 83. 3-77
-
 1
1 -
2
-
3
-
4
-
5
-
6
-
7
-
8
-
9
-
10
-
11
-
12
-
13
-
14
-
15
-
16
-
17
-
18
-
19
-
20
-
21
-
22
-
23
-
24
-
25
-
26
-
27
-
28
-
29
-
30
-
31
-
32
-
33
-
34
-
35
-
36
-
37
-
38
-
39
-
40
-
41
-
42
-
43
-
44
-
45
-
46
-
47
-
48
-
49
-
50
-
51
-
52
-
53
-
54
-
55
-
56
-
57
-
58
-
59
-
60
-
61
-
62
-
63
-
64
-
65
-
66
-
67
-
68
-
69
-
70
-
71
-
 72
72 -
 73
73 -
 74
74 -
 75
75 -
 76
76 -
 77
77 -
 78
78 -
 79
79 -
 80
80 -
 81
81 -
 82
82 -
83
-
84
-
85
-
86
-
87
-
88
-
89
-
90
-
91
-
92
-
93
-
94
-
95
-
96
-
97
-
98
-
99
-
100
-
101
-
102
-
103
-
104
-
105
-
106
-
107
-
108
-
109
-
110
-
111
-
112
-
113
-
114
-
115
-
116
-
117
-
118
-
119
-
120
-
121
-
122
-
123
-
124
-
125
-
126
-
127
-
128
-
129
-
130
-
131
-
132
-
133
-
134
-
135
-
136
-
137
-
138
-
139
-
140
-
141
-
142
-
143
-
144
-
145
-
146
-
147
-
148
-
149
 |
 |