Epson Stylus Pro 4900 User's Guide - Page 115
Chap 6-Maintaining and Transporting the Printer, Alert Lamp, Checking Printer Status and Part Life - cartridges
 |
View all Epson Stylus Pro 4900 manuals
Add to My Manuals
Save this manual to your list of manuals |
Page 115 highlights
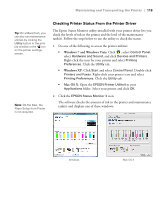
117 Chapter 6: Maintaining and Transporting the Printer The Epson Stylus Pro 4900 requires little maintenance to keep working at its best. This chapter describes the following routine procedures: • Checking printer status and part life • Checking and cleaning the print head • Aligning the print head • Replacing ink cartridges • Changing the black ink cartridge • Replacing the paper cutter blade • Replacing the maintenance tanks • Cleaning the printer • Transporting or storing the printer In addition to the features described in this chapter, you can also use the menu system on the printer to fine-tune a variety of printer settings. Note: To test the print quality, see page 120 for instructions on printing a nozzle check. Alert Lamp The Epson Stylus Pro 4900 is equipped with an alert lamp which automatically lights or flashes when an error or warning occurs. You can set or change the alert lamp settings in maintenance mode. (The default setting is "Disable".) Checking Printer Status and Part Life Using the menus, you can check the amount of ink remaining, the total number of prints, and the status of your cutter blade, maintenance tank(s), and other printer parts. You can either print out a status check (described in the next section), or you can view the printer's status on the LCD screen. 117
-
 1
1 -
2
-
3
-
4
-
5
-
6
-
7
-
8
-
9
-
10
-
11
-
12
-
13
-
14
-
15
-
16
-
17
-
18
-
19
-
20
-
21
-
22
-
23
-
24
-
25
-
26
-
27
-
28
-
29
-
30
-
31
-
32
-
33
-
34
-
35
-
36
-
37
-
38
-
39
-
40
-
41
-
42
-
43
-
44
-
45
-
46
-
47
-
48
-
49
-
50
-
51
-
52
-
53
-
54
-
55
-
56
-
57
-
58
-
59
-
60
-
61
-
62
-
63
-
64
-
65
-
66
-
67
-
68
-
69
-
70
-
71
-
72
-
73
-
74
-
75
-
76
-
77
-
78
-
79
-
80
-
81
-
82
-
83
-
84
-
85
-
86
-
87
-
88
-
89
-
90
-
91
-
92
-
93
-
94
-
95
-
96
-
97
-
98
-
99
-
100
-
101
-
102
-
103
-
104
-
105
-
106
-
107
-
108
-
109
-
 110
110 -
 111
111 -
 112
112 -
 113
113 -
 114
114 -
 115
115 -
 116
116 -
 117
117 -
 118
118 -
 119
119 -
 120
120 -
121
-
122
-
123
-
124
-
125
-
126
-
127
-
128
-
129
-
130
-
131
-
132
-
133
-
134
-
135
-
136
-
137
-
138
-
139
-
140
-
141
-
142
-
143
-
144
-
145
-
146
-
147
-
148
-
149
-
150
-
151
-
152
-
153
-
154
-
155
-
156
-
157
-
158
-
159
-
160
-
161
-
162
-
163
-
164
-
165
-
166
-
167
-
168
-
169
-
170
-
171
-
172
-
173
-
174
 |
 |
