Epson Stylus Pro 7500 Product Support Bulletin(s) - Page 39
Downloading the Output profiles, Profile, Appear in Driver As, Printing from the Adobe PS Driver, - driver download
 |
View all Epson Stylus Pro 7500 manuals
Add to My Manuals
Save this manual to your list of manuals |
Page 39 highlights
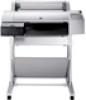
Downloading the Output profiles: 1) Open "Profile Manager". Refer to the RIP Station 5100 Series III "Color Guide" for details on using ColorWise ProTools. 2) Click "Browse", and select Profile Folder [Color (PC) or ColorSync (Mac)]. If the view in Profile Manager is set for description, you will see several descriptions listed on the left hand side of the screen. Please see "[Media and Profile]" for information about media and description of the ICC profiles. 3) Click a profile and download to Output. 4) Select the ICC profile in Output, and click "Profile Setting". 5) Check "Appear in Driver as..." and define a value. Use the chart below to define the values for the ICC profiles. You can also select "Default" if that is the default profile/media you want to use. Profile Photo Glossy Paper Photo Semigloss Paper Premium Luster Photo Paper Smooth Fine Art Paper Textured Fine Art Paper Canvas Synthetic Paper Adhesive Vinyl Tyvek Brillion Heavyweight Polyester Banner Paper Appear in Driver As 1 2 3 4 5 6 7 8 9 10 6) Click "OK". 7) For other profiles, repeat steps 3-7. Printing from the Adobe PS Driver: When printing from the Adobe PS driver, select Print Options and set the following selections for the new media/profile selections. a) Print mode: Refer to Media and Print mode settings for this setting. b) Output Profile: Output 1-10. This is the value you set in the Output menu of the Profile Manager. Page 2 of 3
-
 1
1 -
2
-
3
-
4
-
5
-
6
-
7
-
8
-
9
-
10
-
11
-
12
-
13
-
14
-
15
-
16
-
17
-
18
-
19
-
20
-
21
-
22
-
23
-
24
-
25
-
26
-
27
-
28
-
29
-
30
-
31
-
32
-
33
-
 34
34 -
 35
35 -
 36
36 -
 37
37 -
 38
38 -
 39
39 -
 40
40 -
 41
41 -
 42
42 -
 43
43 -
 44
44 -
45
-
46
-
47
-
48
-
49
-
50
-
51
-
52
 |
 |