Epson Stylus Pro 7500 Product Support Bulletin(s) - Page 45
Instructions for Ethernet Connection - driver windows 7
 |
View all Epson Stylus Pro 7500 manuals
Add to My Manuals
Save this manual to your list of manuals |
Page 45 highlights
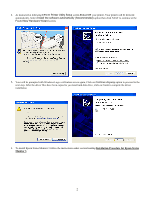
Instructions for Ethernet Connection 1. At the EPSON Printer Utility Setup screen highlight your printer then click OK. Next, you will see the progress bar followed by the Windows Logo verification screen. Click on Continue Anyway option to continue. 2. At this point DO NOT POWER On your printer and at the EPSON Printer Utility Setup screen click on Stop searching button to continue with the installation. Next, you will see the progress bar followed by the Windows Logo verification screen. Select Continue Anyway option. 3. On the next screen your will be notified that the printer has been set to LPT1, click on OK to finish the driver installation. 5
-
 1
1 -
2
-
3
-
4
-
5
-
6
-
7
-
8
-
9
-
10
-
11
-
12
-
13
-
14
-
15
-
16
-
17
-
18
-
19
-
20
-
21
-
22
-
23
-
24
-
25
-
26
-
27
-
28
-
29
-
30
-
31
-
32
-
33
-
34
-
35
-
36
-
37
-
38
-
39
-
 40
40 -
 41
41 -
 42
42 -
 43
43 -
 44
44 -
 45
45 -
 46
46 -
 47
47 -
 48
48 -
 49
49 -
 50
50 -
51
-
52
 |
 |

5
Instructions for Ethernet Connection
1.
At the
EPSON Printer Utility
Setup
screen highlight your printer then click OK. Next, you will see the progress bar
followed by the Windows Logo verification screen. Click on
Continue Anyway
option to continue.
2.
At this point DO NOT POWER On your printer and at the EPSON Printer Utility Setup screen click on
Stop searching
button to continue with the installation.
Next, you will see the progress bar followed by the Windows Logo verification
screen. Select
Continue Anyway
option.
3.
On the next screen your will be notified that the printer has been set to LPT1, click on OK to finish the driver installation.