Epson Stylus Pro 9600 - UltraChrome Ink User Manual - Page 52
Installing Software for Windows, Windows XP
 |
View all Epson Stylus Pro 9600 - UltraChrome Ink manuals
Add to My Manuals
Save this manual to your list of manuals |
Page 52 highlights
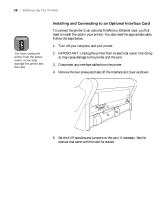
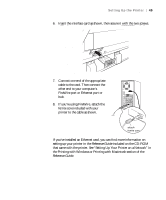
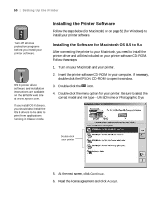
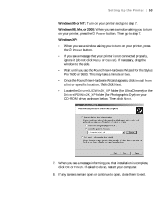
52 | Setting Up the Printer Note If you've installed a FireWire or Ethernet card, you may see additional screens as Windows installs the drivers for your card. Installing Software for Windows After connecting the printer to your computer, you need to install the printer driver and utilities on your printer software CD-ROM. Follow these steps: 1. Make sure your printer is turned off. 2. Turn on your computer and start Windows. 3. Insert the printer software CD-ROM in your computer. The installer starts automatically. If it doesn't start, double-click My Computer or click Start > My Computer. Then double-click your CD-ROM icon. 4. Double-click the menu option for your printer. Be sure to select the correct model and ink type-UltraChrome or Photographic Dye. Note If you're connecting with a parallel cable or Ethernet card, do not turn on your printer when you see a window telling you to do so. Instead, wait until the Stop Searching button appears. Then click the button and go to step 7. When installation is complete, the port setting defaults to LPT1 (parallel port). If you're using an Ethernet card, you'll have to reconfigure the port setting. See your electronic Reference Guide for details. Double-click your printer 5. Windows XP: If you see a message that the software you are installing hasn't passed Windows Logo testing, click Continue Anyway. If you see this message again during installation, be sure to click Continue Anyway. 6. If you're connecting with a parallel cable or network interface card, see the note at left. Otherwise, follow the instructions below for your operating system. 1-52
-
 1
1 -
2
-
3
-
4
-
5
-
6
-
7
-
8
-
9
-
10
-
11
-
12
-
13
-
14
-
15
-
16
-
17
-
18
-
19
-
20
-
21
-
22
-
23
-
24
-
25
-
26
-
27
-
28
-
29
-
30
-
31
-
32
-
33
-
34
-
35
-
36
-
37
-
38
-
39
-
40
-
41
-
42
-
43
-
44
-
45
-
46
-
 47
47 -
 48
48 -
 49
49 -
 50
50 -
 51
51 -
 52
52 -
 53
53 -
 54
54 -
 55
55 -
 56
56 -
 57
57 -
58
-
59
-
60
-
61
-
62
-
63
-
64
-
65
-
66
-
67
-
68
-
69
-
70
-
71
-
72
-
73
-
74
-
75
-
76
-
77
-
78
-
79
-
80
-
81
-
82
-
83
-
84
-
85
-
86
-
87
-
88
-
89
-
90
-
91
-
92
-
93
-
94
-
95
-
96
-
97
-
98
-
99
-
100
-
101
-
102
-
103
-
104
-
105
-
106
-
107
-
108
-
109
-
110
-
111
-
112
-
113
-
114
-
115
-
116
-
117
-
118
-
119
-
120
-
121
-
122
-
123
-
124
-
125
-
126
-
127
-
128
-
129
-
130
-
131
-
132
-
133
-
134
-
135
-
136
-
137
-
138
-
139
-
140
-
141
-
142
-
143
-
144
-
145
-
146
-
147
-
148
-
149
-
150
-
151
-
152
-
153
-
154
-
155
-
156
-
157
-
158
-
159
-
160
-
161
-
162
-
163
-
164
-
165
-
166
-
167
-
168
-
169
-
170
-
171
-
172
-
173
-
174
-
175
-
176
-
177
-
178
-
179
-
180
-
181
-
182
-
183
-
184
-
185
-
186
-
187
-
188
-
189
-
190
-
191
-
192
 |
 |
