Epson Stylus Pro WT7900 User's Guide - Page 110
In The Driver Settings, Load Correct Paper Size
 |
View all Epson Stylus Pro WT7900 manuals
Add to My Manuals
Save this manual to your list of manuals |
Page 110 highlights
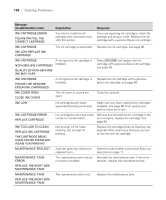
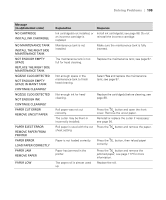
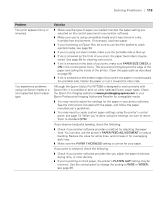
110 | Solving Problems Message (in alphabetical order) Explanation Response PAPER OUT No paper is loaded. Load paper. LOAD PAPER The button has been Press the pressed with no paper loaded. button, then load paper. Paper ran out during printing. Press the button and remove the roll paper core. Then load another roll. PAPER RELEASED LOAD PAPER The button has been pressed. Load paper, then press the button. PAPER SENSOR ERROR The paper is not detected. PRESS THE BUTTON LOAD THE CORRECT PAPER Press the button to clear the error, then select the right paper. PAPER SETTING ERROR CHECK THE PAPER SOURCE IN THE DRIVER SETTINGS AND LOAD PAPER CORRECTLY The paper source selected in your printer software and the control panel do not match. Check the paper source settings and make sure the paper is loaded correctly. PAPER SIZE ERROR The loaded paper size does not Make sure the paper size matches the size LOAD CORRECT PAPER SIZE match the size of the image. of the image. PAPER SKEW LOAD PAPER PROPERLY Paper is not loaded straight. Press the button and make sure the paper is loaded straight. PRINTER ERROR RESTART THE PRINTER You tried to print while an error Press the P power button to turn off the condition was present. printer, then turn it back on. REMOVE AND SHAKE WHITE INK CARTRIDGE ONCE A WEEK It's been a week since the To maintain optimal print quality, shake the white ink cartridge was shaken. white ink cartridge as soon as possible. See page 79 for instructions. REPLACE MAINTENANCE TANK SOON The maintenance tank is almost Make sure you have a replacement full. maintenance tank. SOME NOZZLES ARE CLOGGED During automatic head cleaning, the printer was unable to clean the print head after one or two cleaning cycles. You can continue to print, but you may notice a decline in print quality. If necessary, check and clean the print head as described on page 83. 110
-
 1
1 -
2
-
3
-
4
-
5
-
6
-
7
-
8
-
9
-
10
-
11
-
12
-
13
-
14
-
15
-
16
-
17
-
18
-
19
-
20
-
21
-
22
-
23
-
24
-
25
-
26
-
27
-
28
-
29
-
30
-
31
-
32
-
33
-
34
-
35
-
36
-
37
-
38
-
39
-
40
-
41
-
42
-
43
-
44
-
45
-
46
-
47
-
48
-
49
-
50
-
51
-
52
-
53
-
54
-
55
-
56
-
57
-
58
-
59
-
60
-
61
-
62
-
63
-
64
-
65
-
66
-
67
-
68
-
69
-
70
-
71
-
72
-
73
-
74
-
75
-
76
-
77
-
78
-
79
-
80
-
81
-
82
-
83
-
84
-
85
-
86
-
87
-
88
-
89
-
90
-
91
-
92
-
93
-
94
-
95
-
96
-
97
-
98
-
99
-
100
-
101
-
102
-
103
-
104
-
 105
105 -
 106
106 -
 107
107 -
 108
108 -
 109
109 -
 110
110 -
 111
111 -
 112
112 -
 113
113 -
 114
114 -
 115
115 -
116
-
117
-
118
-
119
-
120
-
121
-
122
-
123
-
124
-
125
-
126
-
127
-
128
-
129
-
130
-
131
-
132
-
133
-
134
-
135
-
136
 |
 |