Epson SureColor S50675 High Production Edition User Manual - Page 160
See Disposal of Used Consumables
 |
View all Epson SureColor S50675 High Production Edition manuals
Add to My Manuals
Save this manual to your list of manuals |
Page 160 highlights
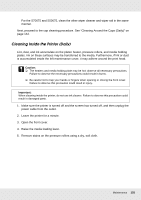
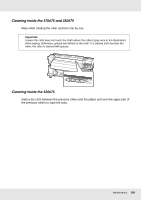
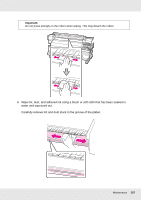
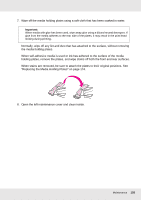
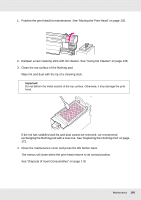
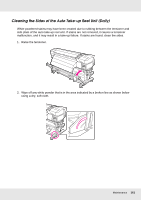
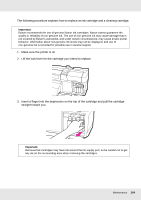
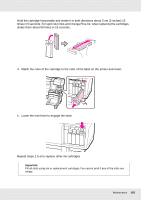
1. Position the print head for maintenance. See "Moving the Print Head" on page 135. 2. Dampen a new cleaning stick with ink cleaner. See "Using Ink Cleaner" on page 136. 3. Clean the top surface of the flushing pad. Wipe lint and dust with the tip of a cleaning stick. Important: Do not deform the metal section of the top surface. Otherwise, it may damage the print head. If the ink has solidified and lint and dust cannot be removed, we recommend exchanging the flushing pad with a new one. See "Replacing the Flushing Pad" on page 172. 4. Close the maintenance cover and press the Z button twice. The menus will close when the print head returns to its normal position. See "Disposal of Used Consumables" on page 179. Maintenance 160
-
 1
1 -
2
-
3
-
4
-
5
-
6
-
7
-
8
-
9
-
10
-
11
-
12
-
13
-
14
-
15
-
16
-
17
-
18
-
19
-
20
-
21
-
22
-
23
-
24
-
25
-
26
-
27
-
28
-
29
-
30
-
31
-
32
-
33
-
34
-
35
-
36
-
37
-
38
-
39
-
40
-
41
-
42
-
43
-
44
-
45
-
46
-
47
-
48
-
49
-
50
-
51
-
52
-
53
-
54
-
55
-
56
-
57
-
58
-
59
-
60
-
61
-
62
-
63
-
64
-
65
-
66
-
67
-
68
-
69
-
70
-
71
-
72
-
73
-
74
-
75
-
76
-
77
-
78
-
79
-
80
-
81
-
82
-
83
-
84
-
85
-
86
-
87
-
88
-
89
-
90
-
91
-
92
-
93
-
94
-
95
-
96
-
97
-
98
-
99
-
100
-
101
-
102
-
103
-
104
-
105
-
106
-
107
-
108
-
109
-
110
-
111
-
112
-
113
-
114
-
115
-
116
-
117
-
118
-
119
-
120
-
121
-
122
-
123
-
124
-
125
-
126
-
127
-
128
-
129
-
130
-
131
-
132
-
133
-
134
-
135
-
136
-
137
-
138
-
139
-
140
-
141
-
142
-
143
-
144
-
145
-
146
-
147
-
148
-
149
-
150
-
151
-
152
-
153
-
154
-
 155
155 -
 156
156 -
 157
157 -
 158
158 -
 159
159 -
 160
160 -
 161
161 -
 162
162 -
 163
163 -
 164
164 -
 165
165 -
166
-
167
-
168
-
169
-
170
-
171
-
172
-
173
-
174
-
175
-
176
-
177
-
178
-
179
-
180
-
181
-
182
-
183
-
184
-
185
-
186
-
187
-
188
-
189
-
190
-
191
-
192
-
193
-
194
-
195
-
196
-
197
-
198
-
199
-
200
-
201
-
202
-
203
-
204
-
205
-
206
-
207
-
208
-
209
-
210
-
211
-
212
-
213
-
214
-
215
-
216
-
217
-
218
-
219
-
220
-
221
-
222
-
223
-
224
-
225
-
226
-
227
-
228
-
229
-
230
-
231
-
232
-
233
-
234
-
235
-
236
-
237
-
238
-
239
-
240
-
241
-
242
-
243
-
244
-
245
-
246
-
247
-
248
-
249
-
250
-
251
-
252
-
253
-
254
-
255
 |
 |

Maintenance
160
1.
Position the print head for maintenance. See “Moving the Print Head” on page 135.
2.
Dampen a new cleaning stick with ink cleaner. See “Using Ink Cleaner” on page 136.
3.
Clean the top surface of the flushing pad.
Wipe lint and dust with the tip of a cleaning stick.
If the ink has solidified and lint and dust cannot be removed, we recommend
exchanging the flushing pad with a new one. See “Replacing the Flushing Pad” on page
172.
4.
Close the maintenance cover and press the
Z
button twice.
The menus will close when the print head returns to its normal position.
See “Disposal of Used Consumables” on page 179.
Important:
Do not deform the metal section of the top surface. Otherwise, it may damage the print
head.