Epson SureColor T3270 Screen Print Edition User Manual - Page 161
Replacing Consumables, Replacing Ink Cartridges
 |
View all Epson SureColor T3270 Screen Print Edition manuals
Add to My Manuals
Save this manual to your list of manuals |
Page 161 highlights
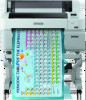
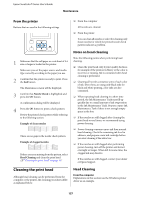
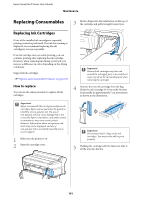
Epson SureColor T-Series User's Guide Maintenance Replacing Consumables 3 Hook a finger into the indentation on the top of the cartridge and pull it straight toward you. Replacing Ink Cartridges If one of the installed ink cartridges is expended, printing cannot be performed. If an ink low warning is displayed, we recommend replacing the ink cartridge(s) as soon as possible. If an ink cartridge runs out while printing, you can continue printing after replacing the ink cartridge. However, when replacing ink during a print job, you may see a difference in color depending on the drying conditions. Supported ink cartridges U"Options and Consumable Products" on page 185 How to replace You can use the same procedure to replace all ink cartridges. c Important: Removed ink cartridges may have ink around the ink supply port, so be careful not to get any ink on the surrounding area when removing the cartridges. 4 Remove the new ink cartridge from the bag. Shake the ink cartridge for 10 seconds 30 times horizontally in approximately 5 cm movements as shown in the illustration. c Important: Epson recommends the use of genuine Epson ink cartridges. Epson cannot guarantee the quality or reliability of non-genuine ink. The use of non-genuine ink may cause damage that is not covered by Epson's warranties, and under certain circumstances, may cause erratic printer behavior. Information about non-genuine ink levels may not be displayed, and use of non-genuine ink is recorded for possible use in service support. 1 Make sure the printer is on. 2 Open the cartridge cover. c Important: Do not touch the IC chips on the ink cartridges. You may not be able to print properly. 5 Holding the cartridge with the label out, slide it all the way into the slot. 161
-
 1
1 -
2
-
3
-
4
-
5
-
6
-
7
-
8
-
9
-
10
-
11
-
12
-
13
-
14
-
15
-
16
-
17
-
18
-
19
-
20
-
21
-
22
-
23
-
24
-
25
-
26
-
27
-
28
-
29
-
30
-
31
-
32
-
33
-
34
-
35
-
36
-
37
-
38
-
39
-
40
-
41
-
42
-
43
-
44
-
45
-
46
-
47
-
48
-
49
-
50
-
51
-
52
-
53
-
54
-
55
-
56
-
57
-
58
-
59
-
60
-
61
-
62
-
63
-
64
-
65
-
66
-
67
-
68
-
69
-
70
-
71
-
72
-
73
-
74
-
75
-
76
-
77
-
78
-
79
-
80
-
81
-
82
-
83
-
84
-
85
-
86
-
87
-
88
-
89
-
90
-
91
-
92
-
93
-
94
-
95
-
96
-
97
-
98
-
99
-
100
-
101
-
102
-
103
-
104
-
105
-
106
-
107
-
108
-
109
-
110
-
111
-
112
-
113
-
114
-
115
-
116
-
117
-
118
-
119
-
120
-
121
-
122
-
123
-
124
-
125
-
126
-
127
-
128
-
129
-
130
-
131
-
132
-
133
-
134
-
135
-
136
-
137
-
138
-
139
-
140
-
141
-
142
-
143
-
144
-
145
-
146
-
147
-
148
-
149
-
150
-
151
-
152
-
153
-
154
-
155
-
 156
156 -
 157
157 -
 158
158 -
 159
159 -
 160
160 -
 161
161 -
 162
162 -
 163
163 -
 164
164 -
 165
165 -
 166
166 -
167
-
168
-
169
-
170
-
171
-
172
-
173
-
174
-
175
-
176
-
177
-
178
-
179
-
180
-
181
-
182
-
183
-
184
-
185
-
186
-
187
-
188
-
189
-
190
-
191
-
192
-
193
-
194
-
195
-
196
-
197
-
198
-
199
-
200
-
201
-
202
-
203
-
204
-
205
-
206
-
207
-
208
-
209
-
210
-
211
-
212
-
213
 |
 |