Epson SureColor T3270 Screen Print Edition User Manual - Page 77
Large Scan, Changing the document eject direction, Shared Folder, Send By Mail
 |
View all Epson SureColor T3270 Screen Print Edition manuals
Add to My Manuals
Save this manual to your list of manuals |
Page 77 highlights
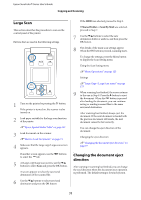
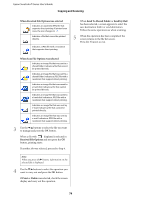
Epson SureColor T-Series User's Guide Copying and Scanning Large Scan This section describes the procedure to scan on the control panel of the printer. Buttons that are used in the following settings 1 Turn on the printer by pressing the P button. If the printer is turned on, the scanner is also turned on. 2 Load paper suitable for the large scan function of the printer. U"Epson Special Media Table" on page 187 3 Load document on the scanner. U"How to Load Documents" on page 74 4 Make sure that the Large copy/Large scan screen appears. If another screen appears, use the l/r buttons to select the tab. 5 At Large copy/Large scan screen, use the d/u buttons to select Scan and press the Z button. A screen appears to select the save/send destination of the scanned file. 6 Use the d/u buttons to select save/send destination and press the Z button. If the HDD was selected, proceed to Step 8. If Shared Folder or Send By Mail was selected, proceed to Step 7. 7 Use the d/u buttons to select the save destination folder or address, and then press the Z button. 8 The details of the main scan settings appear. When the Z button is pressed, scanning starts. To change the settings, press the Menu button to display the Scan Setting menu. Using the Scan Setting menu U"Menu Operations" on page 125 Settings U"Large Copy / Large Scan menu" on page 153 9 When scanning has finished, the screen returns to the one in Step 8. Press the r button to eject the document. When the Z button is pressed after loading the document, you can continue saving or sending scanned files to the same save/send destination. After scanning has finished, always eject the document. If the next document is loaded with the previous document still inside, the next document cannot be fed correctly. You can change the eject direction of the document. Changing the eject direction U"Changing the document eject direction" on page 77 Changing the document eject direction After copying or scanning has finished, you can change the eject direction when the document eject operation is performed. The default setting is forward ejection. 77
-
 1
1 -
2
-
3
-
4
-
5
-
6
-
7
-
8
-
9
-
10
-
11
-
12
-
13
-
14
-
15
-
16
-
17
-
18
-
19
-
20
-
21
-
22
-
23
-
24
-
25
-
26
-
27
-
28
-
29
-
30
-
31
-
32
-
33
-
34
-
35
-
36
-
37
-
38
-
39
-
40
-
41
-
42
-
43
-
44
-
45
-
46
-
47
-
48
-
49
-
50
-
51
-
52
-
53
-
54
-
55
-
56
-
57
-
58
-
59
-
60
-
61
-
62
-
63
-
64
-
65
-
66
-
67
-
68
-
69
-
70
-
71
-
 72
72 -
 73
73 -
 74
74 -
 75
75 -
 76
76 -
 77
77 -
 78
78 -
 79
79 -
 80
80 -
 81
81 -
 82
82 -
83
-
84
-
85
-
86
-
87
-
88
-
89
-
90
-
91
-
92
-
93
-
94
-
95
-
96
-
97
-
98
-
99
-
100
-
101
-
102
-
103
-
104
-
105
-
106
-
107
-
108
-
109
-
110
-
111
-
112
-
113
-
114
-
115
-
116
-
117
-
118
-
119
-
120
-
121
-
122
-
123
-
124
-
125
-
126
-
127
-
128
-
129
-
130
-
131
-
132
-
133
-
134
-
135
-
136
-
137
-
138
-
139
-
140
-
141
-
142
-
143
-
144
-
145
-
146
-
147
-
148
-
149
-
150
-
151
-
152
-
153
-
154
-
155
-
156
-
157
-
158
-
159
-
160
-
161
-
162
-
163
-
164
-
165
-
166
-
167
-
168
-
169
-
170
-
171
-
172
-
173
-
174
-
175
-
176
-
177
-
178
-
179
-
180
-
181
-
182
-
183
-
184
-
185
-
186
-
187
-
188
-
189
-
190
-
191
-
192
-
193
-
194
-
195
-
196
-
197
-
198
-
199
-
200
-
201
-
202
-
203
-
204
-
205
-
206
-
207
-
208
-
209
-
210
-
211
-
212
-
213
 |
 |