Epson WorkForce WF-3540 Quick Guide - Page 21
Scanning With EPSON Scan Software - scan to email
 |
View all Epson WorkForce WF-3540 manuals
Add to My Manuals
Save this manual to your list of manuals |
Page 21 highlights
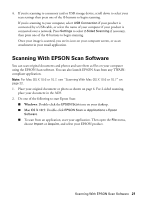
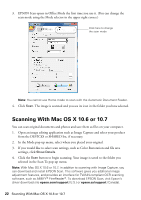
4. If you're scanning to a memory card or USB storage device, scroll down to select your scan settings then press one of the x buttons to begin scanning. If you're scanning to your computer, select USB Connection if your product is connected by a USB cable, or select the name of your computer if your product is connected over a network. Press Settings to select 2-Sided Scanning if necessary, then press one of the x buttons to begin scanning. Once your image is scanned, you see its icon on your computer screen, or as an attachment in your email application. Scanning With EPSON Scan Software You can scan original documents and photos and save them as files on your computer using the EPSON Scan software. You can also launch EPSON Scan from any TWAINcompliant application. Note: For Mac OS X 10.6 or 10.7, see "Scanning With Mac OS X 10.6 or 10.7" on page 22. 1. Place your original document or photo as shown on page 6. For 2-sided scanning, place your document in the ADF. 2. Do one of the following to start Epson Scan: ■ Windows: Double-click the EPSON Scan icon on your desktop. ■ Mac OS X 10.5: Double-click EPSON Scan in Applications > Epson Software. ■ To scan from an application, start your application. Then open the File menu, choose Import or Acquire, and select your EPSON product. Scanning With EPSON Scan Software 21
-
 1
1 -
2
-
3
-
4
-
5
-
6
-
7
-
8
-
9
-
10
-
11
-
12
-
13
-
14
-
15
-
 16
16 -
 17
17 -
 18
18 -
 19
19 -
 20
20 -
 21
21 -
 22
22 -
 23
23 -
 24
24 -
 25
25 -
 26
26 -
27
-
28
-
29
-
30
-
31
-
32
-
33
-
34
-
35
-
36
-
37
-
38
-
39
-
40
-
41
-
42
-
43
-
44
 |
 |
