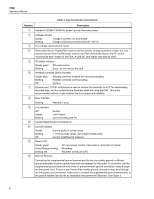
Fluke 1750 Fluke 1750 Operators Manual - Page 19
Installing the Power Recorder at a Facility, Work Flow, sw/FPV_Vx.yy.exe, FPA_Vx.yy_Install.exe - software download
 |
View all Fluke 1750 manuals
Add to My Manuals
Save this manual to your list of manuals |
Page 19 highlights
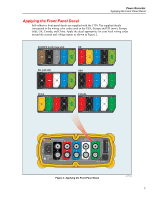
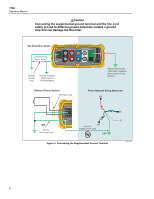
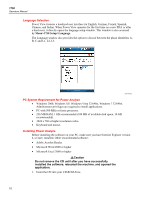
Power Recorder Installing the Power Recorder at a Facility 2. A window appears that lists options on the CD. If the window does not automatically appear: a. Use Windows Explorer to locate the sw/FPV_Vx.yy.exe file on the CD. Replace x.yy with the current version number shipped on the CD. b. Double-click FPA_Vx.yy_Install.exe. 3. Select a language preference for the installation process. Power Analyze initially starts in this language. You can change the language from the menu Settings>Language. 4. Follow the installation instructions that appear. After software installation is complete, the Power Analyze icon appears on your desktop. 5. Start Power Analyze on your PC by choosing Start >All Programs >Fluke >Power Analyze >Launch Power Analyze or double-click the Power Analyze icon on your desktop. 6. After the installation is complete, please take a few minutes to complete your product registration. You can register quickly online (preferred) at http://register.fluke.com or you can print the form and fax it to the number provided on the form. Product registration is very important since it allows you to get free software updates and helps us provide you with the fastest and most efficient technical support. Note You may need to change your Windows firewall settings to allow the program FPA.exe to use ports 18571 (TCP) and 18572 (UDP). For more on changing firewall settings, refer to http://support.microsoft.com. Installing the Power Recorder at a Facility This section describes the steps you need to take to set up the Recorder at a facility and begin a recording session. Work Flow There are three distinct stages for a recording session. • Setup Setup, hookup, and verification of connections and measured signals. This is when you will want to clear the Recorder memory (not required, but best practice because data download when finished only contains your new data). This is a good time to change any recorder settings. Edit the measurement description now or after downloading the measurement data and insert annotations and/or an optional START mark into the recorded data stream. Annotations are messages or notes you insert into the data stream during a recording session. • Interim checkup, mid-recording session At this time, you may want to re-check all the live input signals, and download the data recorded since the beginning of the recording session. This does not interfere with ongoing recording in any way. Annotation capability is always available during the recording session. • End of recording session You can re-verify if desired, correctness of live data and then download data, power off the Recorder, and pack up for transport. 11
-
 1
1 -
2
-
3
-
4
-
5
-
6
-
7
-
8
-
9
-
10
-
11
-
12
-
13
-
 14
14 -
 15
15 -
 16
16 -
 17
17 -
 18
18 -
 19
19 -
 20
20 -
 21
21 -
 22
22 -
 23
23 -
 24
24 -
25
-
26
-
27
-
28
-
29
-
30
-
31
-
32
-
33
-
34
-
35
-
36
-
37
-
38
-
39
-
40
-
41
-
42
-
43
-
44
-
45
-
46
-
47
-
48
-
49
-
50
-
51
-
52
-
53
-
54
-
55
-
56
-
57
-
58
-
59
-
60
 |
 |
