Foxconn A6GMV English Manual. - Page 74
Create RAID array
 |
View all Foxconn A6GMV manuals
Add to My Manuals
Save this manual to your list of manuals |
Page 74 highlights
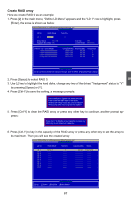
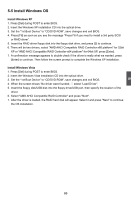
5 Create RAID array Here we create RAID 0 as an example: 1. Press [2] in the main menu, "Define LD Menu" appears and the "LD 1" row is highlight, press [Enter], the scree is shown as below: Option ROM Utility (c) 2008 Advanced Micro Devices, Inc. [ Define LD Menu ] LD No RAID Mode Total Drv LD 1 RAID 0 2 Stripe Block: 64 KB Gigabyte Boundary: ON Fast Init: ON Cache Mode: WriteThru [ Drives Assignment ] Channel :ID Drive Model Compatibilities Capacity(GB) Assignment 1 :Mas XXXXXXXXXXX SATA XG XX.XX Y 2 :Mas XXXXXXXXXXX SATA XG XX.XX Y 3 :Mas XXXXXXXXXXX SATA XG XX.XX N 4 :Mas XXXXXXXXXXX SATA XG XX.XX N [ Keys Available ] [↑] Up [↓] Down [ESC] Exit [Space] Change [Crtl-Y] SAVE [PgUp/Dn] Page Change 2. Press [Space] to select RAID 0. 3. Use [↓] key to highlight the hard disks, change any two of the drives' "Assignment" status to "Y" by pressing [Space] or [Y]. 4. Press [Ctrl-Y] to save the setting, a message prompts: Fast Initialization Option has been selected It will erase the MBR data of the disks, 5. Press [Ctrl-Y] to clear the RAID array or press any other key to continue, another prompt appears: Press Ctrl-Y to Modify Array Capacity or press any other key to use maximum capacity... 6. Press [Ctrl-Y] to key in the capacity of the RAID array or press any other key to set the array to its maximum. Then you will see the created array: Option ROM Utility (c) 2008 Advanced Micro Devices, Inc. [ Define LD Menu ] LD No RAID Mode Total Drv Capacity(GB) Status LD 1 LD 2 LD 3 LD 4 LD 5 LD 6 LD 7 LD 8 LD 9 LD10 RAID 0 2 1X6X3.X99X FunFcutinocntaiol nal [ Keys Available ] [↑] Up [↓] Down [ESC] Exit [Enter] Select 67
-
 1
1 -
2
-
3
-
4
-
5
-
6
-
7
-
8
-
9
-
10
-
11
-
12
-
13
-
14
-
15
-
16
-
17
-
18
-
19
-
20
-
21
-
22
-
23
-
24
-
25
-
26
-
27
-
28
-
29
-
30
-
31
-
32
-
33
-
34
-
35
-
36
-
37
-
38
-
39
-
40
-
41
-
42
-
43
-
44
-
45
-
46
-
47
-
48
-
49
-
50
-
51
-
52
-
53
-
54
-
55
-
56
-
57
-
58
-
59
-
60
-
61
-
62
-
63
-
64
-
65
-
66
-
67
-
68
-
 69
69 -
 70
70 -
 71
71 -
 72
72 -
 73
73 -
 74
74 -
 75
75 -
 76
76
 |
 |
