Foxconn Q57M English Manual. - Page 105
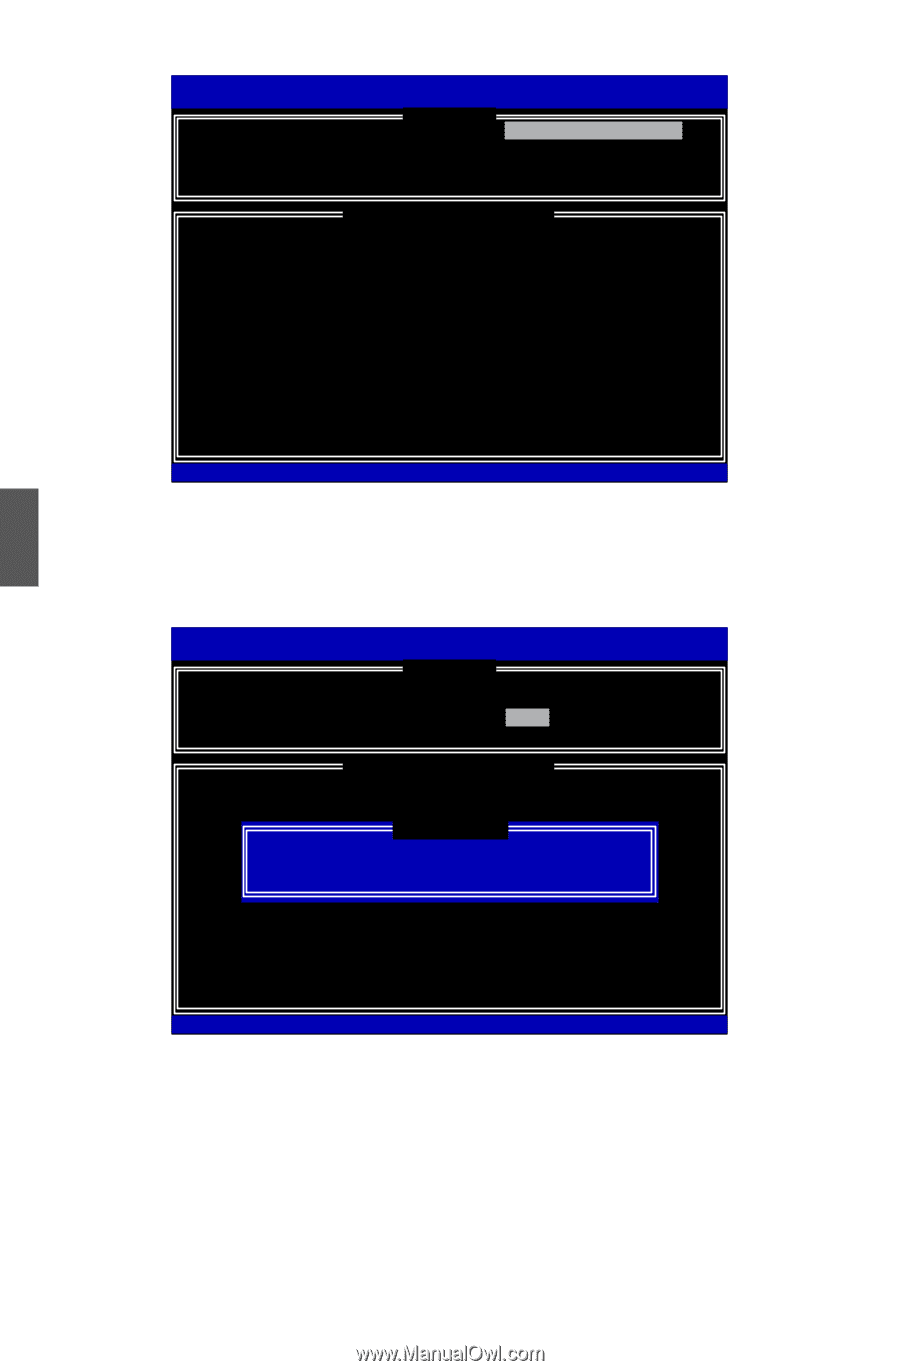
Exit RAID BIOS
 |
View all Foxconn Q57M manuals
Add to My Manuals
Save this manual to your list of manuals |
Page 105 highlights
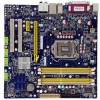
Intel(RI)nMteal(tRrix) RSatopriadgSetoMragneagTeercohpntoiolongRy O- OMpvti5o.n0.R0.O1M011- 9IC.5H.09.R10w2R1 AID5 CCooppyyrriigghhtt((CC)) 22000033--0094 IInntteell CCoorrppoorraattiioonn.AlAl lRl RigihgthstsRReseesrevrevde.d. [ MAIN MENU ] 1. Create RAID Volume 4. RecoveryVVoolulummeeOOpptitoionnss 2. Delete RAID Volume 5. Acceleration Options 3. Reset Disks to Non-RAID 6. Exit [ DISK/VOLUME INFORMATION ] RAID Volume : ID Name Level Stripe Size 0 TryRecovery Recovery(OnReq) N/A 74.5GB Status Bootable NeedUpdate Yes Physical Disks: Port Drive Model Serial # 0 Hitachi HDS72161 PVF904Z21G2JZM 1 ST380811AS 5PS1TAGW 2 SAMSUNG HD161HJ S0V3J9APA30524 3 ST380815AS 5RW1CA37 Size 149.0GB 74.5GB 149.0GB 74.5GB Type/Status(Vol ID) Recovery Disk(0) Offline Disk(0) Member Disk(0) Non-RAID Disk 5 Exit RAID BIOS [↑↓]-Select [ESC]-Exit [ENTER]-Select Menu 1. Take TryRAID5 as an example, select "6. Exit" in main menu and press . The screen displays : Intel(RI)nMteal(tRrix) RSatopriadgSetoMragneagTeercohpntoiolongRy O- OMpvti5o.n0.R0.O1M011- 9IC.5H.09.R10w2R1 AID5 CCooppyyrriigghhtt((CC)) 22000033--0094 IInntteell CCoorrppoorraattiioonn.AlAl lRl RigihgthstsRReseesrevrevde.d. [ MAIN MENU ] 1. Create RAID Volume 4. Recover Volume Options 2. Delete RAID Volume 5. Acceleration Options 3. Reset Disks to Non-RAID 6. Exit [ DISK/VOLUME INFORMATION ] RAID Volume : ID Name Level Stripe Size Status Bootable 0 TryRAID5 RAID5(Parity) 64KB 149.1GB Normal Yes [ CONFIRM EXIT ] Physical Disks: Port Drive Model AreSyeoriuals#ure you want to exit? S(Yiz/Ne ): Type/Status(Vol ID) 0 Hitachi HDS72161 PVF904Z21G2JZM 149.0GB Member Disk(0) 1 ST380811AS 5PS1TAGW 74.5GB Member Disk(0) 2 SAMSUNG HD161HJ S0V3J9APA30524 149.0GB Member Disk(0) 3 ST380815AS 5RW1CA37 74.5GB Non-RAID Disk [↑↓]-Select [ESC]-Exit [ENTER]-Select Menu 2. Press to exit Intel® Matrix Storage Manager program. The system will enter BIOS setup. 3. Shut down the computer, remove the Non-RAID disk, and we will continue for Windows OS installation. If you do not remove irrelevant hard disk, Windows may detect it during the installation, and you could be confused. 4. Remove any diskette from floppy drive. 5. Restart computer to start Windows installation. 98
-
 1
1 -
2
-
3
-
4
-
5
-
6
-
7
-
8
-
9
-
10
-
11
-
12
-
13
-
14
-
15
-
16
-
17
-
18
-
19
-
20
-
21
-
22
-
23
-
24
-
25
-
26
-
27
-
28
-
29
-
30
-
31
-
32
-
33
-
34
-
35
-
36
-
37
-
38
-
39
-
40
-
41
-
42
-
43
-
44
-
45
-
46
-
47
-
48
-
49
-
50
-
51
-
52
-
53
-
54
-
55
-
56
-
57
-
58
-
59
-
60
-
61
-
62
-
63
-
64
-
65
-
66
-
67
-
68
-
69
-
70
-
71
-
72
-
73
-
74
-
75
-
76
-
77
-
78
-
79
-
80
-
81
-
82
-
83
-
84
-
85
-
86
-
87
-
88
-
89
-
90
-
91
-
92
-
93
-
94
-
95
-
96
-
97
-
98
-
99
-
 100
100 -
 101
101 -
 102
102 -
 103
103 -
 104
104 -
 105
105 -
 106
106 -
 107
107 -
 108
108 -
 109
109 -
 110
110 -
111
-
112
-
113
 |
 |